Shoulder Arthroscopy Info Evidence
Last reviewed
Recovery after simple or diagnostic shoulder arthroscopy with no repair — an early-mobilisation fast pathway.
This protocol covers the rehabilitation after a simple or diagnostic shoulder arthroscopy with Dr Kieran Hirpara at Mater Private Hospital Rockhampton — keyhole surgery where the joint was inspected, washed out or tidied up (debrided), with nothing repaired. Because no repair needs protecting, this is one of the quickest shoulder operations to recover from: the aim is early movement and a prompt return to normal life. Bring this page or its PDF to your first physiotherapy visit so your rehabilitation stays coordinated.
This protocol applies when the arthroscopy involved no repair — debridement, washout or diagnostic assessment only. If something was repaired, decompressed or stabilised during your arthroscopy, follow the protocol for that procedure instead — for example, the rotator cuff repair protocol if your rotator cuff was repaired. If you are not sure what was done, check your operation note or ask the rooms before progressing.
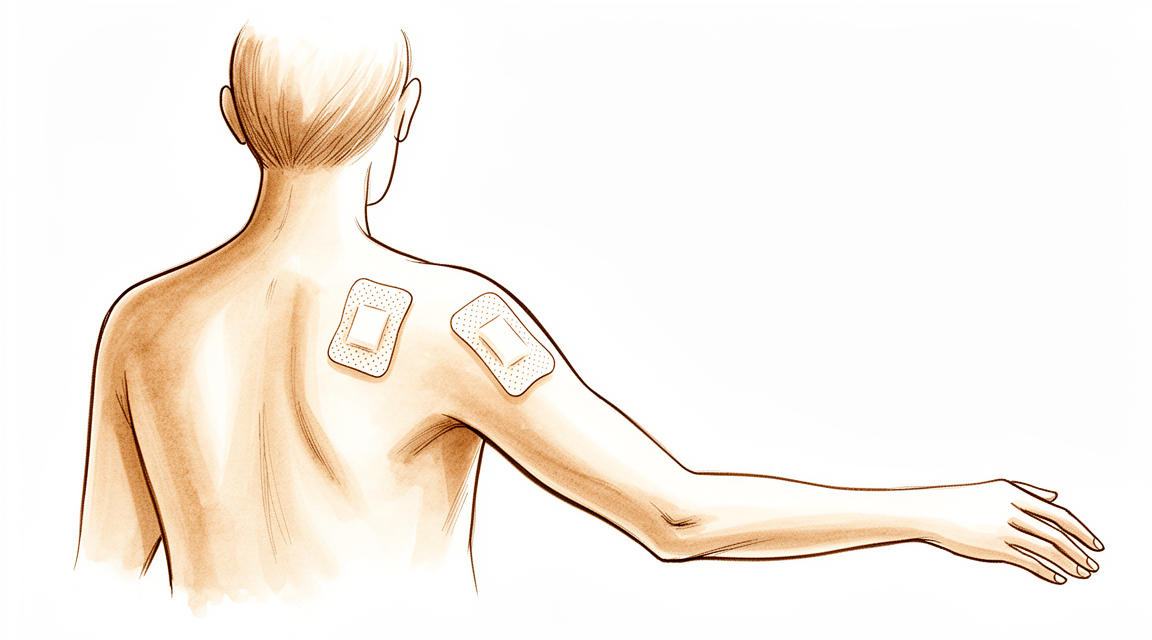
If you have any concerns about your wound after surgery, get in touch with the rooms. It is often helpful to take a photo of the wound and email it for review.
What to expect
After an arthroscopy with no repair there is nothing inside the shoulder that needs protecting, so there are no strict movement restrictions — your shoulder is moved early and progressed on comfort, not on the calendar. A sling is provided for comfort only: most people use it for the first day or two and are out of it completely within the first week. Do not drive while you are wearing the sling.
The journey at a glance:
- Phase I — Early movement and settling — roughly the first two weeks
- Phase II — Restoring full movement and starting strength — week 2–6
- Phase III — Return to full activity — week 6 onwards
Most people are back to desk-based work within a few days to a week, and back to driving within one to three weeks once the sling is off, pain has settled and they are confident controlling the car. Heavier manual work and sport typically take longer — usually somewhere between six and twelve weeks depending on the demands on the shoulder. The shoulder often stays mildly achy for some weeks while the joint settles; this is normal and improves as movement and strength return.
Phase I — Early movement and settling (Week 0–2)
Kieran Hirpara 4.0
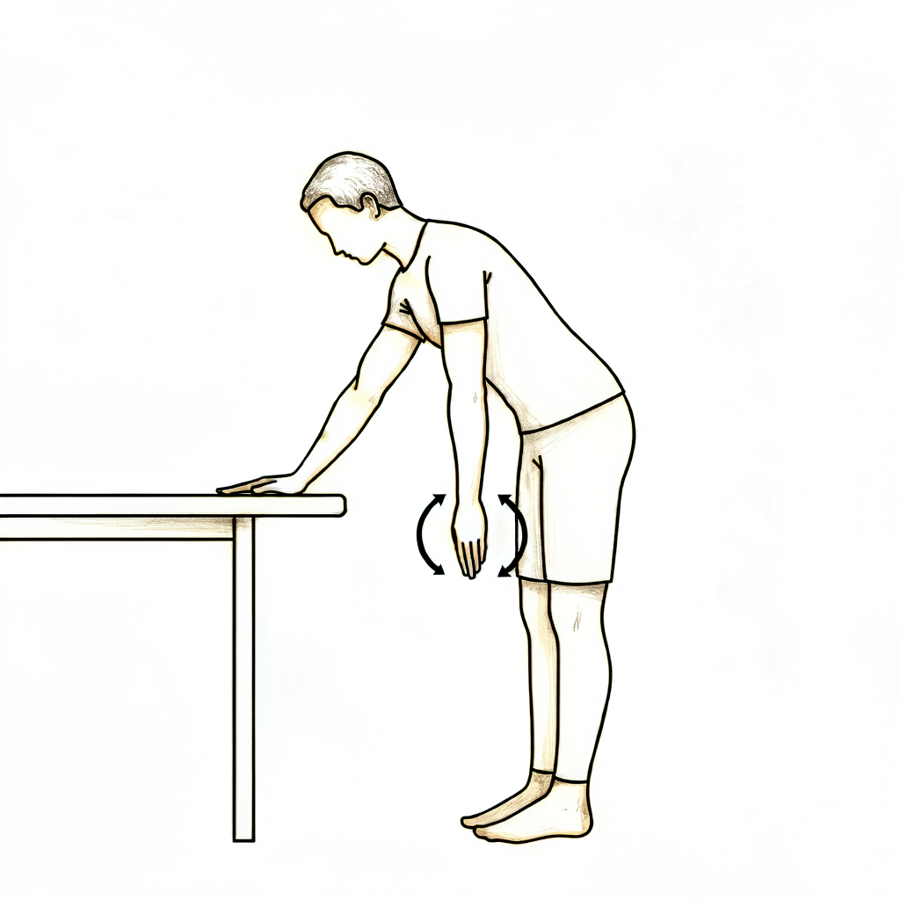
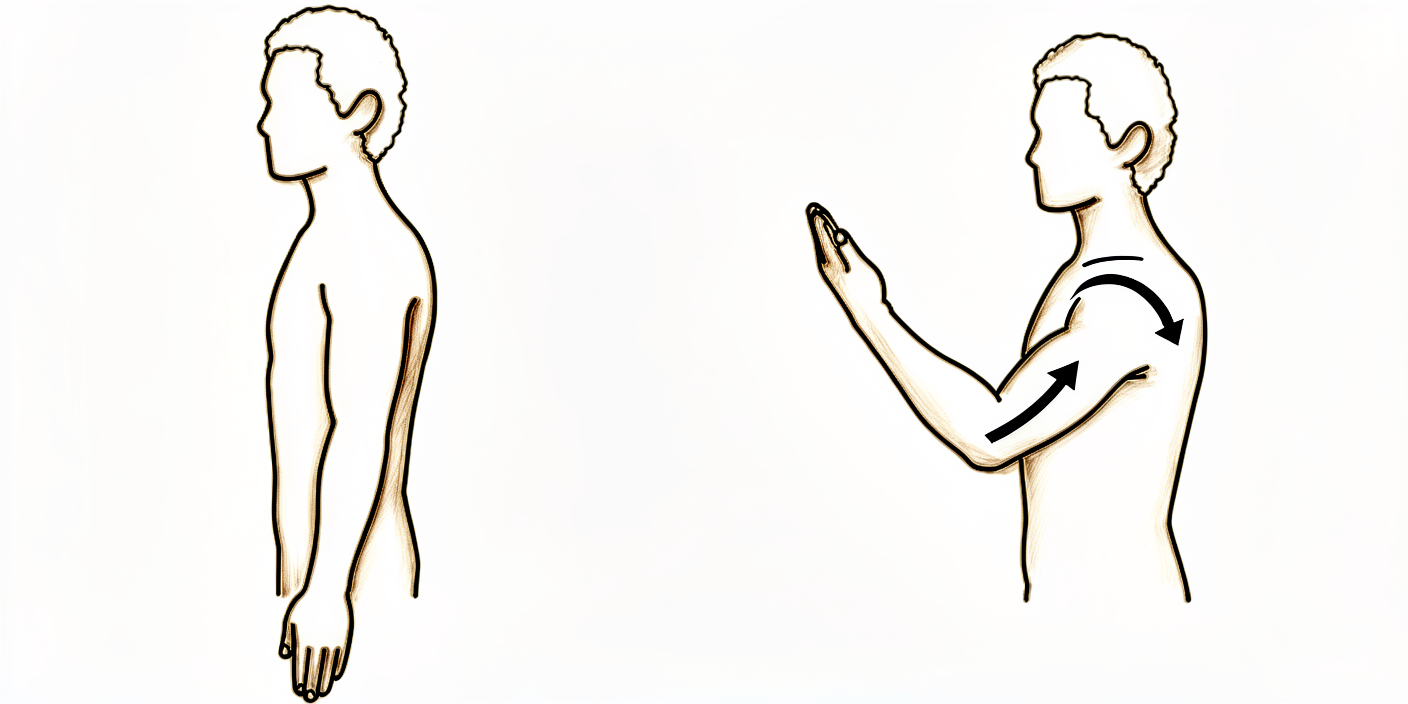
Pendulum exercises
Lean forward, supporting yourself on a table with your other hand, and let the operated arm hang relaxed. Make small circles — clockwise, then anticlockwise — by gently rocking your body. The arm stays relaxed; the movement comes from your body, not the shoulder.
As guided by your physiotherapist
Kieran Hirpara 4.0
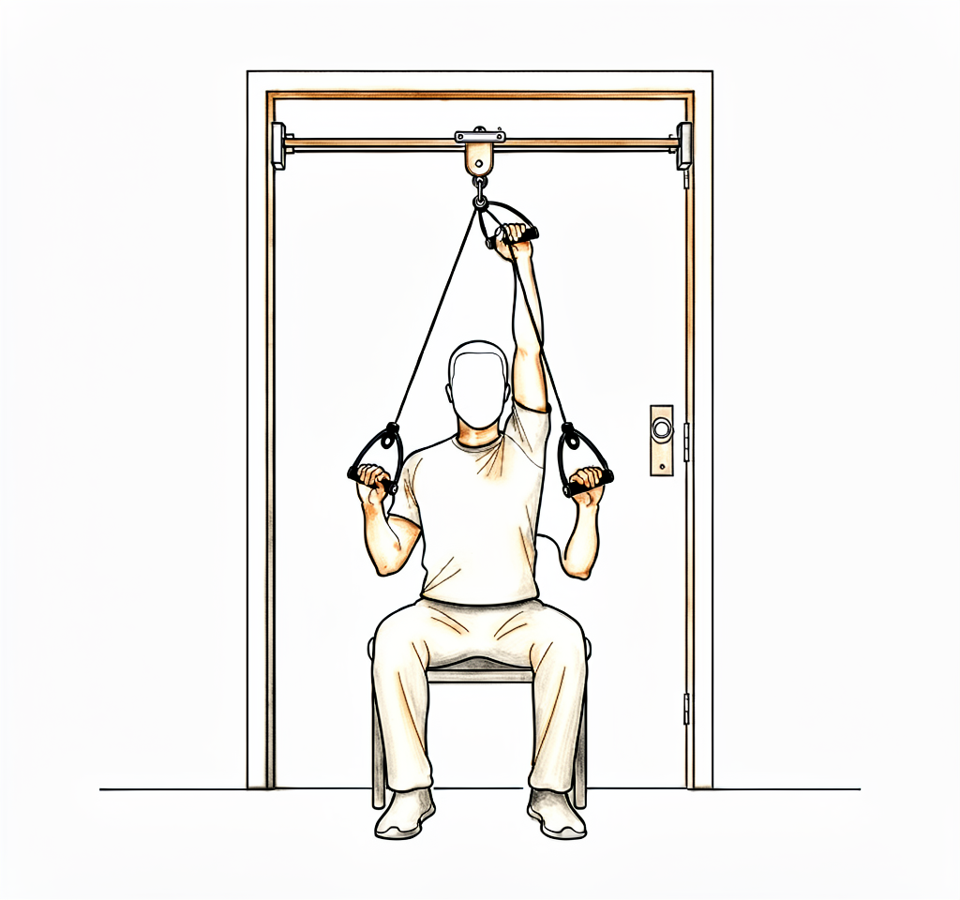
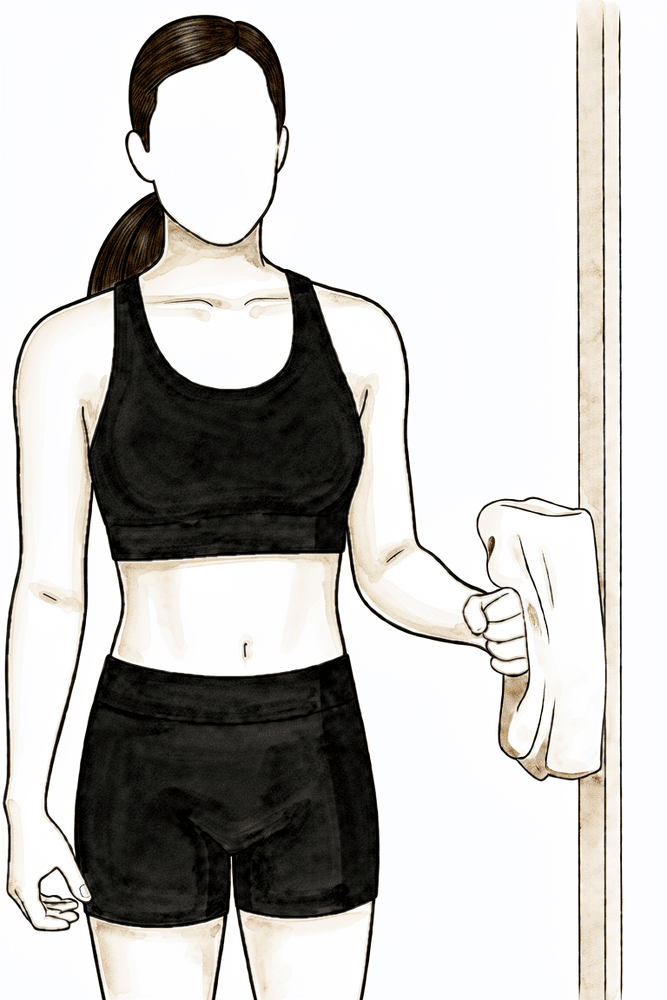
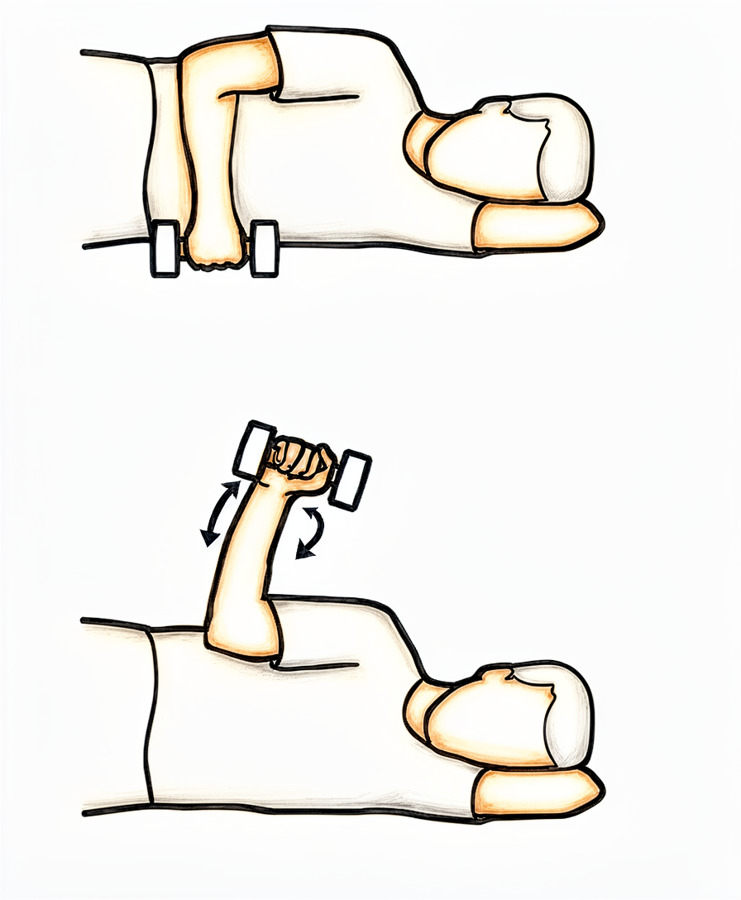
Pulley-assisted movement
Sit beneath an over-door pulley. With the operated arm relaxed, pull down with your other hand so the rope gently raises the operated arm, then lower it slowly. Progress on comfort — easing back from sharp or lingering pain, not pushing through it.
As guided by your physiotherapist
Kieran Hirpara 4.0
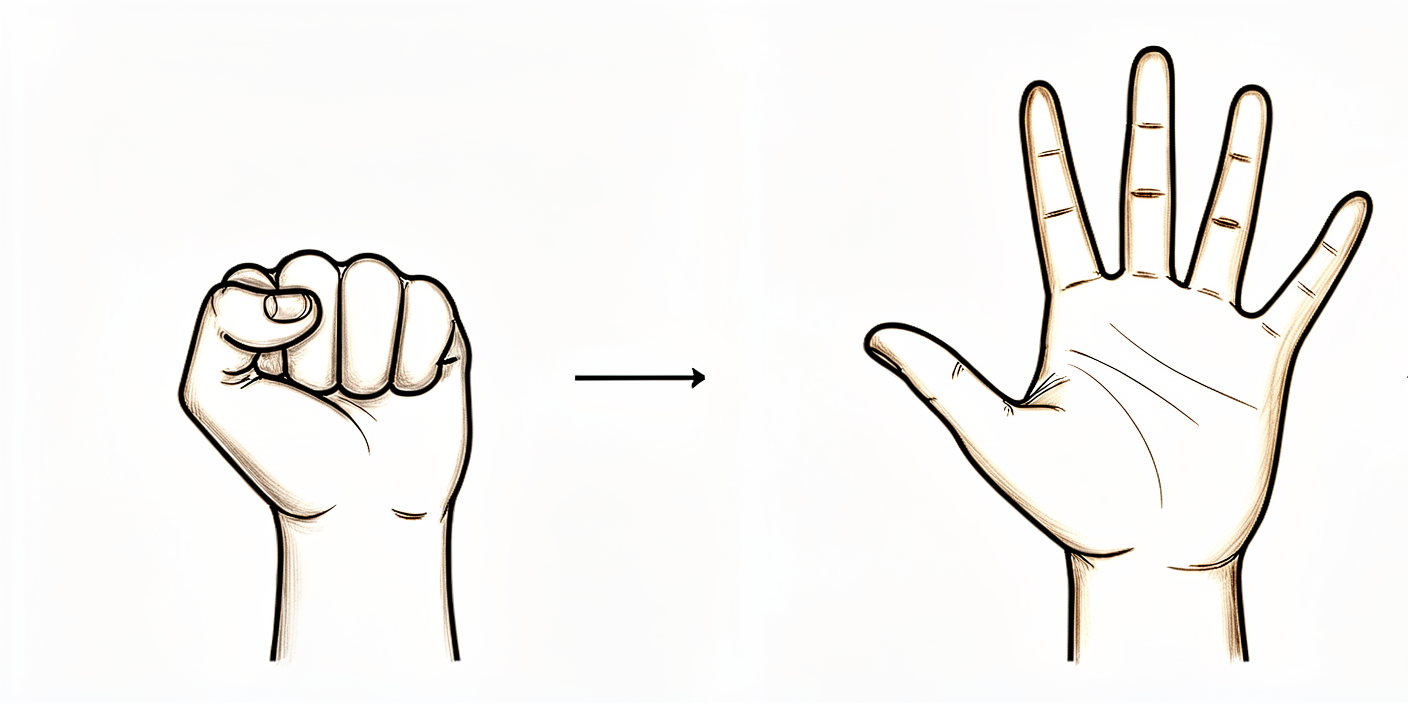
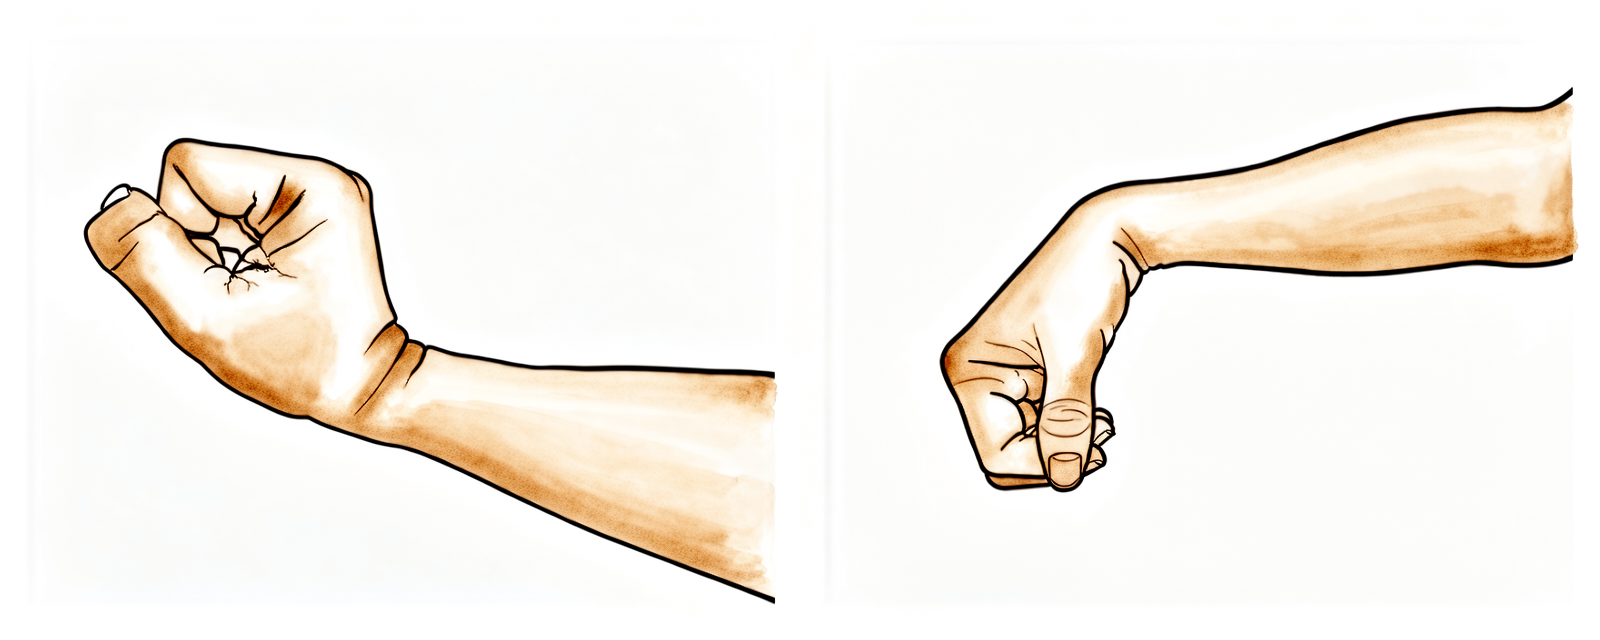
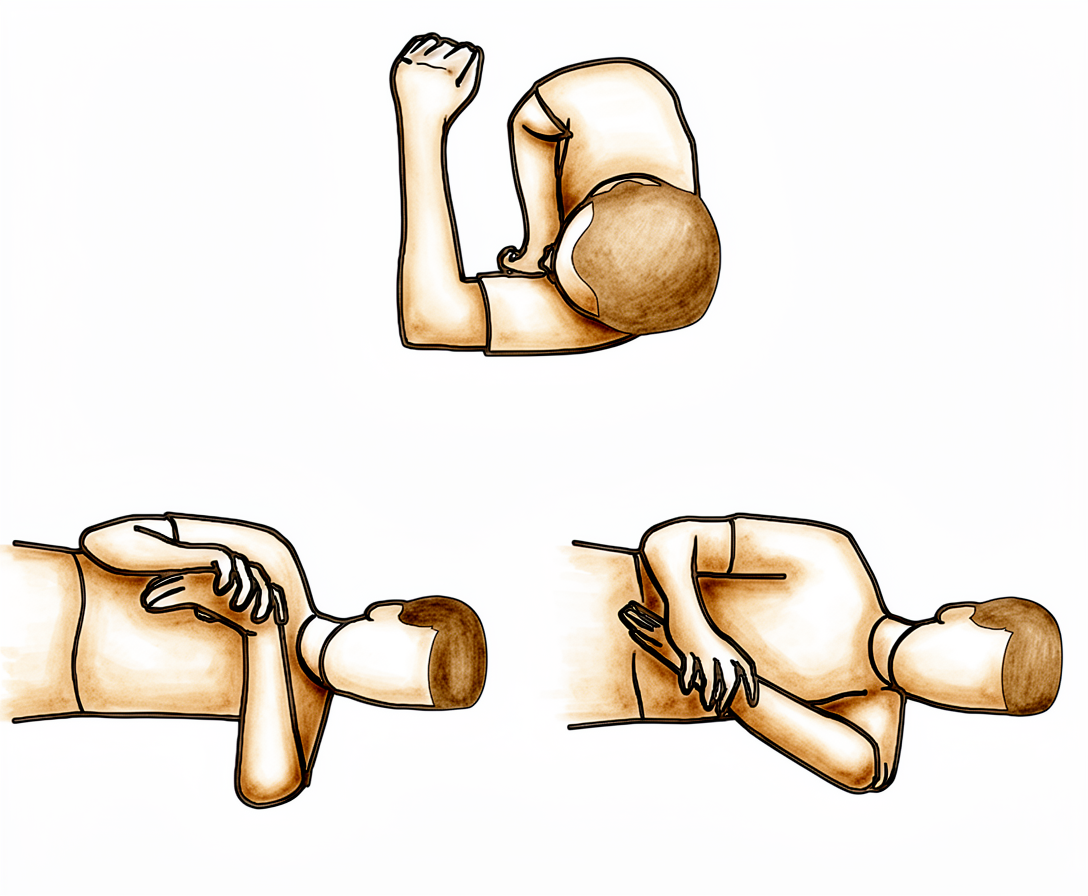
Open and close hand
Make a tight fist or squeeze a soft ball, then open the hand fully. Move your hand, wrist and elbow freely from the start, and use the arm for light everyday tasks as comfort allows.
As guided by your physiotherapist
Kieran Hirpara 4.0
Wrist movement
Keep your wrist moving by bending it forwards, backwards and side to side. Move the hand, wrist and elbow freely from the start so the whole arm stays working while the shoulder settles.
As guided by your physiotherapist
Kieran Hirpara 4.0
Elbow bends
With your upper arm resting by your side, bend the elbow as far as it comfortably goes, then straighten it fully. Only the elbow moves — keep the shoulder relaxed.
As guided by your physiotherapist
Kieran Hirpara 4.0
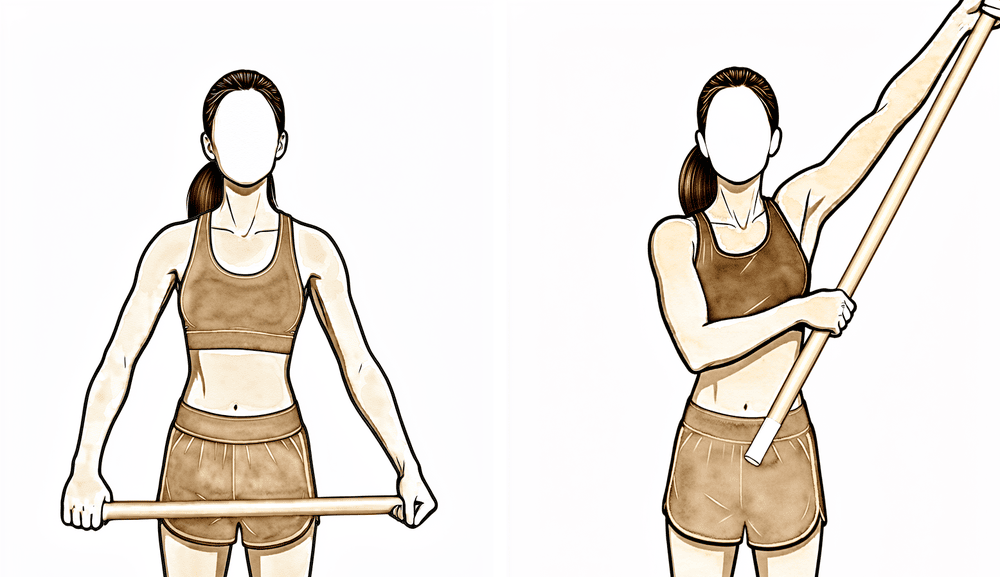
Assisted movement with a stick
Hold a stick (cane or wand) in both hands and let your good arm guide the operated arm out to the side and forwards, taking it as far as comfort allows, then lower with control. This active-assisted movement keeps the shoulder moving early while it settles.
As guided by your physiotherapist
Kieran Hirpara 4.0
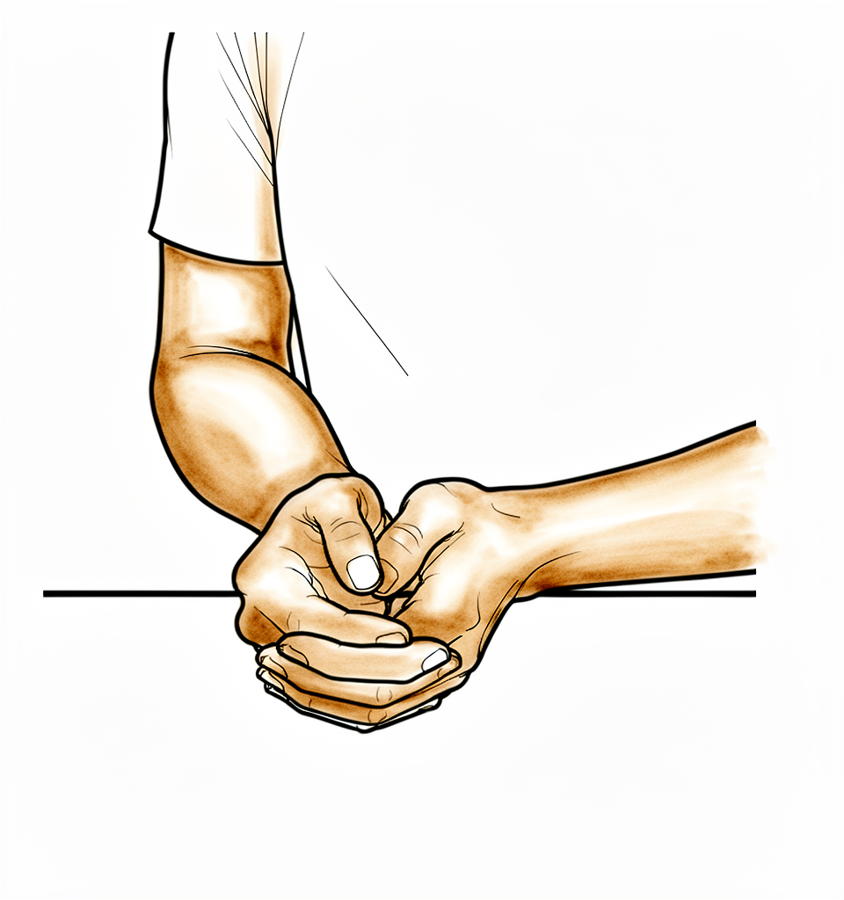
Isometric external rotation
Stand with your elbow tucked at your side and bent to a right angle, the back of your hand against a wall or doorframe. Gently press outwards into it without letting the arm move, hold a few seconds, then relax. This gently switches on the rotator cuff without movement, as comfort allows.
As guided by your physiotherapist
Kieran Hirpara 4.0
Isometric abduction
Stand side-on to a wall with your elbow at your side and gently press the outside of your upper arm into the wall, as if lifting the arm out sideways, without letting it move. Hold a few seconds, then relax. This works the deltoid gently with no movement, as comfort allows.
As guided by your physiotherapist
Kieran Hirpara 4.0
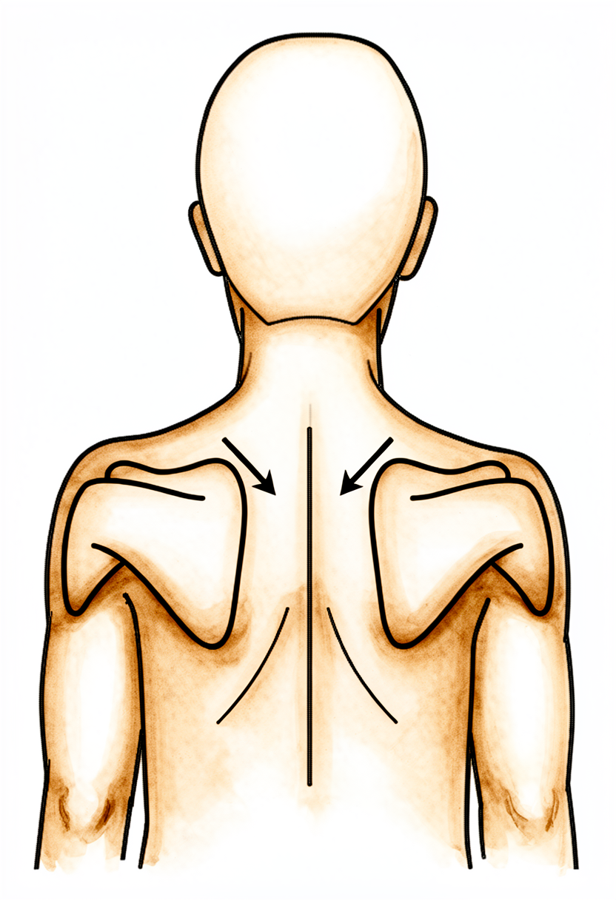
Scapular setting
Sitting or standing tall, gently draw your shoulder blades down and back together without moving the arms, hold for a few seconds, then relax. Keep your ears, shoulders and hips in line.
As guided by your physiotherapist
The first two weeks are about letting the shoulder settle while keeping it moving. Use the sling only while it is helping with comfort — typically the first day or two — and leave it off as much as possible; you do not need to sleep in it. Move your hand, wrist and elbow freely from the start, and use the arm for light everyday tasks such as eating, washing and dressing as comfort allows. Gentle shoulder movement starts straight away: pendulum exercises and assisted movements progressing to active movement as the shoulder allows. Ice and simple pain relief help keep the exercises comfortable. Your wound dressings are splash-proof rather than waterproof — keep them dry where you can, and they can come off about ten to twelve days after surgery.
For your physiotherapist:
Goals
- Settle pain and swelling
- Early range of motion progressing from assisted to active as tolerated
- Independence with light activities of daily living
- Wean from the sling within the first days
Management
- Sling for comfort only — encourage weaning over the first days and discontinuation within the first one to two weeks at the latest
- Pendulum exercises; active-assisted range of motion (pulley, cane or wand) progressing to active range of motion in all planes as tolerated
- Free movement of the hand, wrist and elbow; grip work as comfortable
- Scapular setting and postural work
- Gentle rotator cuff and deltoid isometrics as comfort allows
- Cryotherapy and analgesia to support the exercise program
Precautions
- No driving while wearing the sling
- Movement is progressed on comfort — sharp or lingering pain means easing back, not pushing through
- Keep the dressings dry until removed at around 10–12 days; report excessive redness or discharge
Criteria to progress
- Out of the sling and comfortable with light daily activities
- Pain settled enough to work on range of motion actively
Phase II — Restoring full movement and starting strength (Week 2–6)
Kieran Hirpara 4.0
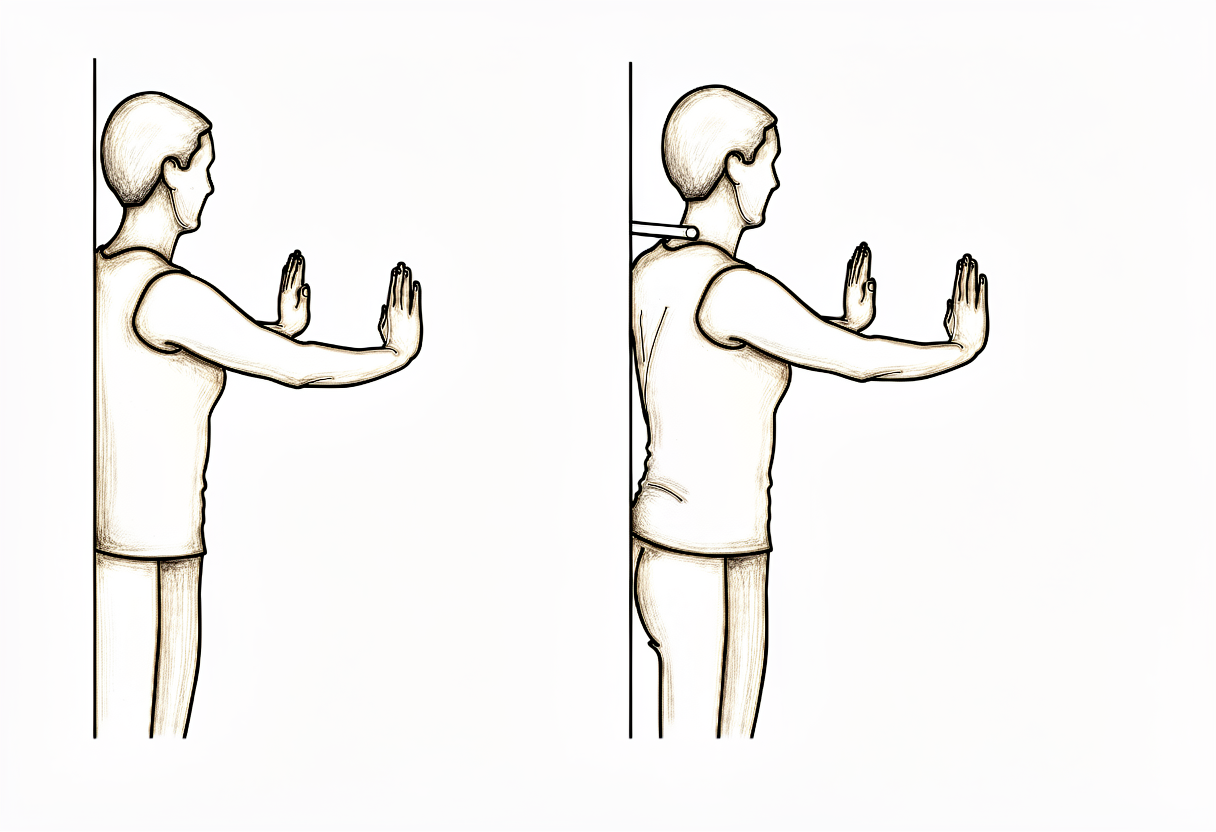
Wall protraction
Stand with your hands flat on a wall at chest height and your arms straight. Without bending the elbows, push the wall away so your upper back rounds and the shoulder blades slide apart, then return with control.
As guided by your physiotherapist
Kieran Hirpara 4.0
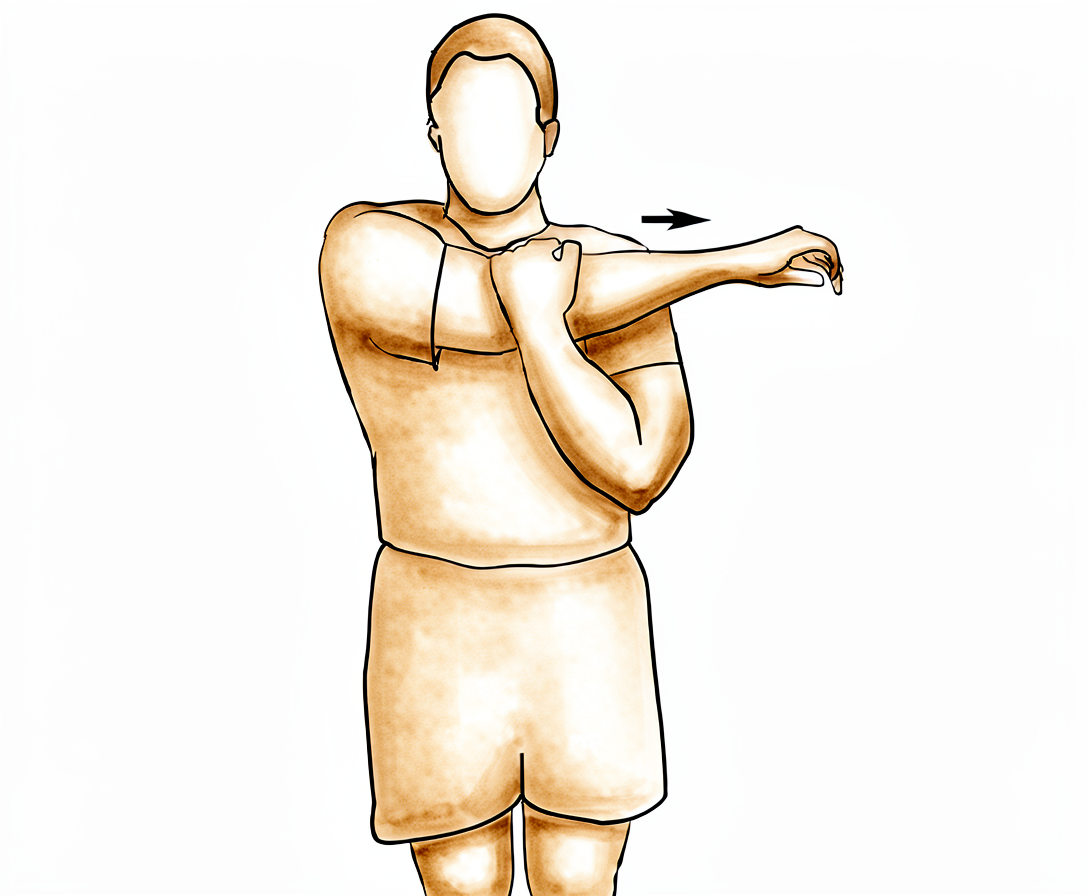
Cross-body stretch
If the back of the shoulder remains tight, use your other hand to draw the operated arm across your chest until you feel a stretch at the back of the shoulder. Hold briefly, then release. Stretch to firm discomfort only — it should not provoke pain that lingers.
As guided by your physiotherapist
Kieran Hirpara 4.0
Sleeper stretch
Lie on the operated side with the arm out in front and the elbow bent. Use your good hand to press the forearm gently down towards the bed until you feel a stretch deep in the shoulder, then ease off. This eases any residual tightness at the back of the shoulder.
As guided by your physiotherapist
Kieran Hirpara 4.0
Band external rotation (near neutral)
Stand with your elbow tucked into your side and bent to a right angle, holding an elastic band anchored across your body at waist height. Keeping the elbow at your side, rotate the forearm outwards to about the midline against the band, then return slowly. This begins the rotator cuff strengthening as you move on from the isometric holds.
Low resistance, as guided by your physiotherapist
Kieran Hirpara 4.0
Shoulder-blade squeeze with band
Holding a band anchored in front of you, draw your elbows back and squeeze your shoulder blades together and down, then return slowly. This strengthens the muscles that steady the shoulder blade as resistance is added through this phase.
As guided by your physiotherapist
Kieran Hirpara 4.0
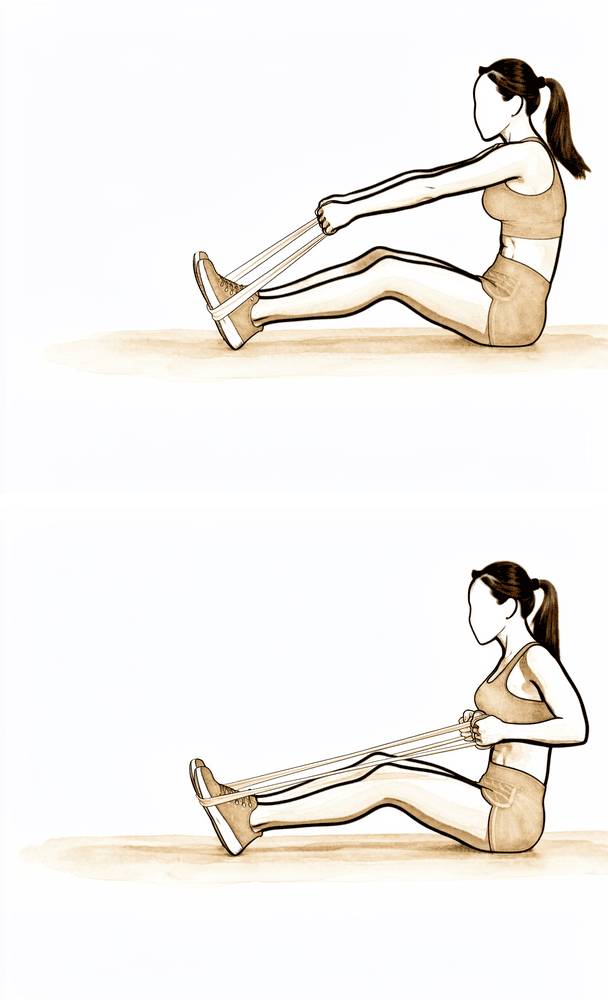
Low row
Hold a band anchored in front of you at waist height. Keeping the arm fairly straight, pull it back and down towards your hip, squeezing the shoulder blade down and back, then return slowly. This builds the shoulder-blade depressors that support the cuff.
As guided by your physiotherapist
Kieran Hirpara 4.0
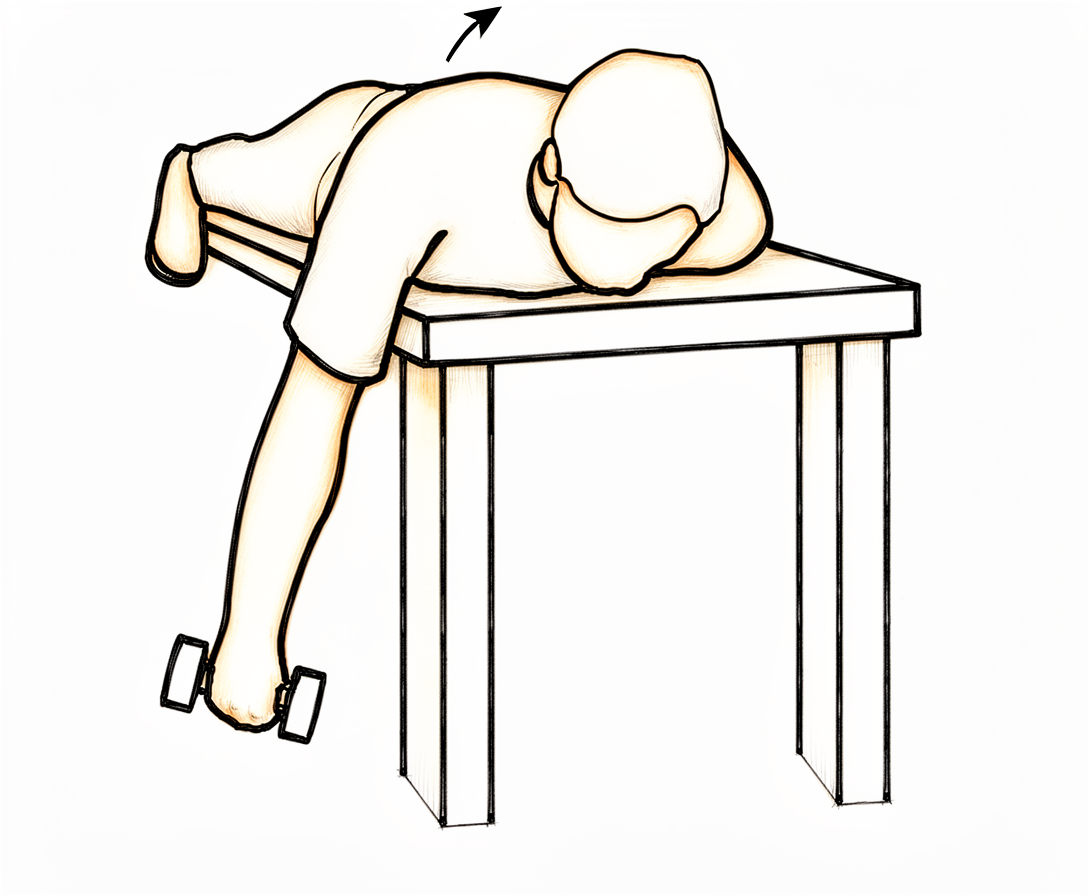
Side-lying external rotation with weight
Lie on your non-operated side with the top elbow bent to a right angle and tucked against your body. Holding a light weight, rotate the forearm up towards the ceiling, then lower slowly. This is light isotonic cuff work — low weight and higher repetitions — from around week four as comfort allows.
Low load, higher repetitions, as guided by your physiotherapist

Kieran Hirpara 4.0
External rotation at 90/90 (lying)
Lie on your back with the arm out to the side at shoulder height and the elbow bent to a right angle, supported on a pillow. Slowly rotate the forearm back towards the head as far as is comfortable, then return with control. This restores rotation in the raised position.
10 times, as guided by your physiotherapist
Kieran Hirpara 4.0
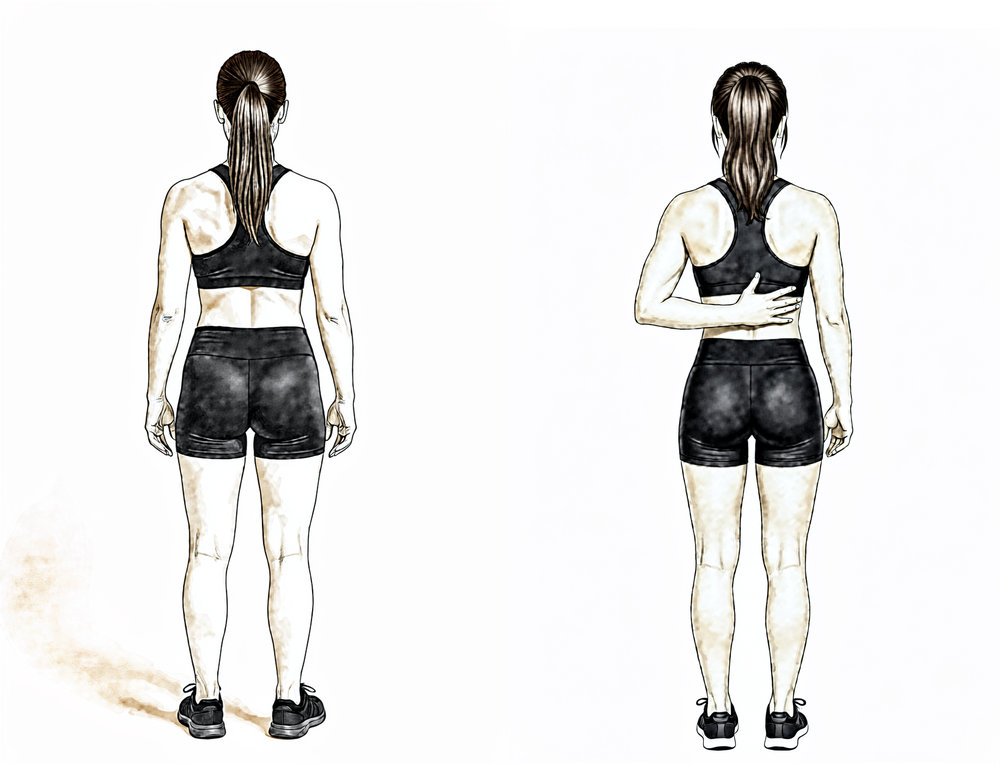
Hand-behind-back reach
Standing, place the back of your operated hand against your lower back and gently slide it up your spine as far as is comfortable using your own muscles, then lower. Move only within a comfortable range and never force it.
As guided by your physiotherapist
With the shoulder settling, the focus turns to regaining full movement and beginning strengthening. Active movement is progressed in all directions towards full range, and resistance work starts gently — isometric holds progressing to elastic-band exercises for the rotator cuff and shoulder blade muscles as comfort allows. Most people return to desk-based work in the first week or two if they have not already, and to driving once the sling is off, pain has settled and they feel confident to control the car in an emergency — typically within one to three weeks of surgery. Lighter recreational activities resume during this phase as guided by your physiotherapist.
For your physiotherapist:
Goals
- Full, or near-full, active range of motion in all planes
- Begin graduated strengthening of the rotator cuff and scapular stabilisers
- Return to normal daily activities, work and driving
Management
- Progress active range of motion in all planes towards full; typical interim targets are forward flexion beyond 140–160° and external rotation beyond 40–60°
- Progress from isometrics to elastic-band rotator cuff work (internal and external rotation near neutral), advancing as tolerated
- Scapular strengthening — shrugs, retraction, protraction and depression work progressing to resistance
- From around week 4, light isotonic strengthening with low weights and higher repetitions as comfort allows
- Manual therapy and stretching for any residual capsular tightness, including posterior capsule stretching where indicated
Precautions
- Strengthening stays within the comfortable range and should not provoke pain that lingers afterwards
- Build loaded rotation in abduction (90/90 positions) gradually — introduce once neutral rotation work is comfortable
- Avoid heavy lifting and forceful overhead work while strength returns
Criteria to progress
- Full or near-full active range of motion with minimal pain
- Band and light-weight strengthening tolerated without flare-up
Phase III — Return to full activity (Week 6 onwards)
Kieran Hirpara 4.0
Push-up plus
From a push-up position — against a wall, on your knees, or full as strength allows — complete the push-up, then push a little further so your upper back rounds and the shoulder blades spread apart, then return. This closed-chain work builds control and strength as you return to full activity.
As guided by your physiotherapist
The final phase is a graduated return to heavier lifting, manual work, gym training and sport. Conventional weight training can usually restart from about six weeks, beginning light and progressing steadily, and overhead or contact sport typically resumes somewhere between six and twelve weeks depending on the sport and how the shoulder is performing. The benchmark for finishing rehabilitation is a comfortable shoulder with full movement and confident strength — most people are back to everything they want to do by about three months, and any residual aching continues to settle beyond that.
For your physiotherapist:
Goals
- Full, pain-free range of motion
- Restoration of strength, endurance and confidence for work and sport
- Graduated return to heavy manual work, gym training and sport
Management
- Progress to conventional resistance training from around week 6, advancing from machine to free weights as control allows
- Eccentric and closed-chain work as tolerated
- Sport-specific conditioning, including a staged throwing or overhead program where relevant
- Limit heavy rotator cuff strengthening to around three sessions per week to avoid overload tendinopathy
Precautions
- Progression remains symptom-guided — pain that builds with load or lingers afterwards means stepping the load back
- Return to contact or overhead sport waits for full, pain-free range and adequate strength
Criteria to progress
- Full, pain-free range of motion with strength comparable to the other side for the intended activity
- Sport- or work-specific tasks performed without provocation
After your protocol
The phases above are adapted from published rehabilitation protocols for simple and diagnostic shoulder arthroscopy — Dr Jorge Chahla (Rush University Medical Center), Dr Benedict Nwachukwu (Hospital for Special Surgery), Dr Blake Obrock (orthopaedic sports medicine, Amarillo) and the Royal National Orthopaedic Hospital's patient guide to diagnostic shoulder arthroscopy. The week ranges are typical rather than fixed, and your rehabilitation is guided individually by your physiotherapist, working with the practice, based on how your shoulder recovers. This page works alongside the practice's general recovery advice — see managing post-operative pain and wound care. For the operation itself, see shoulder arthroscopy. The evidence behind this protocol — the early-motion rationale, the placebo-controlled surgical trials, and the published rehabilitation protocols it draws on — is summarised in the evidence section, available as a PDF from the top of this page.
Evidence & references
Shoulder Arthroscopy (Diagnostic / Debridement / Washout) — Post-operative Rehabilitation
Topic scope: Post-operative rehabilitation after a generic keyhole shoulder arthroscopy in which nothing was repaired — diagnostic assessment, washout (lavage), debridement of degenerate tissue, removal of loose bodies, and isolated subacromial decompression or distal clavicle excision. Specific repair or reconstruction procedures have their own protocols that take priority — rotator-cuff repair, labral/instability stabilisation (anterior-Bankart, posterior-stabilisation, Latarjet), capsular release, biceps tenodesis and AC-joint stabilisation each convert to a slower, construct-protecting pathway. This page is the default keyhole pathway used only when the operation note confirms no repair was performed.
Defining principle of the rehab here: when nothing is repaired there is no construct to protect, so the rehab is an early-motion pathway — a sling for comfort only (days, not weeks), unrestricted use below shoulder height from day one, motion progressed on comfort rather than the calendar, and strengthening as soon as range and pain allow. The single branch point is whether anything was actually repaired or stabilised; if it was, recovery converts to that procedure's protected protocol. Unlike a cuff repair or a labral repair, there is no healing tissue that early movement can disrupt, so the usual risks of early motion (re-tear, construct failure) do not apply — the main thing early motion prevents here is post-operative stiffness.
The operation and why the rehab is fast
A keyhole (arthroscopic) shoulder operation in this scope involves looking inside the joint and subacromial space through small portals and doing one or more of: confirming a diagnosis, washing out the joint, trimming (debriding) frayed labrum, degenerate cuff or inflamed bursa, removing loose bodies, or shaving bone in a subacromial decompression or distal clavicle excision. None of these creates a repair that must heal under protection. That is the central fact that separates this pathway from cuff repair, stabilisation and the other audited protocols: the tissue is either removed or simply inspected, so the post-operative soreness — not a healing construct — is what paces recovery.
Because of this, recovery is among the quickest of any shoulder operation. Most people are back to desk-based work within days to a week, out of the sling within the first week, driving within one to three weeks once the sling is off and they can control the car confidently, and back to heavier manual work and sport somewhere between six and twelve weeks depending on the demands placed on the shoulder.
Evidence by theme
1. Early motion is the goal — there is no construct to protect
The case for early movement here is largely a mechanistic one rather than one settled by a dedicated trial: with no repair to disrupt, the only thing prolonged immobilisation achieves is avoidable stiffness, discomfort and delayed return to activity. The closest high-quality evidence comes by analogy from the cuff-repair literature, where — even with a real construct to protect — randomised trials and meta-analyses show early controlled motion does not increase re-tear and tends to reduce stiffness (number-needed-to-harm for re-tear in the order of several hundred). If early motion is safe when a repair is present, it is plainly safe when there is nothing to protect. Mechanistic + analogous moderate evidence; no debridement-specific RCT.
2. The procedures themselves: a candid note on efficacy
Two landmark placebo-controlled surgical trials bear directly on the commonest reason a no-repair arthroscopy is done — subacromial pain:
- FIMPACT (BMJ 2018) — a double-blind trial of 210 patients randomised to arthroscopic subacromial decompression, diagnostic arthroscopy (placebo surgery), or exercise therapy. At 24 months decompression gave no benefit over diagnostic arthroscopy; both surgical arms improved, but no more than each other. Strong (placebo-controlled RCT).
- CSAW (Lancet 2018) — a three-arm placebo-controlled UK trial reaching the same conclusion: decompression was no better than investigational (diagnostic) arthroscopy, and the small edge of either over no-treatment was not clinically important. Strong (placebo-controlled RCT).
The honest reading is that for subacromial pain the surgical element adds little over diagnostic arthroscopy or structured exercise — which reinforces why, when this operation is done, the rehabilitation (early motion, restoring strength and confidence) carries much of the recovery. A longer-term single RCT (Magnussen-class, 10-year follow-up, in the corpus) did favour decompression over therapy alone, so practice remains individualised — but the placebo-controlled data are the higher tier.
3. Debridement of degenerate tissue — limited, old evidence
Arthroscopic debridement of irreparable degenerative cuff lesions (Burkhart, J Bone Joint Surg 1995, in the corpus) can relieve pain and restore functional "force-couple" mechanics in selected patients, but the evidence base is small, old and uncontrolled. Debridement and washout are best understood as symptom-directed measures, not structural repairs — which again places the weight of recovery on rehabilitation rather than on a healing construct. Weak (historical case series).
4. The phased protocol is consensus, drawn from published surgeon protocols
The phase structure below is expert/consensus, compiled from published patient-guidance protocols for general/diagnostic shoulder arthroscopy and debridement (Chahla – Rush; Nwachukwu – HSS; Obrock; Royal National Orthopaedic Hospital). There is no rehabilitation RCT defining the optimal regimen for a no-repair arthroscopy; the week ranges are typical, not trial-derived. Weak/consensus.
Phased post-op timeline (no repair performed)
| Phase | Window | Sling | ROM / use | Strengthening | Notes |
|---|---|---|---|---|---|
| I — Early movement & settling | Week 0–2 | Comfort only, days (rarely > 1–2 wk), off ASAP; no sleeping in it | Free hand/wrist/elbow + light ADLs from day 1; pendulums and assisted ROM progressing to active ROM as comfort allows | Scapular setting; gentle cuff/deltoid isometrics as comfort allows | Settle the post-op flare. No driving while in the sling. Dressings off ~10–12 days |
| II — Restore movement, start strength | Week 2–6 | Off | Progress active ROM in all planes toward full (interim targets ~140–160° flexion, 40–60° ER) | Isometric → elastic-band cuff + scapular work; light isotonic from ~wk 4 | Desk work + driving once sling off, pain settled, confident to control the car (typically wk 1–3) |
| III — Return to full activity | Week 6 onward | Off | Maintain full, pain-free ROM | Conventional resistance training from ~wk 6; eccentric/closed-chain; sport-specific conditioning. Cap heavy cuff loading at ~3×/week | Heavier manual work & sport return ~6–12 wk by demand; most back to everything by ~3 months |
Branch point — if anything was repaired or stabilised: recovery converts to that procedure's protected protocol (e.g. rotator-cuff repair — sling ~6 weeks, restricted ROM, deferred strengthening, ~5 months total; or the relevant stabilisation/capsular-release pathway). The operation note and the rooms confirm which pathway applies.
Key controversies / evidence quality
- Does the surgery help at all (for subacromial pain)? Two placebo-controlled RCTs (FIMPACT, CSAW) found decompression no better than diagnostic arthroscopy, and arthroscopy little better than exercise. This is the strongest evidence in the topic — and it argues that, where a no-repair arthroscopy is performed, good rehabilitation is doing much of the work. Strong.
- Debridement evidence is thin and dated. The supportive data (e.g. Burkhart 1995) are small, uncontrolled case series; debridement is symptom-directed, not curative. Weak.
- The rehab protocol itself is consensus, not trial-derived. No RCT defines the optimal regimen after a no-repair arthroscopy; phase timings are typical surgeon-protocol values, and recovery is individualised by the treating physiotherapist. Weak/consensus.
- Safety of early motion is inferred, not directly tested here. It rests on a sound mechanism (nothing to protect) reinforced by analogy to the cuff-repair early-motion trials, rather than a debridement-specific RCT. Mechanistic + analogous moderate.
The evidence base for this generic pathway is genuinely limited. The high-quality data (placebo-controlled trials) speak to whether the operation helps, not to how best to rehabilitate it; the rehabilitation guidance is consensus-level. This is stated plainly because it is the honest position.
Evidence-strength flags (summary)
- STRONG (placebo-controlled RCT): subacromial decompression gives no benefit over diagnostic arthroscopy — FIMPACT (BMJ 2018), CSAW (Lancet 2018).
- MODERATE (analogous RCT/MA): safety of early controlled motion (extrapolated from cuff-repair early-motion trials — early motion does not raise re-tear and reduces stiffness even when a construct is present).
- WEAK (historical case series): arthroscopic debridement of irreparable degenerative cuff lesions (Burkhart 1995).
- WEAK / CONSENSUS: the post-operative rehabilitation protocol itself (published surgeon patient-guidance documents; no defining rehab RCT).
- SAFETY NOTE (rare complication): glenohumeral chondrolysis has been linked to post-arthroscopic intra-articular continuous bupivacaine infusion and to thermal capsulorrhaphy — a reason such adjuncts are avoided, not a reflection on standard debridement.
CITATIONS
RAG corpus (180,000+ Orthopaedic articles)
- Burkhart SS. Débridement of degenerative, irreparable lesions of the rotator cuff. J Bone Joint Surg Am. 1995. DOI: 10.2106/00004623-199506000-00006
- Magnussen R, et al. Subacromial decompression yields a better clinical outcome than therapy alone: a prospective randomized study with minimum 10-year follow-up. Am J Sports Med. 2018. DOI: 10.1177/0363546518755759
- Bailie DS, Ellenbecker TS. Severe chondrolysis after shoulder arthroscopy associated with continuous bupivacaine infusion. Arthroscopy. 2009. DOI: 10.1016/j.arthro.2009.08.024
- (The corpus is thin on no-repair / diagnostic-arthroscopy rehabilitation specifically; the higher-tier evidence below comes from the placebo-controlled surgical trials and published surgeon protocols.)
Literature (URLs)
- FIMPACT — Paavola M, et al. Subacromial decompression versus diagnostic arthroscopy for shoulder impingement: randomised, placebo surgery controlled clinical trial. BMJ. 2018. https://pmc.ncbi.nlm.nih.gov/articles/PMC6052435/
- CSAW — Beard DJ, et al. Arthroscopic subacromial decompression for subacromial shoulder pain: a multicentre, pragmatic, placebo-controlled, three-group, randomised surgical trial. Lancet. 2018. https://www.thelancet.com/journals/lancet/article/PIIS0140-6736(17)32457-1/fulltext
Published rehab protocols (patient-guidance — basis for the phase structure)
- Chahla J. Shoulder Arthroscopy Debridement — Rehab Protocol. Rush University Medical Center. https://www.jorgechahlamd.com/wp-content/uploads/2021/08/Shoulder-Arthroscopy-Debridement.pdf
- Nwachukwu BU. Post-Operative Shoulder Arthroscopy Debridement Rehab Protocol. Hospital for Special Surgery. https://manhattansportsdoc.com/post-operative-shoulder-arthroscopy-debridement-rehab-protocol/
- Obrock B. Post-operative Rehabilitation Protocol — General Shoulder Arthroscopy (Debridement, Subacromial Decompression, and/or Distal Clavicle Resection). https://www.drblakeobrock.com/pdf/obrock-shoulder-arthroscopy-general.pdf
- Royal National Orthopaedic Hospital. A Patient's Guide to Diagnostic Shoulder Arthroscopy. https://www.rnoh.nhs.uk/patients-and-visitors/patient-information-guides/diagnostic-shoulder-arthroscopy-patients-guide