Biceps Tenodesis Info Evidence
Last reviewed
Rehabilitation after isolated biceps tenodesis, protecting the tenodesis fixation through staged return of biceps loading.
This protocol covers the rehabilitation after biceps tenodesis with Dr Kieran Hirpara at Mater Private Hospital Rockhampton — whether the operation was done arthroscopically (keyhole) or through a small open incision near the front of the armpit (open subpectoral technique). Bring this page or its PDF to your first physiotherapy visit so your rehabilitation stays coordinated. Your rehabilitation is progressed individually by your physiotherapist through the phases below, depending on how your shoulder and arm progress.
This protocol is for an isolated biceps tenodesis. If your operation also included a rotator cuff repair, follow the rotator cuff repair protocol instead — the repaired tendon sets a slower pace.
If you have any concerns about your wound after surgery, get in touch with the rooms. It is often helpful to take a photo of the wound and email it for review.
What to expect
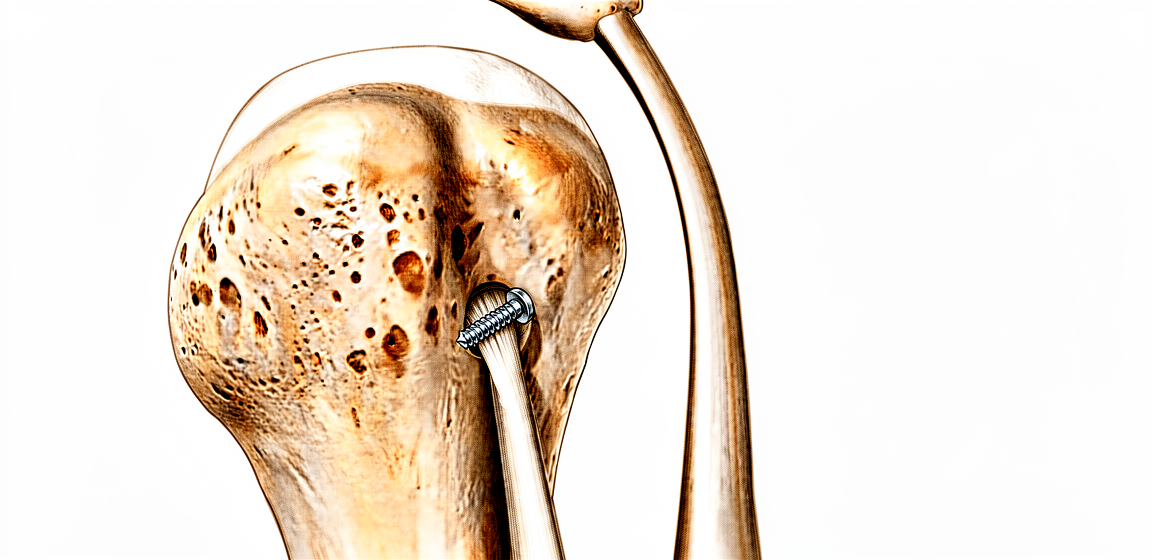
In a biceps tenodesis, the long head of the biceps tendon is detached from its original anchor point inside the shoulder and fixed to the upper arm bone (humerus) instead, using an anchor or screw. That new attachment needs time to heal securely to the bone, and the early weeks of rehabilitation are organised around protecting it.
The biceps muscle does two jobs: it bends the elbow and it turns the palm upwards (supination). That is why — unusually for a shoulder operation — the early restrictions are mostly about the elbow: for the first weeks the elbow is moved passively (the other hand, or your physiotherapist, does the bending) so the healing tendon is not asked to pull. Lifting and carrying with the operated arm are off the menu early for the same reason. A few shoulder positions that put tension on the tendon are also limited at first: rotating the arm outwards past about 40 degrees, and taking the arm behind the line of the body.
You will wear a sling for about three to four weeks, including while sleeping, weaning out of it from around week three as comfort allows. You must not drive while you are wearing the sling.
The journey at a glance:
- Phase I — Protecting the tenodesis — roughly the first four weeks
- Phase II — Active movement — week 4–6
- Phase III — Strengthening — week 6–12, with resisted biceps work from week 10
- Phase IV — Return to full activity — week 12 onwards
The week ranges are typical rather than fixed — your physiotherapist will progress you on how your arm is healing and moving, not on the calendar. Physiotherapy usually starts within the first week or two after surgery, and your first appointment is detailed in your discharge pack unless you have chosen to arrange your own.
Phase I — Protecting the tenodesis (Week 0–4)
Kieran Hirpara 4.0
Passive elbow bending
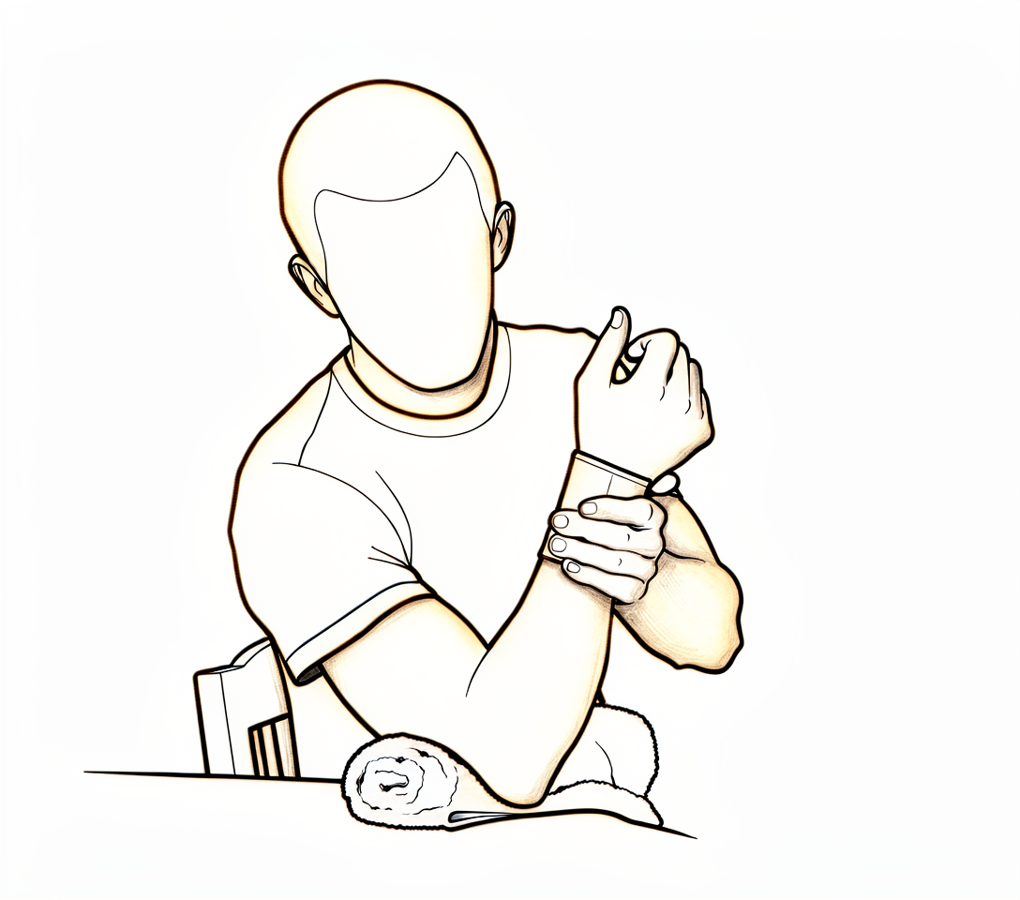
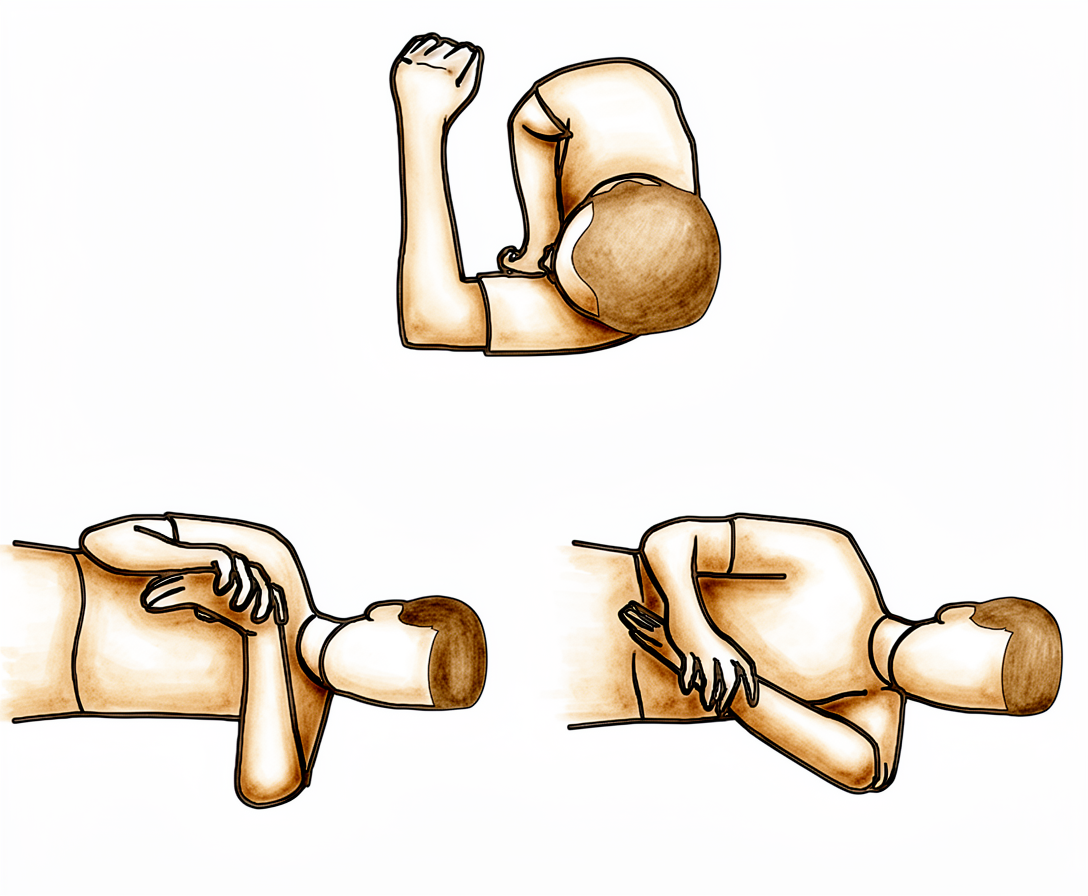
Let the operated arm rest completely relaxed and use your other hand to bend the elbow up, then let it straighten back out. Your other hand does all the work — the biceps must stay switched off so the healing tendon is not asked to pull. Do the same for turning the palm up and down.
Every day
Kieran Hirpara 4.0
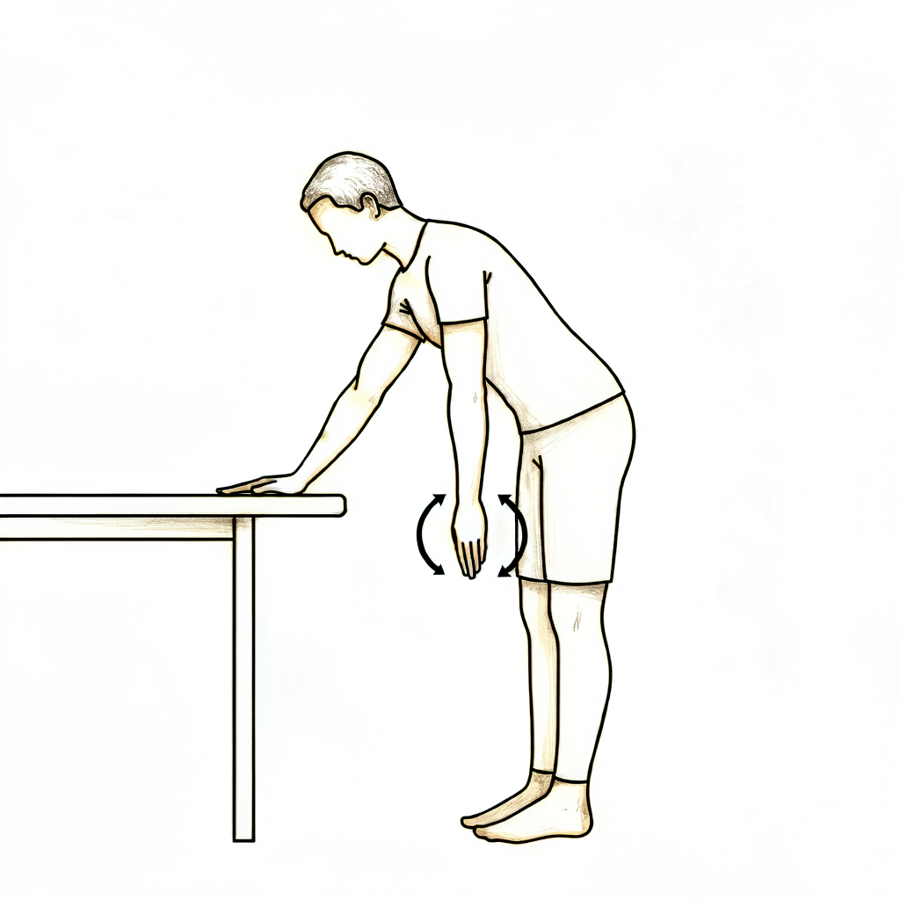
Pendulum exercise
Out of the sling, bend forward at the waist and let the operated arm hang gently away from the body. Let the arm swing in small, relaxed circles — the movement comes from your body, not the shoulder or arm muscles. Stay within comfort, then return the arm to the sling.
As guided by your physiotherapist
Kieran Hirpara 4.0
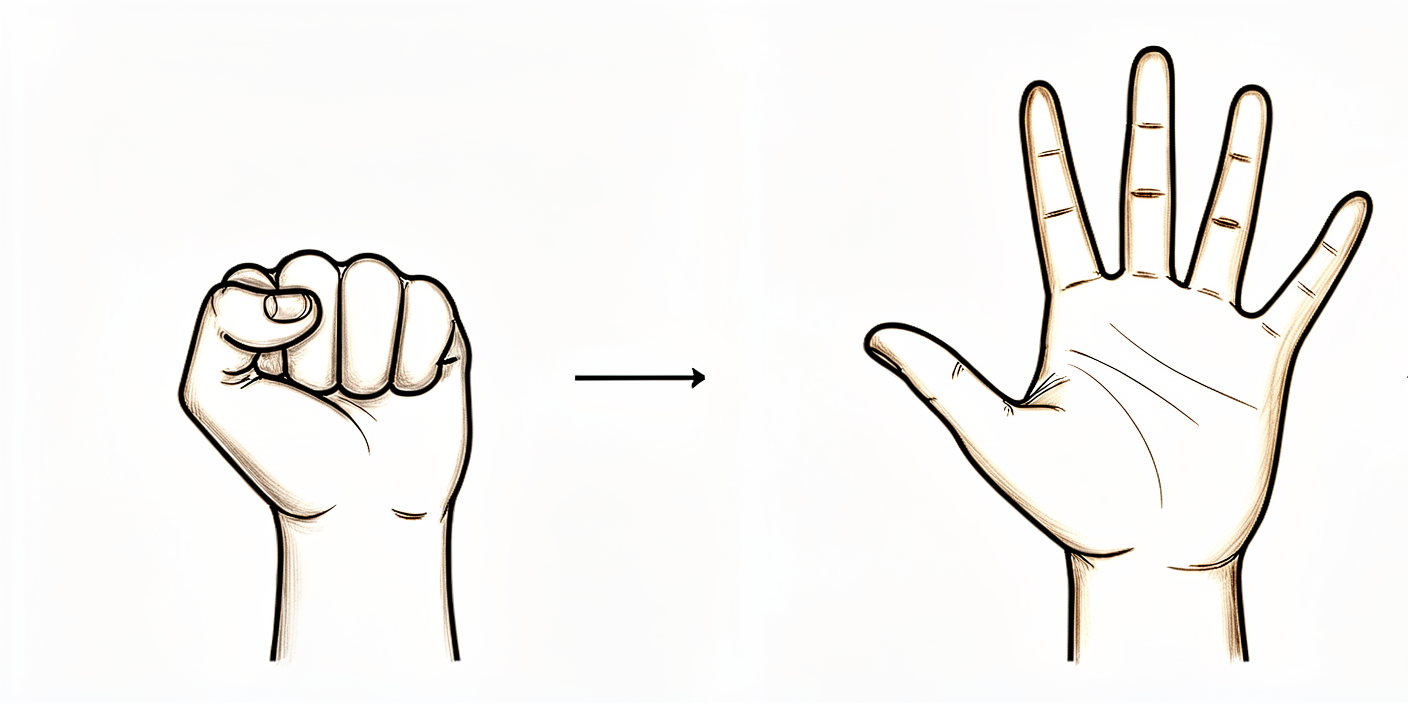
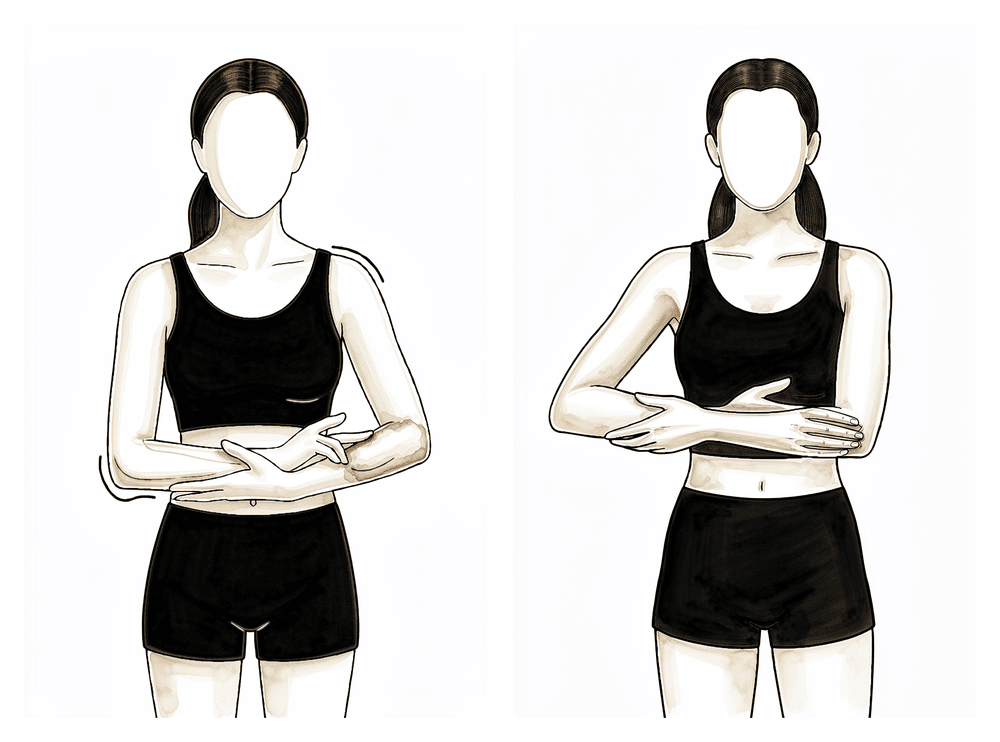
Hand and grip exercises
With the arm supported, make a full fist, then open the fingers out straight. A soft ball or rolled-up sock can be squeezed for grip work. The hand, wrist and fingers stay active from the start.
As guided by your physiotherapist
Kieran Hirpara 4.0
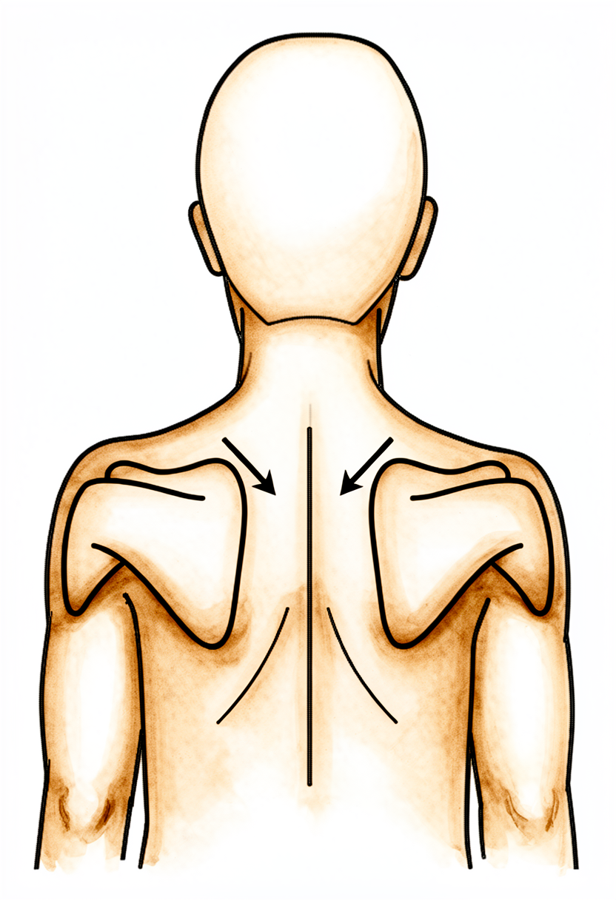
Scapular setting
With the arm supported, gently draw your shoulder blades back together and down, away from your ears. Hold for a few seconds, then relax. This keeps posture and shoulder-blade control working without loading the tenodesis.
As guided by your physiotherapist
Kieran Hirpara 4.0
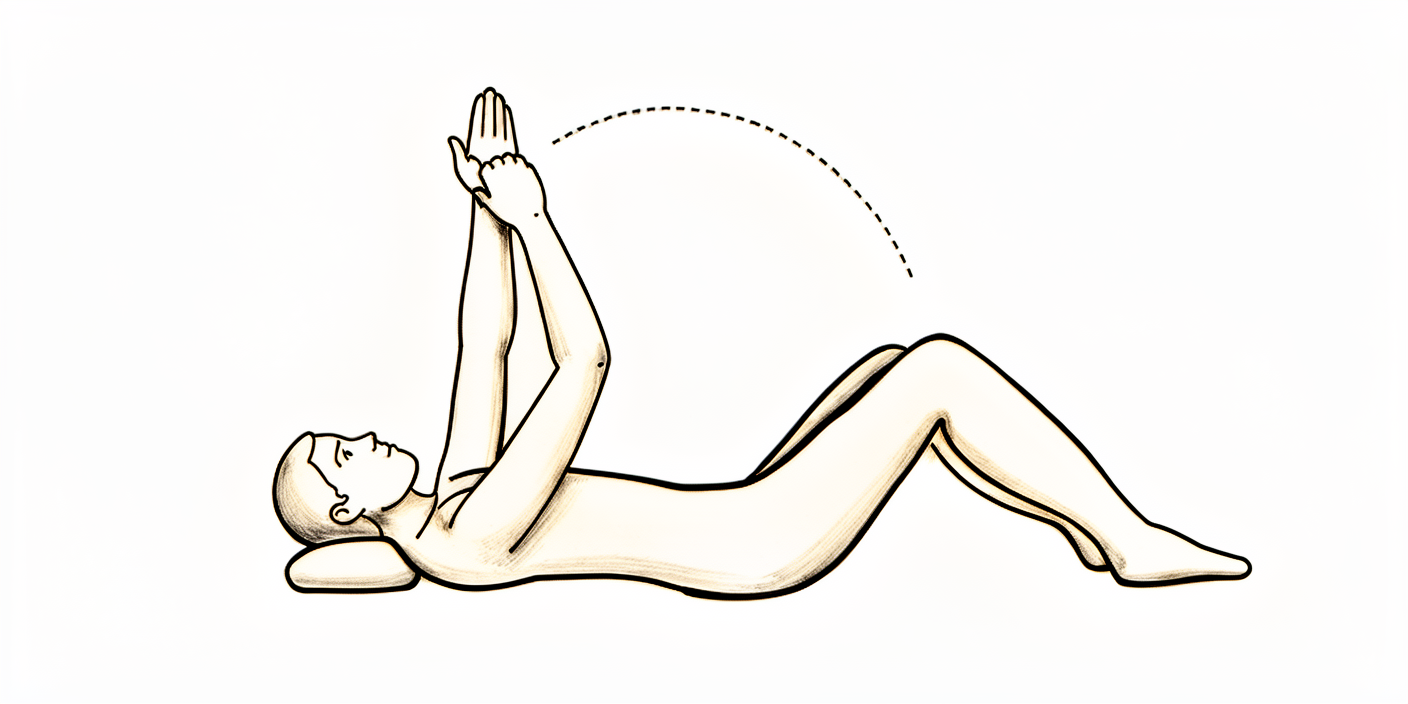
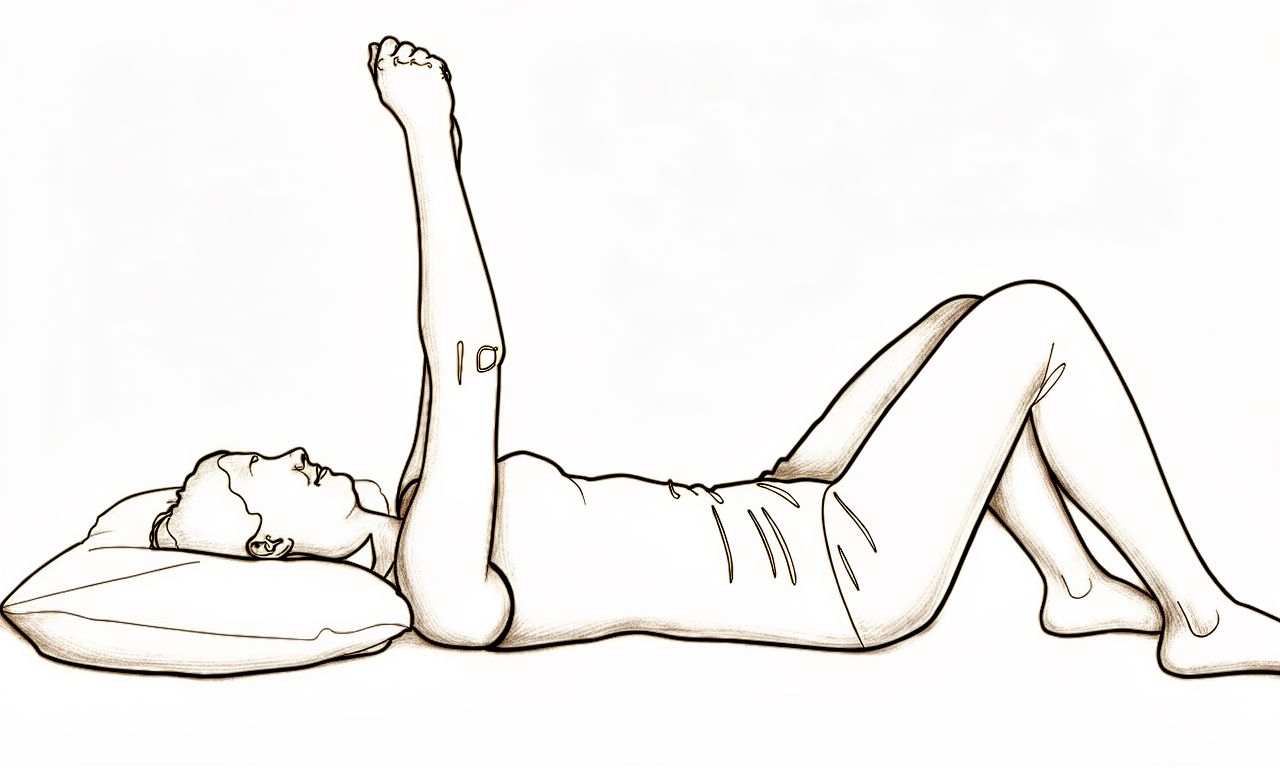
Assisted overhead lift (lying)
Lie on your back and use your good arm to help lift the operated arm up in front of you towards about shoulder height, then lower it back down with the good arm still helping. Your other arm does the work so the biceps stays relaxed. Stay within comfort — this keeps the shoulder moving while the tenodesis heals.
As guided by your physiotherapist
Kieran Hirpara 4.0
Assisted movement out to the side
Cradle the operated forearm with your other arm and gently lift both out to the side, letting the good arm do the work, then lower with control. Keep it comfortable and within early limits — this maintains gentle shoulder range without asking the biceps to work.
As guided by your physiotherapist
Kieran Hirpara 4.0
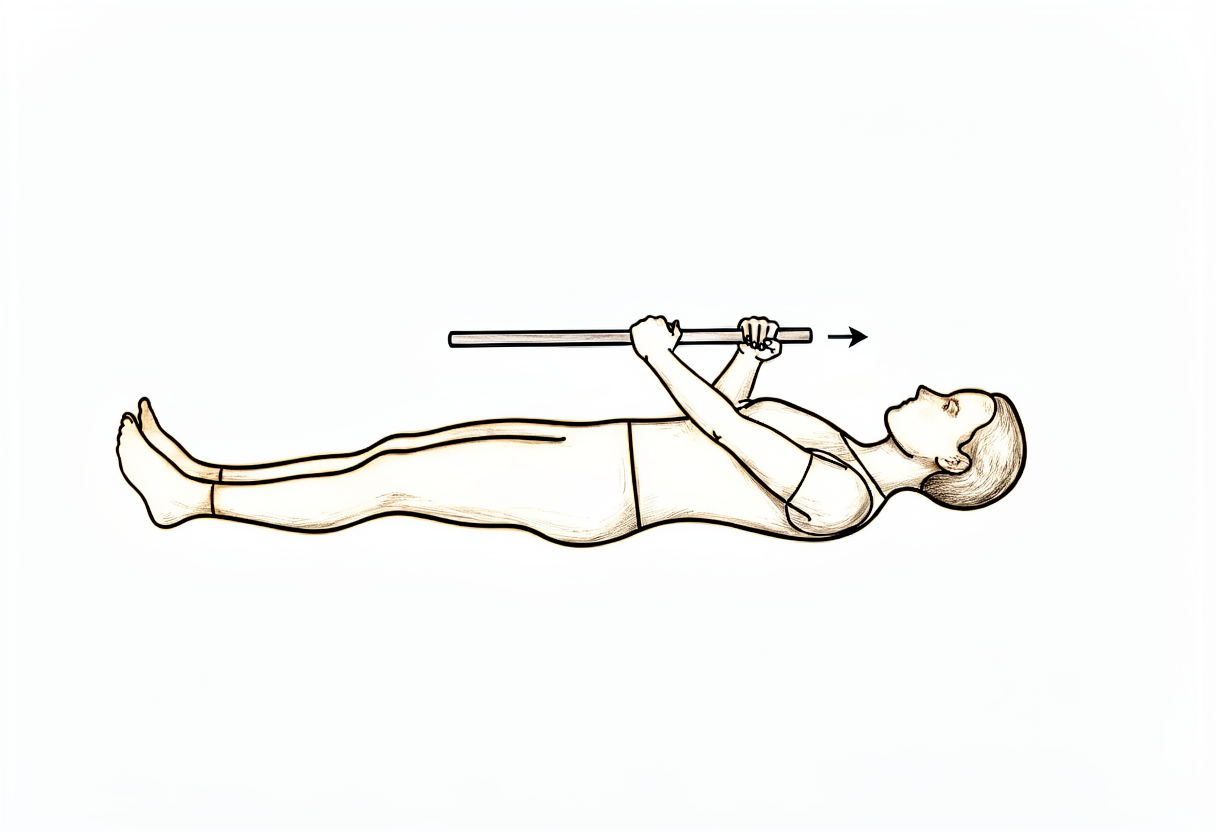
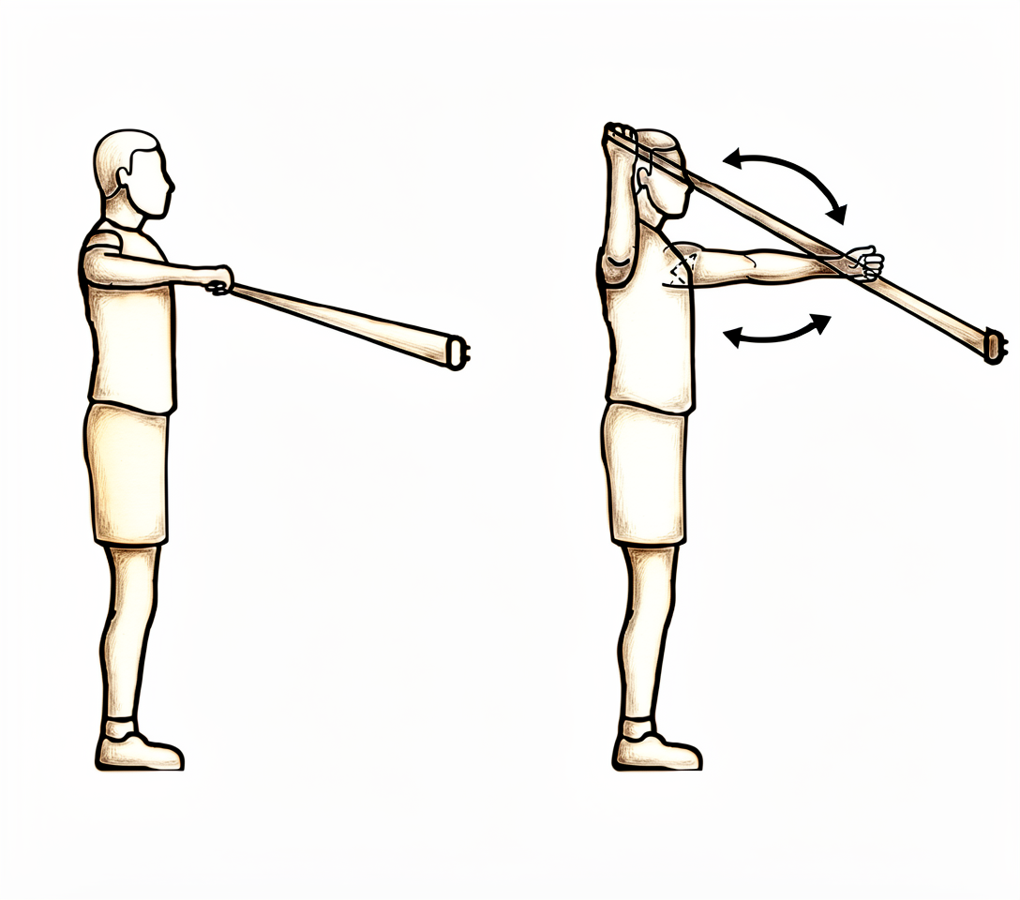
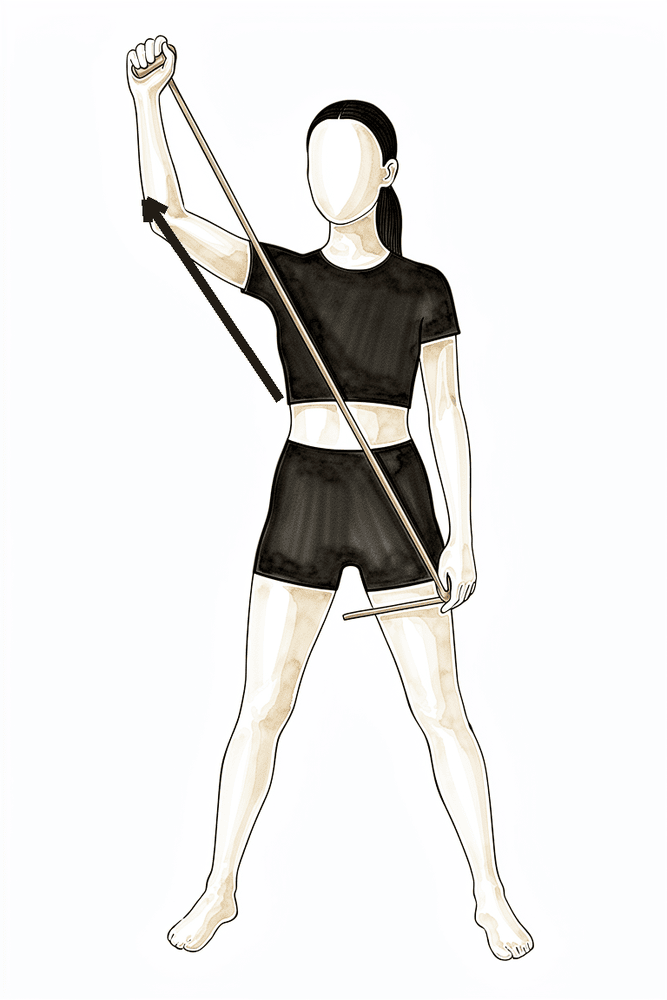
Assisted outward rotation with a stick
Lie on your back with the elbow tucked by your side and bent to a right angle. Hold a stick in both hands and use your good arm to turn the operated hand outwards. Only go to about 40 degrees in these early weeks — this is a limited, protected stretch, not a full one, to keep tension off the healing tendon.
As guided by your physiotherapist, to about 40 degrees
Kieran Hirpara 4.0
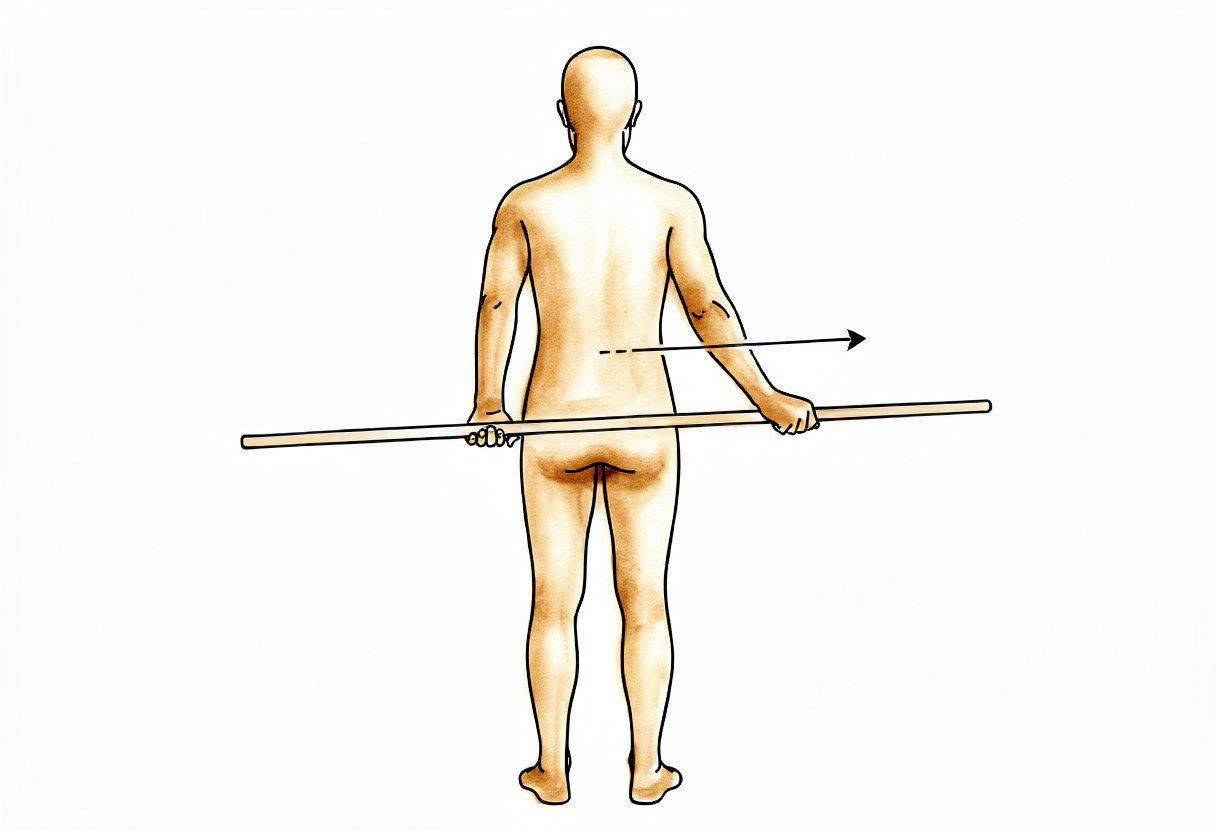
Assisted inward rotation with a stick
Using the same stick, let your good arm guide the operated hand gently inwards across the front of the body, to about 45 degrees, then return. Keep the operated arm relaxed and stay within the early limit — this maintains inward rotation without loading the tenodesis.
As guided by your physiotherapist, to about 45 degrees
The first weeks are about letting the tendon heal onto the bone while keeping everything around it moving. Your hand, wrist and fingers stay active from the start. Your elbow is moved every day, but passively — let your other hand do the bending and the palm-up/palm-down turning, so the biceps itself stays relaxed. The shoulder is moved gently within the limits below, with pendulum exercises and assisted movements. Use ice for pain relief, take your painkillers before your exercises and physiotherapy sessions, and keep the sling on, including in bed. Do not lift or carry anything with the operated arm, and do not drive while the sling is required. Light tasks with the forearm supported, such as writing or typing, are generally fine as comfort allows.
For your physiotherapist:
Goals
- Protect the tenodesis fixation while it heals to bone
- Settle pain, swelling and the inflammatory response
- Full passive elbow and forearm range of motion; comfortable passive shoulder range within the limits below
- Maintain scapular function and posture
Management
- Sling for about 3–4 weeks including at night, weaning from around week 3
- Passive range of motion of the elbow: flexion/extension and forearm supination/pronation
- Active range of motion of the wrist and hand; ball squeezes
- Shoulder passive and gentle active-assisted range of motion within limits: pendulums, flexion and scaption to about 90 degrees initially, progressing as comfort allows; external rotation to 40 degrees; internal rotation to about 45 degrees
- Scapular setting and retraction (arm supported), progressing to scapular isometrics; cervical range of motion and posture work
- Cryotherapy for pain and swelling; analgesia before exercises and sessions
- A towel roll or small pillow under the elbow when lying on the back, to avoid shoulder extension
Precautions
- No active elbow flexion and no resisted forearm supination — the biceps stays unloaded
- No active shoulder range of motion; no external rotation beyond 40 degrees; no shoulder extension or horizontal abduction past neutral
- No lifting or carrying with the operated arm
- No friction massage over the proximal biceps / tenodesis site
- No driving while the sling is required
Criteria to progress
- Wound healed and pain well controlled
- Full passive elbow flexion/extension and forearm rotation
- Comfortable passive shoulder range of motion within the prescribed limits
Phase II — Active movement (Week 4–6)
Kieran Hirpara 4.0
Active elbow bending and straightening
Bend and straighten the elbow under its own power, with nothing in the hand, and turn the palm up and down. The biceps is now moving but not yet working against load — keep lifting to a minimum (nothing heavier than a cup of tea with that arm) until your physiotherapist progresses you.
As guided by your physiotherapist
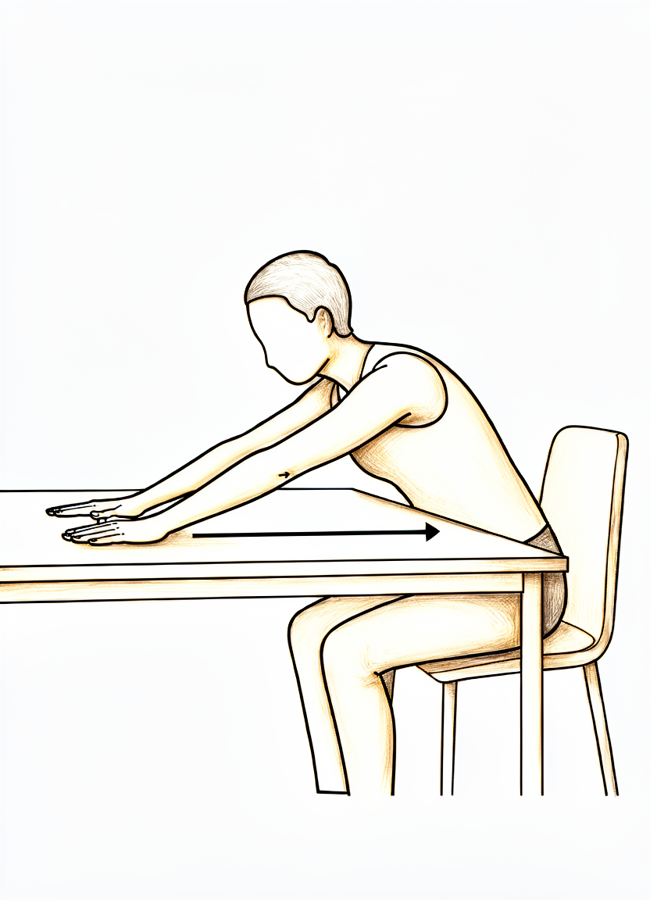
Kieran Hirpara 4.0
Table slide
Sit at a table with your hand resting on a towel or cloth. Slide the hand forwards along the surface, leaning in so the arm travels up in front of you, then slide back. The table supports the weight, helping the shoulder move actively as your range returns.
As guided by your physiotherapist

Kieran Hirpara 4.0
Active lift in the scapular plane
Stand and raise the operated arm up and slightly forwards — about halfway between straight in front and out to the side — with the thumb pointing up, as if holding a full can. Lift under your own power within comfort, then lower slowly. This restores active shoulder lift without any added weight.
As guided by your physiotherapist
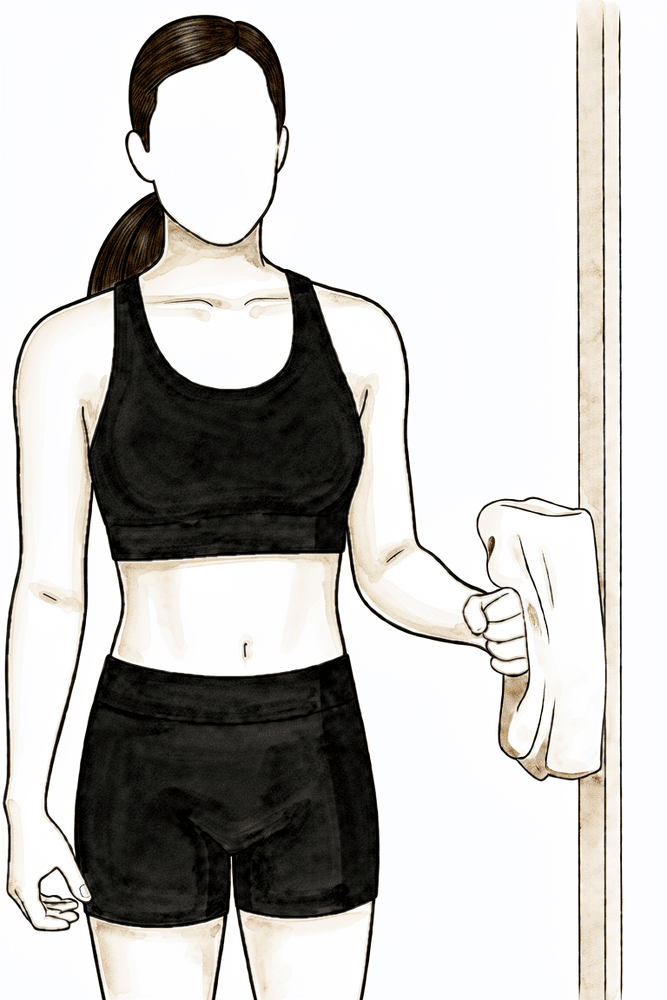
Kieran Hirpara 4.0
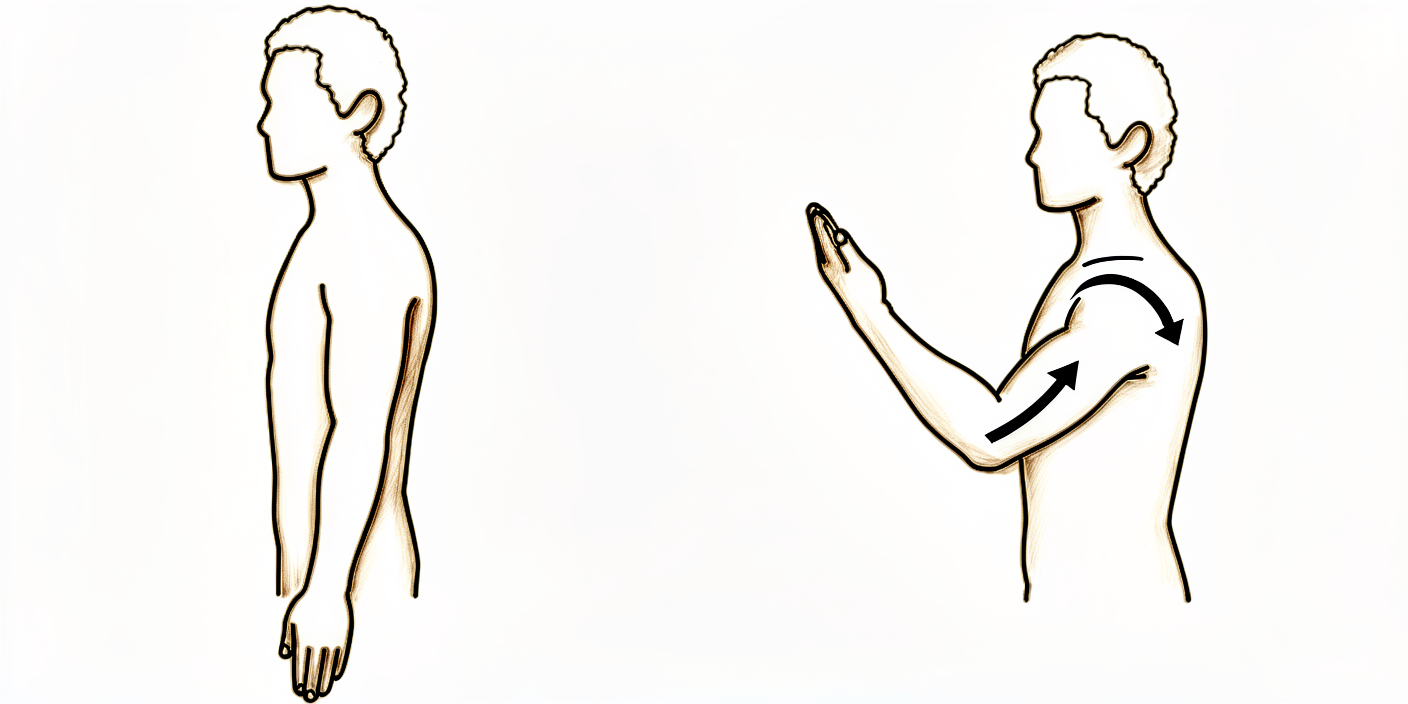
Isometric external rotation
Stand with your elbow tucked at your side and bent to a right angle, the back of your hand against a wall or doorframe. Gently press outwards into it without letting the arm move, hold a few seconds, then relax. This starts building the rotator cuff with no movement and no load on the biceps.
Hold a few seconds, several times; as guided by your physiotherapist
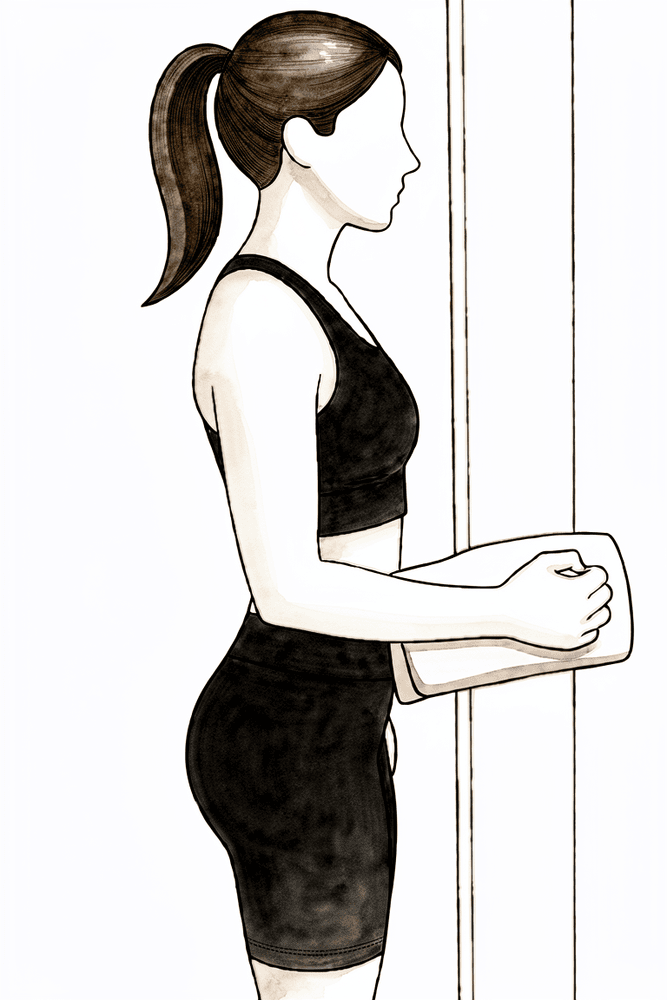
Kieran Hirpara 4.0
Isometric internal rotation
Stand with your elbow tucked at your side and bent to a right angle, your palm against a wall or doorframe. Gently press inwards into it without letting the arm move, hold a few seconds, then relax. A submaximal hold — firm but easy, never straining.
Hold a few seconds, several times; as guided by your physiotherapist
Kieran Hirpara 4.0
Isometric abduction
Stand side-on to a wall with your elbow at your side. Press the outside of your upper arm gently into the wall as if lifting it out to the side, without letting it move, hold a few seconds, then relax. This builds the shoulder muscles statically before active loading begins.
Hold a few seconds, several times; as guided by your physiotherapist
Kieran Hirpara 4.0
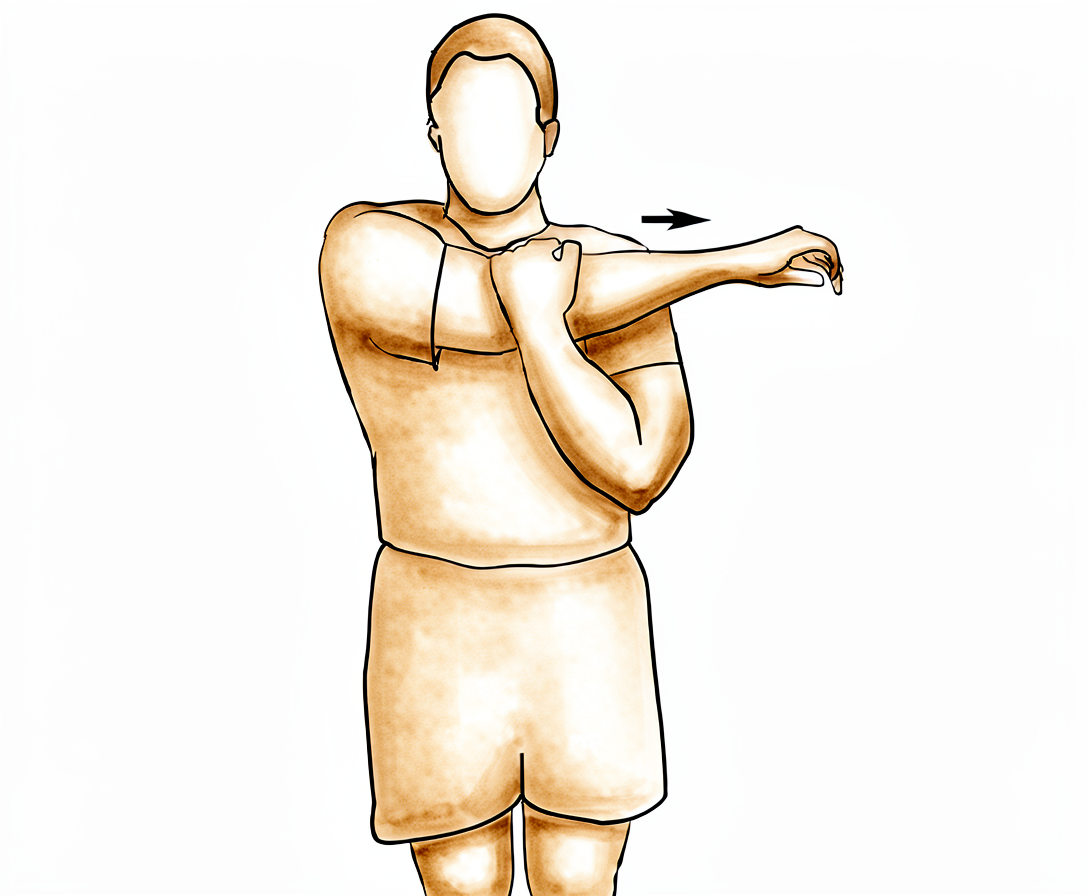
Cross-body stretch
Bring the operated arm across your chest and use your other arm to draw it gently further across until you feel a comfortable stretch at the back of the shoulder. Hold, then relax. This eases tightness at the back of the shoulder as your active range returns.
As guided by your physiotherapist
Kieran Hirpara 4.0
Sleeper stretch
Lie on the operated side with that arm out in front and the elbow bent to a right angle. Use your other hand to gently press the forearm down towards the bed until you feel a stretch at the back of the shoulder. Keep it gentle — relax into the stretch rather than forcing it.
As guided by your physiotherapist
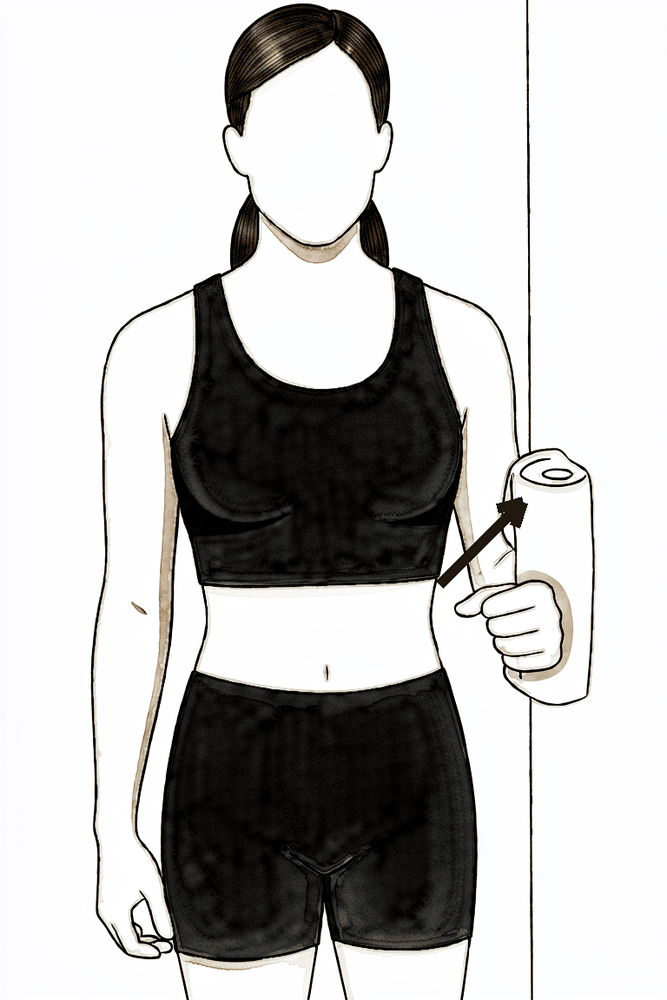
Kieran Hirpara 4.0
Isometric squeeze-in (adduction)
Stand with your elbow tucked at your side and a rolled towel between your upper arm and your body. Gently squeeze your arm inwards against the towel WITHOUT moving — a gentle effort, about a quarter of your strength, with no pain. Hold, then relax.
Hold ~5 seconds, gentle (~25% effort), as guided by your physiotherapist
With the sling gone, the arm starts moving under its own power. The shoulder progresses from assisted movements to active movement in all directions, and the elbow now bends and turns actively — but still without load. The biceps is moving, not yet working: keep lifting to a minimum (nothing heavier than a cup of tea with that arm) and leave pushing, pulling and carrying to the other side. Light desk-based work is typically comfortable in this phase. Once you are out of the sling, you can return to driving when you can control the car comfortably and safely.
For your physiotherapist:
Goals
- Gradual restoration of full active shoulder and elbow range of motion
- Normal scapular mechanics with movement
- Begin submaximal shoulder isometrics
- Light waist-level functional use of the arm
Management
- Shoulder active-assisted progressing to active range of motion in all planes (for example lawn-chair progression, wall and rail slides, supine flexion to standing scaption)
- Active elbow flexion/extension and forearm supination/pronation, unresisted
- Submaximal shoulder isometrics: internal rotation, external rotation, abduction, adduction
- Continue scapular stabilisation and posture work
- Scar massage as the wound matures — no cross-friction over the tenodesis site
- Posterior capsule stretching (cross-body, sleeper stretch) as indicated
- Walking or stationary bike for fitness — no weight bearing through the affected arm
Precautions
- No resisted biceps work — no loading of the elbow flexors or supinators
- No lifting with the operated arm; no running yet
- Avoid overstressing the healing tendon with aggressive stretching or manual therapy
Criteria to progress
- Full, pain-free active range of motion of the shoulder, elbow and forearm
- Proper scapular mechanics with movement and light function
- Pain well controlled
Phase III — Strengthening (Week 6–12)
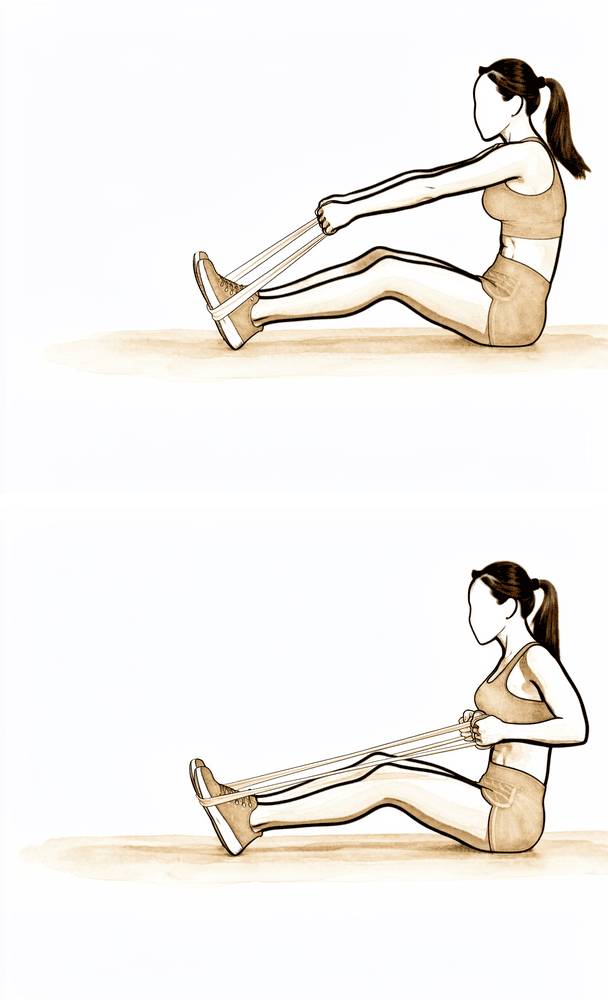
Kieran Hirpara 4.0
Elastic-band row
Anchor an elastic exercise band in front of you at about waist height. Pull the band towards you, drawing the shoulder blade back and down as the elbow travels past your side, then return with control. Part of the shoulder-blade program — keep the load low and the repetitions high.
As guided by your physiotherapist
Kieran Hirpara 4.0
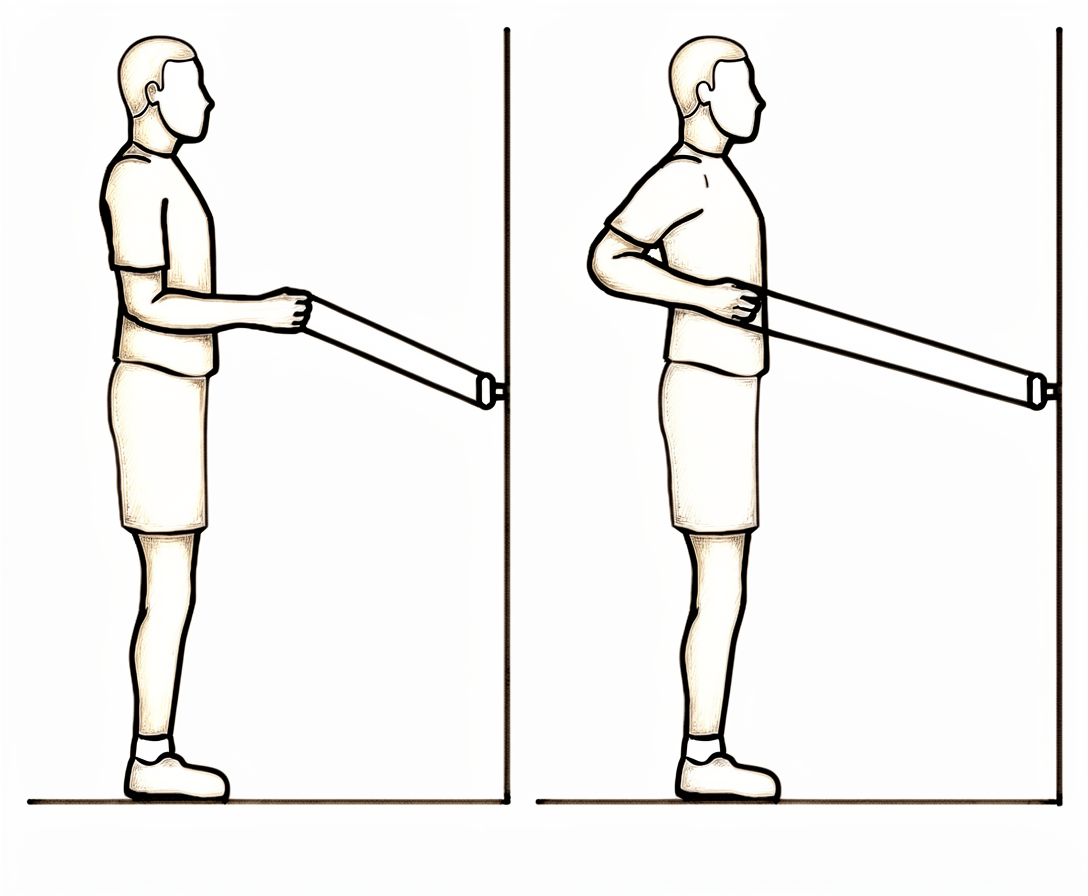
Band external rotation
Anchor an elastic band at waist height. With your elbow tucked at your side and bent to a right angle, pull the band outwards, rotating the forearm away from your body, then return slowly. Start light with high repetitions — this strengthens the rotator cuff.
As guided by your physiotherapist — low load, high repetitions
Kieran Hirpara 4.0
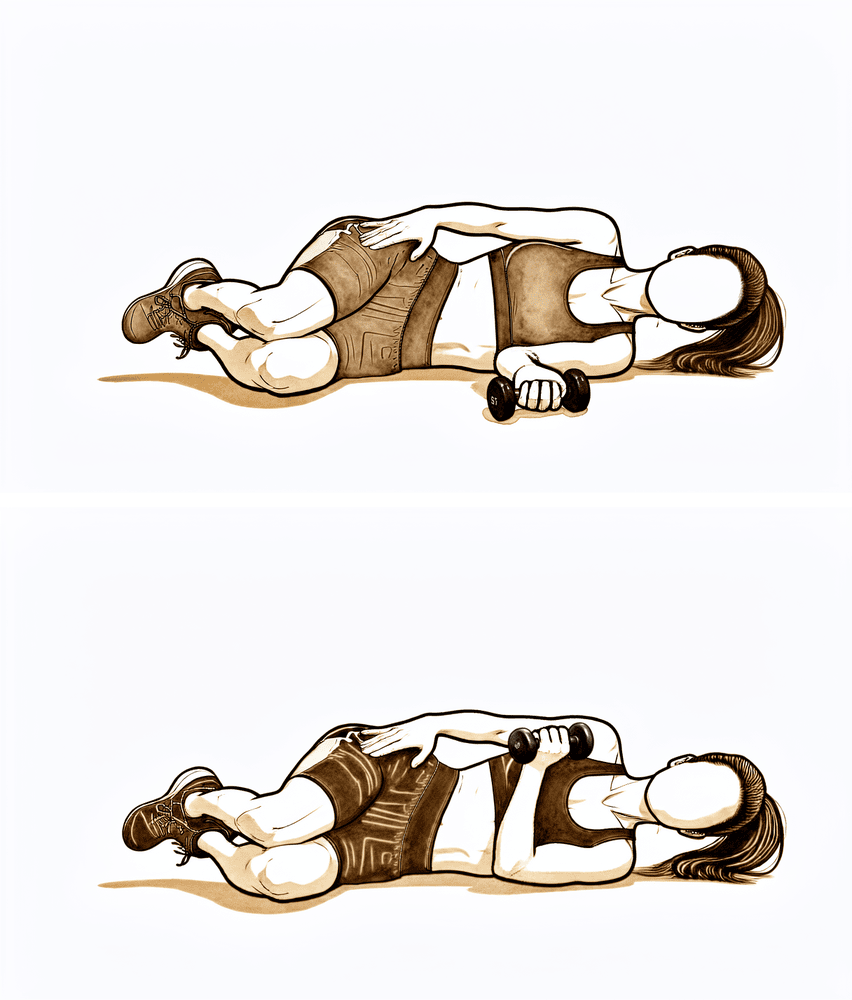
Resisted internal rotation
Lie on the operated side with a light weight in the hand and the elbow bent at your side. Lift the weight by rotating the forearm up towards your body, then lower slowly. This strengthens the inward rotators of the cuff — keep the load light to begin with.
As guided by your physiotherapist — low load, high repetitions
Kieran Hirpara 4.0
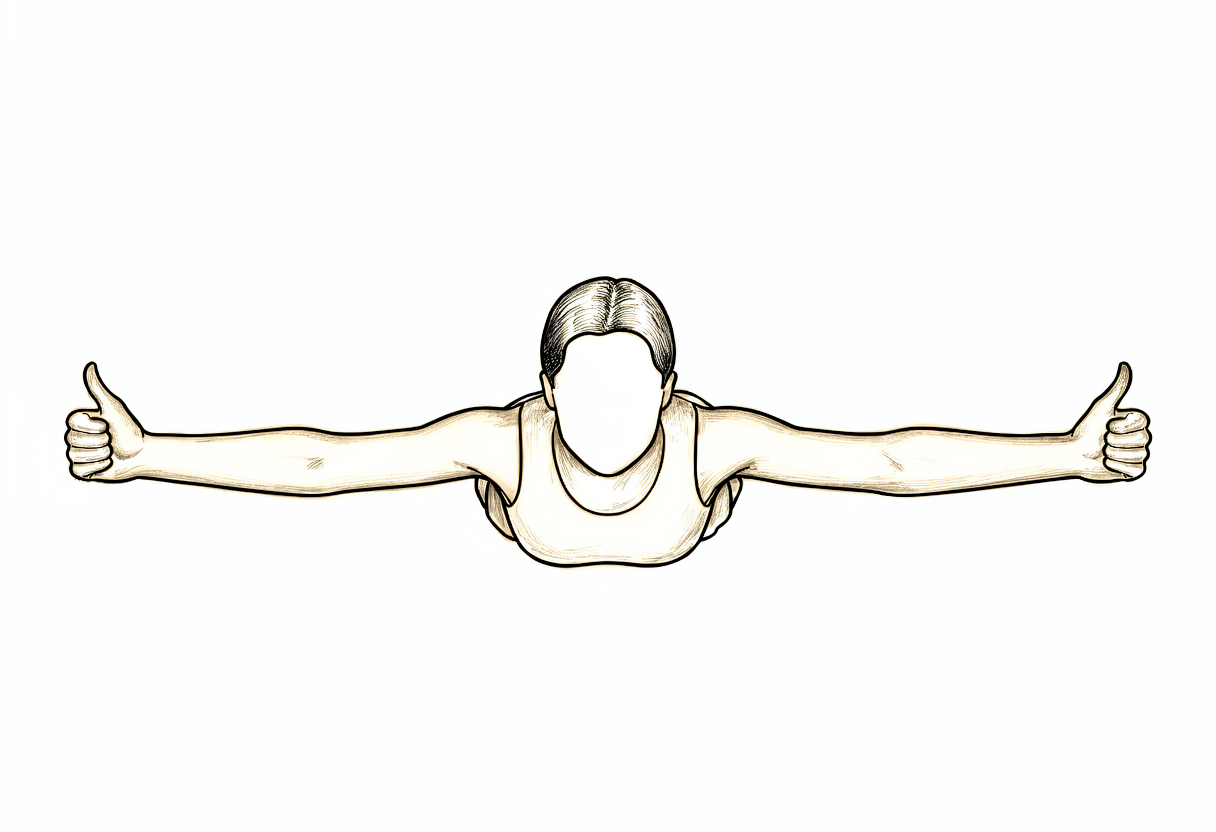
Prone T raise
Lie face down with your arms hanging over the edge. Raise the operated arm out to the side to shoulder height, squeezing the shoulder blade, so the arms form a T, then lower slowly. Part of the shoulder-blade program — control matters more than weight.
As guided by your physiotherapist
Kieran Hirpara 4.0
Prone W raise
Lie face down and draw the elbows back and down towards your waist, bending them so the arms form a W, squeezing the shoulder blades together, then lower slowly. This trains the lower shoulder-blade muscles that support good posture.
As guided by your physiotherapist
Kieran Hirpara 4.0
Low row
With the arm at your side, press down and back against a band or surface, drawing the shoulder blade down and in, then release. This is part of the scapular program, building control low around the shoulder blade.
As guided by your physiotherapist
Kieran Hirpara 4.0
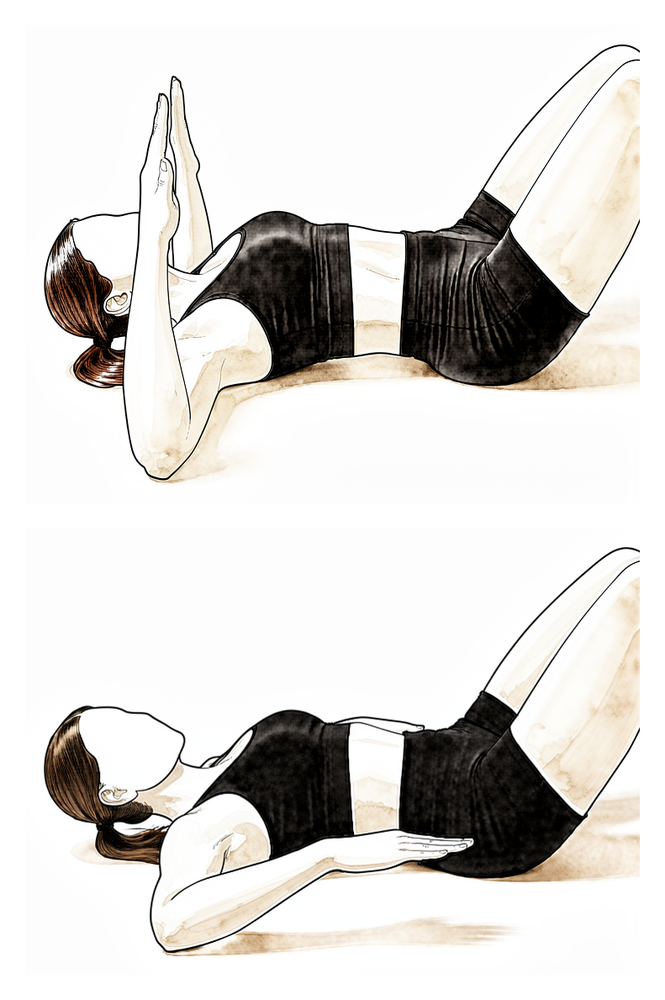
Serratus punch
Lie on your back and reach the operated arm straight up towards the ceiling. Punch upwards a little further so the shoulder blade lifts off the floor, then lower it back. This trains the serratus muscle that holds the shoulder blade against the ribs.
As guided by your physiotherapist

Kieran Hirpara 4.0
Diagonal band pattern (D1)
Using an elastic band, draw the arm on a diagonal from across the front of your body up and out away from you, then return with control. These diagonal patterns rebuild coordinated, functional shoulder strength.
As guided by your physiotherapist
Kieran Hirpara 4.0
Diagonal band pattern (D2)
Using an elastic band, sweep the arm on a diagonal from low across your body up and outwards overhead, then control it back down. A second diagonal pattern that builds strength through fuller, sport-like ranges.
As guided by your physiotherapist
Kieran Hirpara 4.0
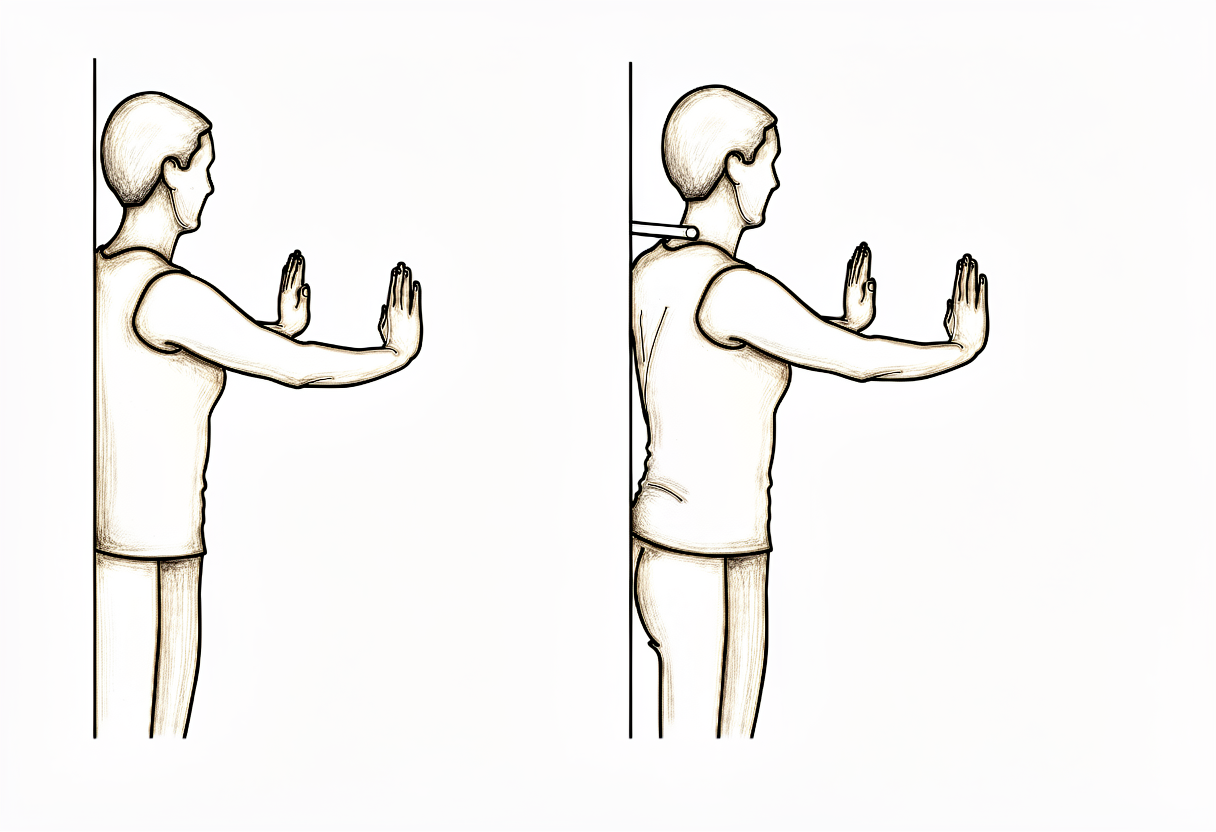
Wall push-up plus
Stand with both hands on a wall at shoulder height. Keeping the elbows straight, push the chest away from the wall so the shoulder blades round forward, then relax back. This is the start of the push-up plus progression — wall, then counter, then knees, then floor, as guided.
As guided by your physiotherapist
Kieran Hirpara 4.0
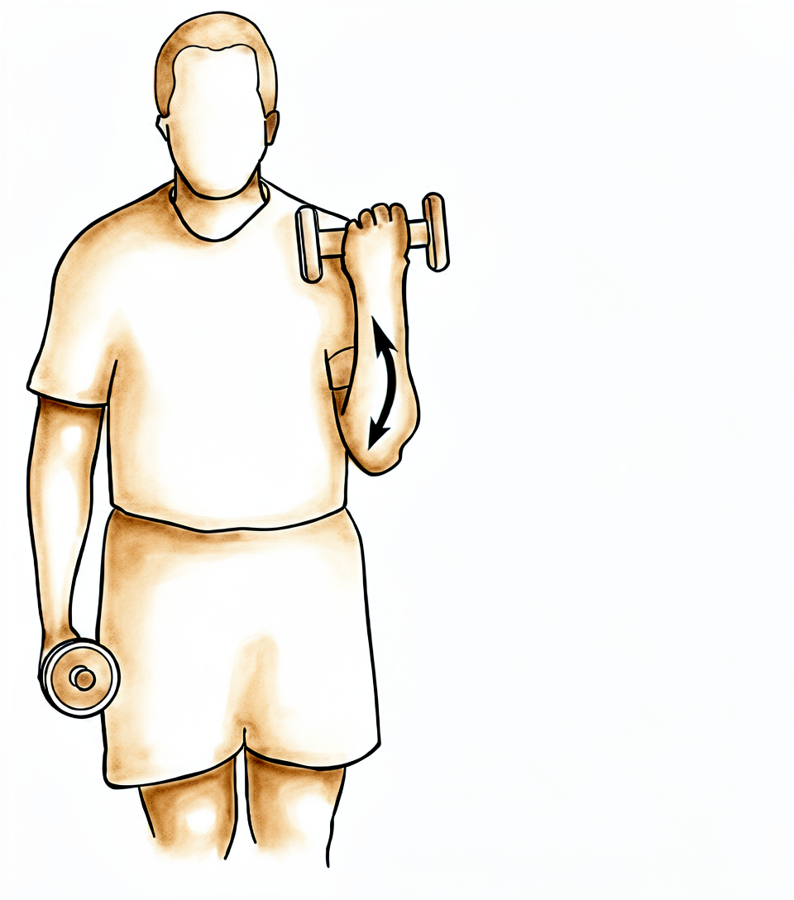
Biceps curl
Not before week 10. With a light weight in the hand and the elbow at your side, bend the elbow to lift the weight, then lower slowly. Resisted palm-up rotation is added the same way. Start light and progress slowly — this is deliberately the last exercise to load the healing tendon.
From week 10 — low load, high repetitions
Kieran Hirpara 4.0
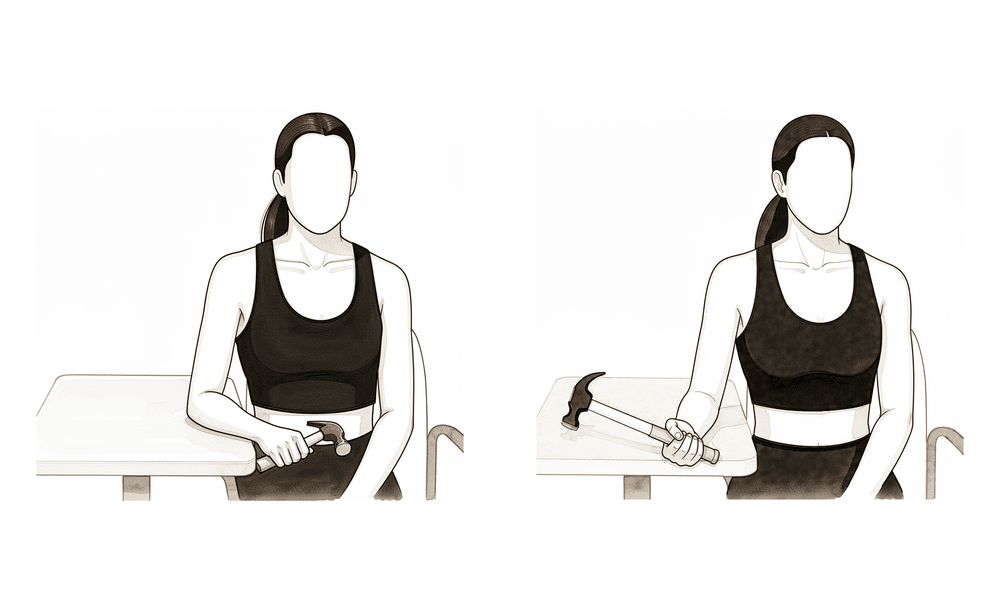
Resisted forearm rotation
Not before week 10. Rest the forearm on a table with the hand off the edge, holding a light weight. Slowly turn the palm up, then turn it down, keeping the movement controlled. Turning the palm up works the biceps directly, so this waits with the curls — start light and build gradually.
From week 10 — low load, high repetitions

Kieran Hirpara 4.0
External rotation at 90/90 (band)
With the arm out to the side at shoulder height and the elbow bent to a right angle, rotate the forearm back and up against a light band or weight, then lower slowly. Builds rotator-cuff strength in the raised (throwing) position.
2 to 3 sets of 10 to 15, low resistance
Kieran Hirpara 4.0
Internal rotation at 90/90 (band)
From the same position with the arm out to the side at shoulder height, rotate the forearm forwards and down towards your feet against a light band or weight, then return with control.
2 to 3 sets of 10 to 15, low resistance
Kieran Hirpara 4.0
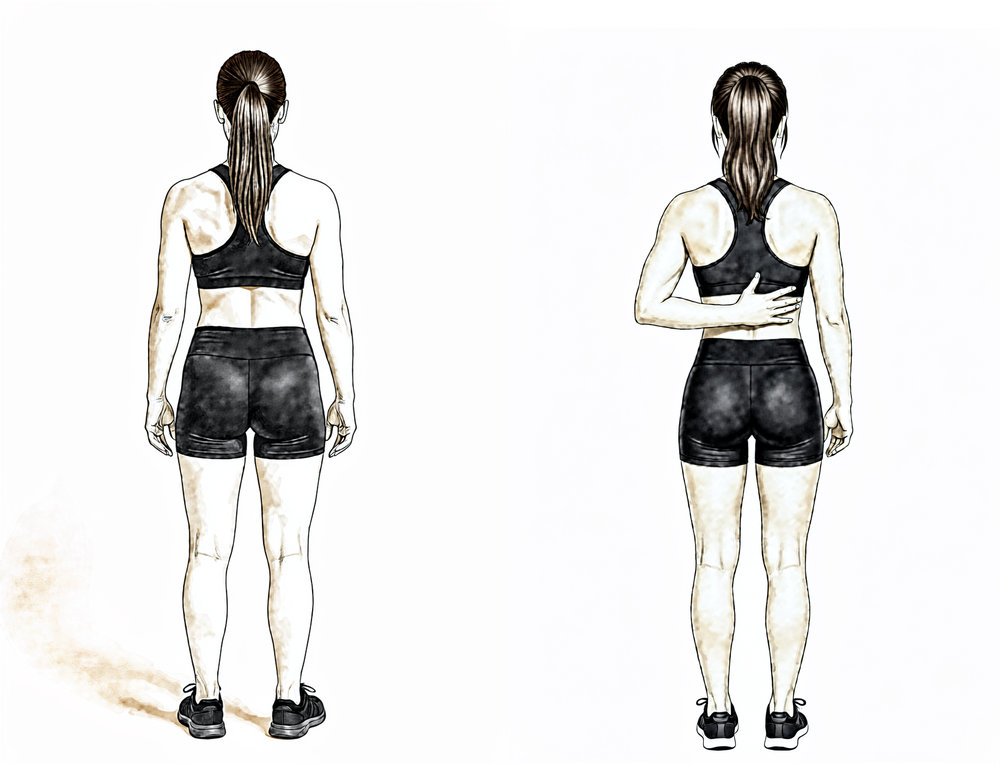
Hand-behind-back reach
Standing, place the back of your operated hand against your lower back and gently slide it up your spine as far as is comfortable using your own muscles, then lower. Move only within a comfortable range and never force it.
As guided by your physiotherapist
Kieran Hirpara 4.0
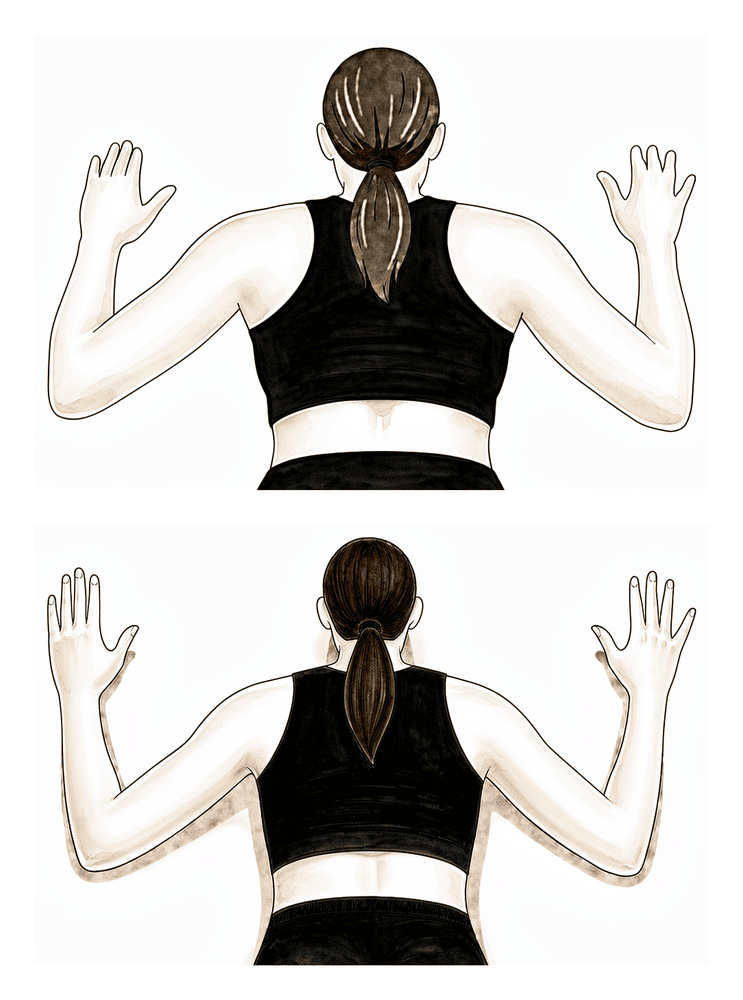
Prone Y (lower shoulder blade)
Lie face down with your operated arm reaching overhead and out at about 45° to form a Y, thumb pointing up. Lift the arm a small way off the surface by drawing the shoulder blade down and back, then lower slowly. Keep it light — this targets the lower shoulder-blade muscles.
As guided by your physiotherapist — light, high repetitions
Kieran Hirpara 4.0
Prone row
Lie face down with the operated arm hanging down towards the floor. Draw your elbow up towards the ceiling, squeezing the shoulder blade in towards your spine, then lower slowly. Start with no weight and keep the movement controlled.
As guided by your physiotherapist
Strengthening starts gently and works from the shoulder blade outwards: rotator cuff and scapular muscles first, with elastic bands and light weights at low load and high repetitions. Resisted biceps work — curls and resisted palm-up rotation — waits until week 10, then starts light and progresses slowly. Published protocols introduce it anywhere between week 6 and week 10; this protocol follows the more protective end of that range to give the tenodesis fixation the longest run before it is loaded. Normal daily activities should be largely back to usual through this phase, and from around week 8 you can typically return to running, cycling and golf, as guided by your physiotherapist.
For your physiotherapist:
Goals
- Normalise strength, endurance and neuromuscular control
- Restore function from waist level through chest level towards overhead
Management
- Maintain full shoulder and elbow range of motion throughout
- Isotonic rotator cuff strengthening: internal and external rotation with light resistance, from neutral progressing towards 90 degrees of abduction
- Scapular program: prone series progressing through the phase; resisted serratus punch, low row, push-up plus progression (wall, counter, knees, floor)
- Resisted biceps curls, supination and pronation from week 10 — short lever first, low load, high repetitions, progressed cautiously
- Rhythmic stabilisation and diagonal (D1/D2) patterns; closed-chain stabilisation work
- Return to running, cycling and golf from around week 8, with proper mechanics
Precautions
- Avoid long-lever resisted elbow flexion and supination early in the phase
- No heavy lifting or carrying until strength has recovered
- No swimming or throwing in this phase
- Strengthening waits until range of motion is close to full, and stays pain-free
Criteria to progress
- Full, pain-free active range of motion with normal scapulohumeral rhythm
- 5/5 rotator cuff strength at 90 degrees of abduction in the scapular plane, and 5/5 scapulothoracic strength
- Strengthening tolerated without flare-up of symptoms
Phase IV — Return to full activity (Week 12 onwards)
The final phase is a graduated return to heavier work, overhead activity and sport. Most people are cleared for the gym, manual work and recreational sport between three and four months, building loads progressively; overhead and contact athletes — throwing, swimming, racquet sports — are staged back over a longer run, often four to five months or more. The biceps keeps gaining strength and confidence for months after that, so progress in this phase is judged on what the arm can do, not the date.
For your physiotherapist:
Goals
- Full strength and power without compensatory movement patterns
- Stability and control with higher-velocity and sport-specific movements
- Return to normal sport and work activities
Management
- Multi-joint and compound strengthening, progressing load steadily
- Plyometric training starting below shoulder height with both arms, progressing to single-arm and overhead
- Interval return-to-sport programs for throwing, swimming or racquet sports as relevant
- Address core and hip strength and control so the shoulder is not compensating
Precautions
- Progress exercises that stress the anterior shoulder (for example bench press, upright row) slowly
- Return to sport follows clearance, with roughly 90% strength compared with the other arm and pain-free control of high-velocity, sport-specific movements
After your protocol
The phases above are adapted from published rehabilitation protocols for isolated biceps tenodesis — Massachusetts General Brigham Sports Medicine, the University of Virginia Department of Orthopaedic Surgery, The Ohio State University Wexner Medical Center and UW Health (University of Wisconsin). The week ranges are typical rather than fixed, and your ongoing rehabilitation is guided individually by your physiotherapist, working with the practice, based on how your arm recovers. This page works alongside the practice's general recovery advice — see managing post-operative pain and wound care. For the operation itself, see biceps tenodesis. The evidence behind this protocol — fixation and healing, the tenodesis-versus-tenotomy decision, complication and failure rates, and how the rehab pace is chosen — is summarised in the evidence section, available as a PDF from the top of this page.
Evidence & references
Biceps Tenodesis — Post-operative Rehabilitation Evidence Summary
Topic scope: the evidence behind post-operative rehabilitation after isolated biceps tenodesis (re-anchoring the long head of biceps to the humerus) — fixation methods and their healing implications, when to protect versus load the construct (active elbow flexion and resisted supination), shoulder ROM restrictions, return-to-activity timing, and the failure/complication profile (Popeye deformity, fixation failure). The combined cuff-repair pathway defers to the rotator-cuff-repair protocol and is out of scope here.
Defining principle of the surgical rehab here: a tenodesis is a healing construct that must be protected — the tendon has been detached from its native anchor and fixed into bone, and that bone–tendon interface needs weeks to heal. Because the biceps bends the elbow and turns the palm up (supination), the early restrictions are unusually centred on the elbow, not the shoulder: active elbow flexion and resisted supination are the loads that pull directly on the fresh tenodesis, so they are deferred while the construct heals. The shoulder itself is generally less restricted — only positions that tension the tendon (external rotation past ~40°, extension/horizontal abduction behind the body) are limited early. This is the inverse of a rotator-cuff or labral repair, where the shoulder is the protected structure.
A. THE PROCEDURE & WHY THE REHAB IS SHAPED THIS WAY
In a biceps tenodesis the long head of biceps is released from its origin on the superior glenoid/labrum and re-fixed into the proximal humerus, most commonly with an interference screw, a suture anchor, or a cortical/unicortical button (or combinations). The location is either suprapectoral (higher, usually all-arthroscopic, in or above the bicipital groove) or subpectoral (lower, usually open, below the pectoralis major tendon). Both achieve the same goal — remove the painful intra-articular biceps as a pain generator while preserving the muscle's length-tension relationship to avoid a Popeye deformity and cramping.
The rehab is built around the time for the tendon to incorporate into the bone tunnel/socket. The biceps' two actions — elbow flexion and forearm supination — are precisely the movements that load the tenodesis, so resisted/active use of these is staged in last. Shoulder motion is restored earlier because most shoulder positions do not pull hard on the construct.
B. EVIDENCE BY THEME
1. Tenodesis vs tenotomy — the decision upstream of rehab
Tenotomy (simply releasing the tendon) and tenodesis give broadly equivalent pain relief and function, but tenodesis trades a slightly more demanding recovery for a lower rate of Popeye deformity and cramping/fatigue, particularly relevant in younger, leaner and more active patients. A prospective double-blinded RCT and multiple reviews support this trade-off [Castricini RCT; Frost/Hackney review; Slenker review]. Moderate–strong (RCT + SR). This is why a tenodesis — and therefore a protected construct needing staged rehab — is chosen in the first place.
2. Fixation strength and what it permits
Interference screws and suture anchors both provide clinically adequate fixation; biomechanical load-to-failure figures vary between studies and clinical outcomes do not differ meaningfully by fixation type [biomechanical cadaver series; clinical comparisons]. The practical point for rehab: the construct is strong at time zero but the biological bond to bone is what is healing over the first 6–12 weeks — which is why loaded elbow flexion is deferred regardless of the hardware used. Moderate (biomechanical + clinical cohorts).
3. Does the rehab pace actually need to be slow? — the key controversy
The traditional protocol protects the elbow for ~6 weeks before active flexion and reserves resisted biceps work for ~10–12 weeks. However, Mazzocca et al. challenged this: in 105 open subpectoral tenodeses (dual-fixation button + interference screw) rehabilitated with immediate, unrestricted motion and no postoperative restrictions, the failure rate was only 2.2% (2 of 98) at minimum 2-year follow-up, with excellent ASES/DASH scores. Both failures occurred early (5 and 9 weeks). The conclusion: with a robust dual-fixation construct, early mobilisation is reasonable and may improve outcomes [Mazzocca, JSES 2018, DOI 10.1016/j.jse.2018.02.061]. A subsequent comparison of early versus delayed active ROM reached similar reassurance [PMID 34458384]. Moderate (single-arm cohort + comparative). This protocol nonetheless follows the more protective published pace — it is the safer default across mixed fixation methods and does not assume a dual-fixation construct.
4. Complications and failure rates — what rehab is protecting against
A review of 1,526 shoulders found a low overall complication rate: persistent anterior shoulder pain ~11–13%, Popeye deformity ~4.6–4.7%, with no meaningful difference by fixation type or location; reported fixation failure/re-rupture is ~0.8% [Nho/Virk review, DOI 10.1016/j.jse.2018.09.005]. The small early-failure window (the Mazzocca failures at 5 and 9 weeks) is exactly the period the protective phases cover. Moderate (large pooled review).
5. Suprapectoral vs subpectoral — does it change rehab?
A systematic review and meta-analysis of arthroscopic suprapectoral versus open subpectoral tenodesis found comparable clinical outcomes and complication profiles [DOI 10.1177/2325967120945322]. The rehabilitation pathway is therefore the same for both techniques — this protocol covers arthroscopic and open subpectoral alike. Moderate (SR-MA).
C. PHASED POST-OP TIMELINE (isolated tenodesis)
Consistent with the synthesis protocol. The hallmark is protect the elbow (no active flexion / no resisted supination) while keeping the hand, wrist, scapula and most of the shoulder moving.
| Phase | Window | Sling | ROM | Strengthening | Notes |
|---|---|---|---|---|---|
| I — Protecting the tenodesis | Week 0–4 | Yes, incl. at night; wean from ~wk 3 | Passive elbow flexion/extension + forearm rotation; active hand/wrist; gentle shoulder PROM/AAROM — flexion/scaption to ~90°, ER to 40°, IR to ~45°; pendulums | None (biceps stays unloaded) | No active elbow flexion, no resisted supination; no shoulder extension / horizontal abduction past neutral; no lifting/carrying. No driving while in the sling. |
| II — Active movement | Week 4–6 | Off | Progress shoulder AAROM → AROM all planes; active (unloaded) elbow flexion/extension + supination/pronation begins | Submaximal shoulder isometrics | Biceps moving but not working — keep lifting minimal (≤ a cup of tea). Driving once out of sling and able to control the car safely. |
| III — Strengthening | Week 6–12 | Off | Maintain full ROM | Cuff + scapular strengthening from wk 6; resisted biceps curls / resisted supination from ~week 10 | Resisted biceps deliberately last; published protocols introduce it wk 6–10, this protocol uses the protective end. Running/cycling/golf from ~wk 8. |
| IV — Return to full activity | Week 12+ | Off | Full | Progressive load, power, sport-specific | Gym/manual work/recreational sport ~3–4 months; overhead/throwing/contact staged over ~4–5 months+. |
Branch point — combined cuff repair: if a rotator cuff repair was performed at the same time, the rotator-cuff-repair protocol takes priority (sling ~6 weeks, ROM restrictions, slower strengthening, ~5 months total). The surgeon confirms post-operatively which pathway applies.
D. KEY CONTROVERSIES / EVIDENCE QUALITY
- How fast is safe? The strongest single piece of rehab-specific evidence (Mazzocca 2018) suggests immediate unrestricted motion is safe with a robust dual-fixation construct (2.2% failure). But this is a single-arm cohort with one specific construct; it does not license fast rehab across all fixation methods. The protective default remains the prudent generalisation. Moderate.
- Tenodesis vs tenotomy is well studied (RCT + SRs) and favours tenodesis for cosmesis/cramping — but this is the indication decision, not a rehab-timing trial. Moderate–strong.
- The rehab protocol timings themselves are consensus/expert, drawn from published academic physiotherapy guidelines (MGH Brigham, UVA, Ohio State, UW Health) rather than head-to-head rehab RCTs. Week ranges are typical, not trial-derived. Weak/consensus.
- Resisted-biceps start week varies (6–10) across published protocols; the choice of week 10 here is a deliberate protective bias, not a trial-supported threshold. Weak/consensus.
E. EVIDENCE-STRENGTH FLAGS (summary)
- MODERATE–STRONG (RCT / SR-MA): tenodesis vs tenotomy equivalence with lower Popeye/cramping after tenodesis; suprapectoral vs subpectoral outcome equivalence (SR-MA).
- MODERATE (cohorts / large pooled review): immediate-unrestricted-motion safety with dual fixation (Mazzocca, 2.2% failure); low overall complication profile (1,526-shoulder review — Popeye ~4.6%, fixation failure ~0.8%); fixation-type clinical equivalence.
- WEAK / CONSENSUS: the post-operative rehabilitation protocol itself (academic PT guidelines, no defining rehab RCT); the specific week-10 resisted-biceps threshold.
CITATIONS
RAG corpus (180,000+ Orthopaedic articles)
- Mazzocca AD, et al. Immediate physical therapy without postoperative restrictions following open subpectoral biceps tenodesis: low failure rates and improved outcomes at a minimum 2-year follow-up. J Shoulder Elbow Surg. 2018. DOI: 10.1016/j.jse.2018.02.061
- Complications of biceps tenodesis based on location, fixation, and indication: a review of 1526 shoulders. J Shoulder Elbow Surg. 2019. DOI: 10.1016/j.jse.2018.09.005
- Biceps tenotomy versus tenodesis: a review of clinical outcomes and biomechanical results. J Shoulder Elbow Surg. 2011. DOI: 10.1016/j.jse.2010.08.019
- Biceps Tenodesis Versus Tenotomy in the Treatment of Lesions of the Long Head of the Biceps Tendon in Patients Undergoing Arthroscopic Shoulder Surgery: A Prospective Double-Blinded Randomized Controlled Trial. Am J Sports Med. 2020. DOI: 10.1177/0363546520912212
- Outcomes and Complications After Primary Arthroscopic Suprapectoral Versus Open Subpectoral Biceps Tenodesis for SLAP Tears or Biceps Abnormalities: A Systematic Review and Meta-analysis. Orthop J Sports Med. 2020. DOI: 10.1177/2325967120945322
- Arthroscopic Proximal Biceps Tenodesis at the Articular Margin: Evaluation of Outcomes, Complications, and Revision Rate. Arthroscopy. 2014. DOI: 10.1016/j.arthro.2014.08.024
- Clinical and Biomechanical Evaluation of an All-Arthroscopic Suprapectoral Biceps Tenodesis. Orthop J Sports Med. 2014. DOI: 10.1177/2325967114553558
- All-Arthroscopic Suprapectoral Versus Open Subpectoral Tenodesis of the Long Head of the Biceps Brachii Without the Use of Interference Screws. Arthroscopy. 2016. DOI: 10.1016/j.arthro.2016.07.007
Literature (URLs)
- Early Versus Delayed Active Range of Motion After Open Subpectoral Biceps Tenodesis. PubMed. https://pubmed.ncbi.nlm.nih.gov/34458384/
- Complications of biceps tenodesis based on location, fixation, and indication: a review of 1526 shoulders. PubMed. https://pubmed.ncbi.nlm.nih.gov/30573431/
- Mazzocca — immediate PT without restrictions (minimum 2-year follow-up). PubMed. https://pubmed.ncbi.nlm.nih.gov/29804912/
- Interference Screw vs. Suture Anchor Fixation for Open Subpectoral Biceps Tenodesis: Does it Matter? PMC. https://www.ncbi.nlm.nih.gov/pmc/articles/PMC2553411/
Published rehab protocols (patient-guidance — basis for the phase structure)
- Massachusetts General Brigham Sports Medicine. Rehabilitation Guidelines for Biceps Tenodesis. https://www.massgeneral.org/assets/MGH/pdf/orthopaedics/sports-medicine/physical-therapy/rehabilitation-protocol-for-biceps-tenodesis.pdf
- UVA Department of Orthopaedic Surgery, University of Virginia. Isolated Biceps Tenodesis Post-operative Rehabilitation Protocol. https://med.virginia.edu/orthopaedic-surgery/wp-content/uploads/sites/242/2021/06/Isolated-Biceps-Tenodesis.pdf
- The Ohio State University Wexner Medical Center. Biceps Tenodesis Clinical Practice Guideline. https://medicine.osu.edu/-/media/files/medicine/departments/sports-medicine/medical-professionals/shoulder-and-elbow/bicep-tenodesis-2020.pdf
- UW Health Sports Medicine, University of Wisconsin. Rehabilitation Guidelines for Biceps Tenodesis. https://bynder.uwhealth.org/m/8a7c2438102f495f/original/Rehab-Guideline-Biceps-Tenodesis.pdf