Posterior Stabilisation Info Evidence
Last reviewed
Rehabilitation protocol after posterior shoulder stabilisation, with posterior-specific precautions and return-to-sport criteria.
This protocol guides your recovery after posterior stabilisation of the shoulder with Dr Kieran Hirpara at Mater Private Hospital Rockhampton. Each phase below opens with a plain-English explanation of what is happening and what matters most, followed by the structured programme you can share with your physiotherapist — bring this page or its PDF to your first physiotherapy visit so your rehabilitation stays coordinated. Your physiotherapist may adjust the plan depending on how your recovery progresses.
If you have any concerns about your wound after surgery, get in touch with the rooms. It is often helpful to take a photo of the wound and email it for review.
What to expect
Posterior stabilisation repairs the back (posterior) part of the shoulder, where the lip of cartilage (labrum) and the capsule have torn away from the socket. Because the repair sits at the back of the joint, the movement that loads it most is reaching forwards while turning the arm inwards — and three everyday movements are protected early on, because each one pushes the ball of the joint backwards against the fresh repair:
- turning the arm inwards (internal rotation) — such as reaching behind your back, or turning your hand in towards and across your stomach;
- reaching across your body towards the opposite shoulder (cross-body adduction);
- leaning or pushing through the operated arm.
This is the mirror image of an anterior (front) stabilisation, where it is turning the arm outwards that has to be protected. For a posterior repair the safe direction is actually turning the arm outwards, and it is inward rotation that is restored last — gently, and not at full range until about three months. The phases below set out exactly when each protected movement can return.
There is always a temptation to push movement early, but the evidence shows that any extra range gained from rushing is temporary, and the repair is at its weakest in the first six weeks. A steady, staged programme gives the safest and most predictable return to full function. Posterior instability is uncommon, so this timeline is built on biomechanical reasoning and published fellowship protocols rather than large trials — Dr Hirpara will tailor the pace to you.
You will wear a simple sling — not a special abduction or "gunslinger" brace. Protection comes from the positional precautions above (keeping the arm in front and avoiding inward rotation and reaching across), not from the shape of the sling.
The journey at a glance:
- Phase I — Protect, weeks 0–2
- Phase II — Early movement, weeks 2–4
- Phase III — Increase movement and begin strengthening, weeks 4–6
- Phase IV — Advance, weeks 6–8
- Phase V — Strengthen, weeks 8–12
- Phase VI — Full range and weight training, weeks 12–14
- Returning to sport — from week 12, with contact sport not before 5 months
Returning to your activities:
- Work — sedentary job: as tolerated; manual job: at least 3 months
- Driving — once out of the sling and in control of the arm, usually around 6 weeks
- Lifting — light lifting can begin in the early weeks within limits; avoid heavier lifting for about 3 months
- Contact sport (football, rugby, martial arts, racket sports, rock climbing, horse riding) — from 5 months at the earliest, and only once the return-to-sport criteria are met
The procedure
Your posterior stabilisation is usually done arthroscopically (keyhole), or occasionally through a small open incision. The torn labrum and capsule at the back of the shoulder are re-attached and tightened onto the rim of the socket (sometimes called a reverse Bankart repair or a posterior capsulorrhaphy). The job of rehabilitation is to keep the ball of the joint off that repair while it heals — by limiting forward, inward and across-the-body movements early — then to rebuild full movement, strength and function in stages.
Wearing your sling
Your sling supports the arm and is a reminder to keep it in the safe position while the repair heals. The rules are simple:
- Wear a simple sling for about 6 weeks, especially when you are out of the house or around other people. Dr Hirpara does not use an abduction pillow, wedge or gunslinger brace — a simple sling plus the positional precautions below is what protects a posterior repair.
- You do not sleep in the sling. Sleep out of it — but keep your arm out of the at-risk position while you sleep: rest it slightly out in front of you, not turned inwards or tucked across your body. A pillow under the arm helps hold it there.
- Take the sling off for showering and for your exercises (once you have been shown how). Whenever the sling is off, keep your arm relaxed and in front of your body — never let it drift behind your back or across your chest.
- Use ice if the shoulder is swollen or sore, especially after exercise.
Watch your posture while you are using the sling: keep your ears, shoulders and hips in line and avoid slumping. Good posture protects your back and helps stop the shoulder stiffening.
Your physiotherapist will use three kinds of movement: passive range of motion (PROM) — your arm completely relaxed, with the other arm or the physiotherapist doing all the work; active-assisted range of motion (AAROM) — your good arm or an object helping the operated arm move; and active range of motion (AROM) — you moving the arm under its own power. Your treating team will tell you which applies at each stage.
Key precautions — do NOT
For the first six weeks especially, the following protect the repair at the back of the shoulder:
- Do NOT turn the arm inwards past the straight-ahead (neutral) position — no reaching behind your back, and no turning the hand in across your stomach. Inward rotation is the single most important movement to avoid early, and it is the last to be restored.
- Do NOT reach across your body towards the opposite shoulder (no cross-body movements).
- Do NOT combine reaching forwards with turning the arm inwards — this is the exact position that loads the repair.
- Do NOT lean on the operated arm, push up from a chair or bed with it, or bear weight through it.
- Do NOT lift, push or pull anything heavy with the operated arm early.
- Do NOT force or stretch into any of these directions — let range return gradually within your physiotherapist's limits.
- Turning the arm outwards is the safe direction after a posterior repair — but still keep within the limits your physiotherapist sets.
Your first days in hospital
Kieran Hirpara 4.0
Wrist, hand and fingers
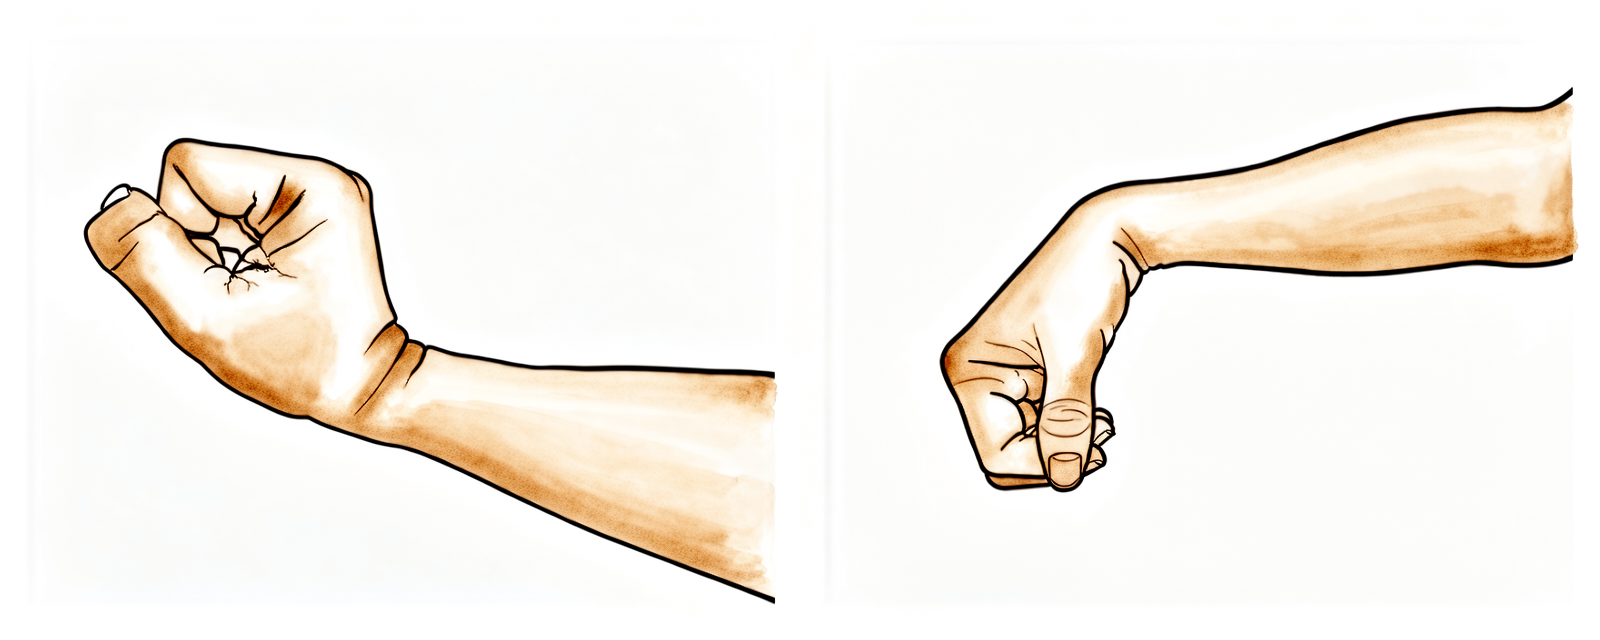
Keep your hand moving by bending your wrist forwards, backwards and side to side, and by opening and closing your fingers or squeezing a soft ball. This keeps the hand and wrist supple and helps reduce swelling — it does not load the repair.
10 times, 3 times a day
Kieran Hirpara 4.0
Elbow bends
With your upper arm kept in front of your body, gently bend and straighten your elbow. Keep your shoulder relaxed and still.
10 times, 3 times a day
Kieran Hirpara 4.0
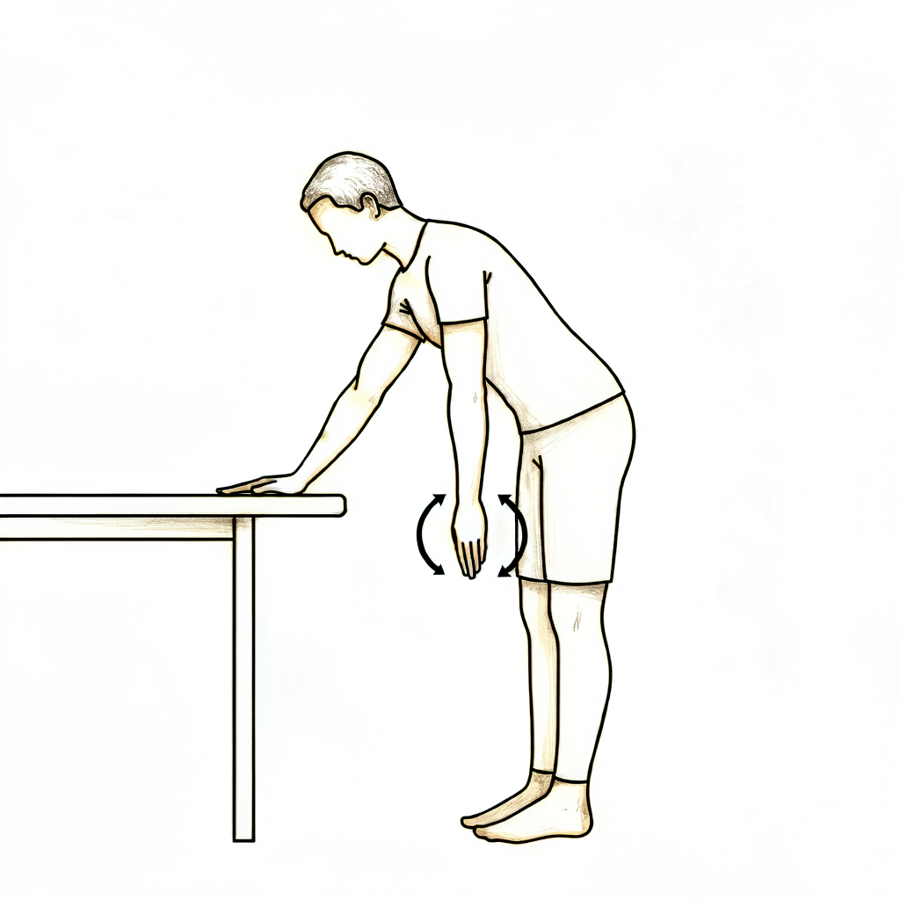
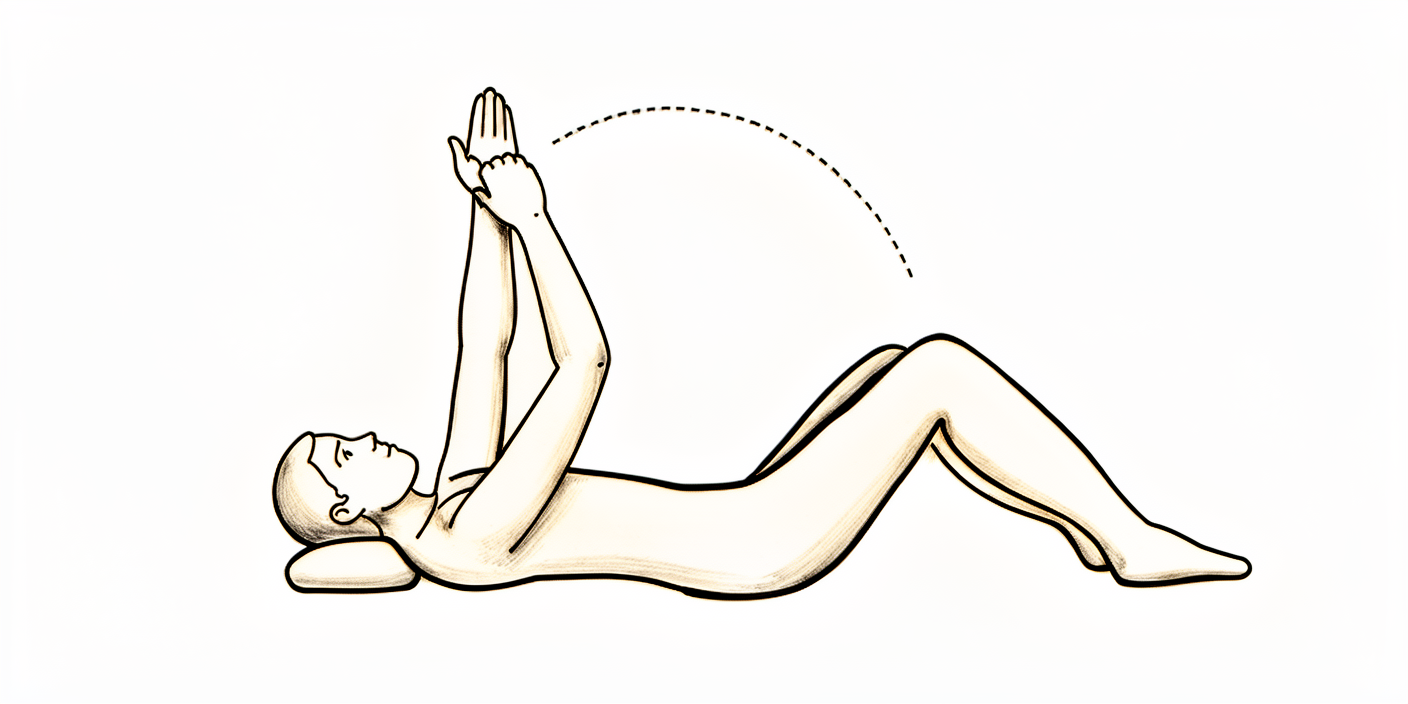
Pendulum swings
Lean forwards and let your operated arm hang down, completely relaxed. Use your body to swing the arm gently — small circles clockwise and anti-clockwise, and gently forwards/backwards and side to side. Your shoulder muscles do nothing; your body does the moving. Keep the swing small.
About 30 seconds each way, 3 times a day
A few rules for the ward and your first days at home:
- Use ice for pain relief if needed.
- When wearing your sling, relax your shoulder and let the sling take the weight of your arm — and keep the arm in front of your body.
- Take your painkillers before you do your exercises and before your physiotherapy appointments.
- You are allowed to take your arm out of the sling for your exercises and for showering.
- Wear your sling for about 6 weeks, especially when out of the house.
- Unless you have arranged your own physiotherapy, an appointment has been made for you and is in your discharge pack.
- If you have any problems, contact the office or let your physiotherapist know.
Phase I — Protect (weeks 0–2)
Kieran Hirpara 4.0
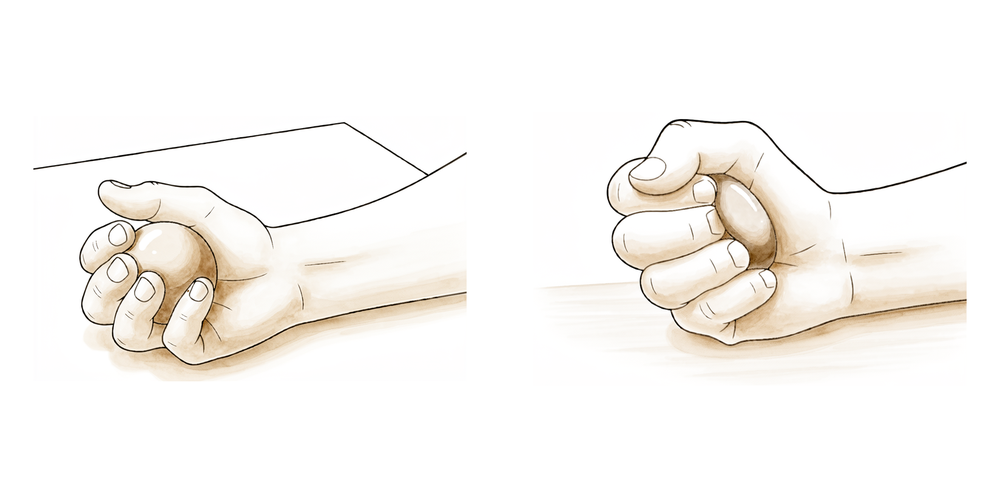
Ball squeeze
With your arm resting comfortably in front of you, squeeze a soft ball or rolled-up sock, hold briefly, then relax. This keeps your forearm and grip active without moving the shoulder.
Hold 5 seconds, 10 times, 3 times a day
Kieran Hirpara 4.0
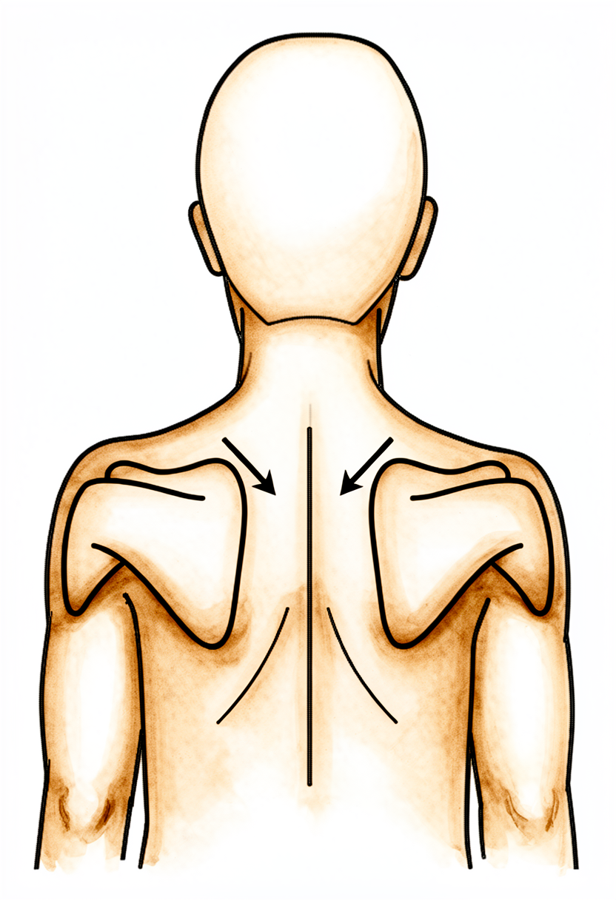
Shoulder-blade setting
Gently squeeze your shoulder blades downwards and together, hold, then relax. Your arm does not move — this is a light muscle-activation drill that steadies the shoulder blade.
Hold 5 seconds, 5 times, 3 times a day
Kieran Hirpara 4.0
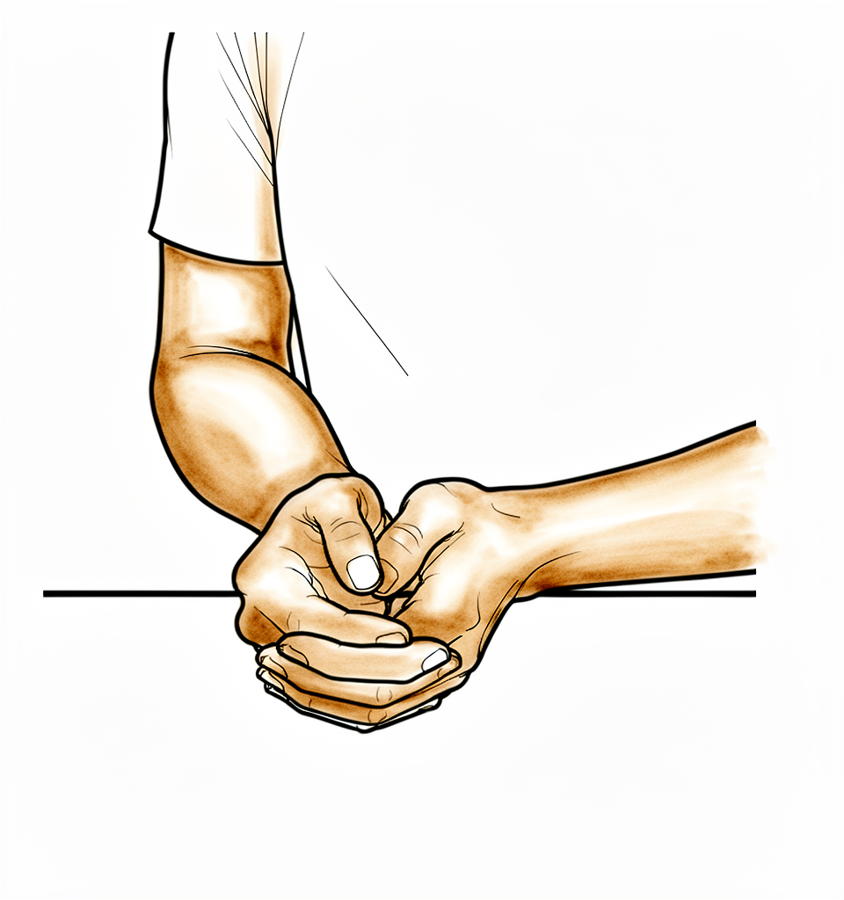
Assisted forward lift
Sit and lean forwards slightly, cradle your operated arm with your good arm, and gently help it up in front of you. Do NOT go past about halfway up (roughly 60°) in this first phase. Lower it back down with your good arm doing the work. Keep the arm in front of you the whole time and never force it.
10 times, 3 times a day, within your physiotherapist's limit
Kieran Hirpara 4.0
Assisted outward rotation (to neutral only)
Sitting, keep your elbow tucked in front of you and turn your forearm outwards only as far as pointing straight ahead. Turning outwards is SAFE after a posterior repair — but it is the inward direction you must avoid, so do NOT let the hand drift inwards across your body.
Gently, 10 times, 3 times a day
The first two weeks are about protecting the repair while staying gently mobile. You stay in the simple sling, keep the arm in front of your body, and do only gentle drills that keep your hand, wrist and elbow moving and start to "set" your shoulder blade — without loading the back of the shoulder. Two rules matter most: keep the arm in front and never turn it inwards across your body, and nothing is forced or stretched. Assisted forward movement is kept to about halfway up, and turning outwards only as far as straight-ahead.
- Sling: simple sling, daytime; sleep OUT of it but keep the arm in front, not turned inwards. Off for exercises and showering.
- Movement allowed: assisted and passive movement only. Assisted forward lift to about 60° (roughly halfway up); turning outwards only to the straight-ahead (neutral) position; no inward rotation past neutral, no reaching behind the back, no across-the-body movement.
- Exercises: pendulum swings; gentle hand, wrist and elbow movement; ball squeeze; shoulder-blade setting; assisted forward lift (to halfway); assisted outward rotation to neutral.
Ready for the next phase when: your pain is settling and well controlled; you can comfortably keep the arm in the protected position (in front, not turned inwards); your assisted forward lift reaches about halfway comfortably; your wound has healed with no concerns; and you are confidently following the posterior precautions.
Phase II — Early movement (weeks 2–4)
Kieran Hirpara 4.0
Assisted arm-out-to-the-side
Sitting and leaning forwards slightly, cradle your operated arm with your good arm and help it out to the side — like gently rocking a baby. Keep within the range your physiotherapist sets (about 90° / shoulder height) and keep the arm in front of the body, not behind.
10 times, 3 times a day
Kieran Hirpara 4.0
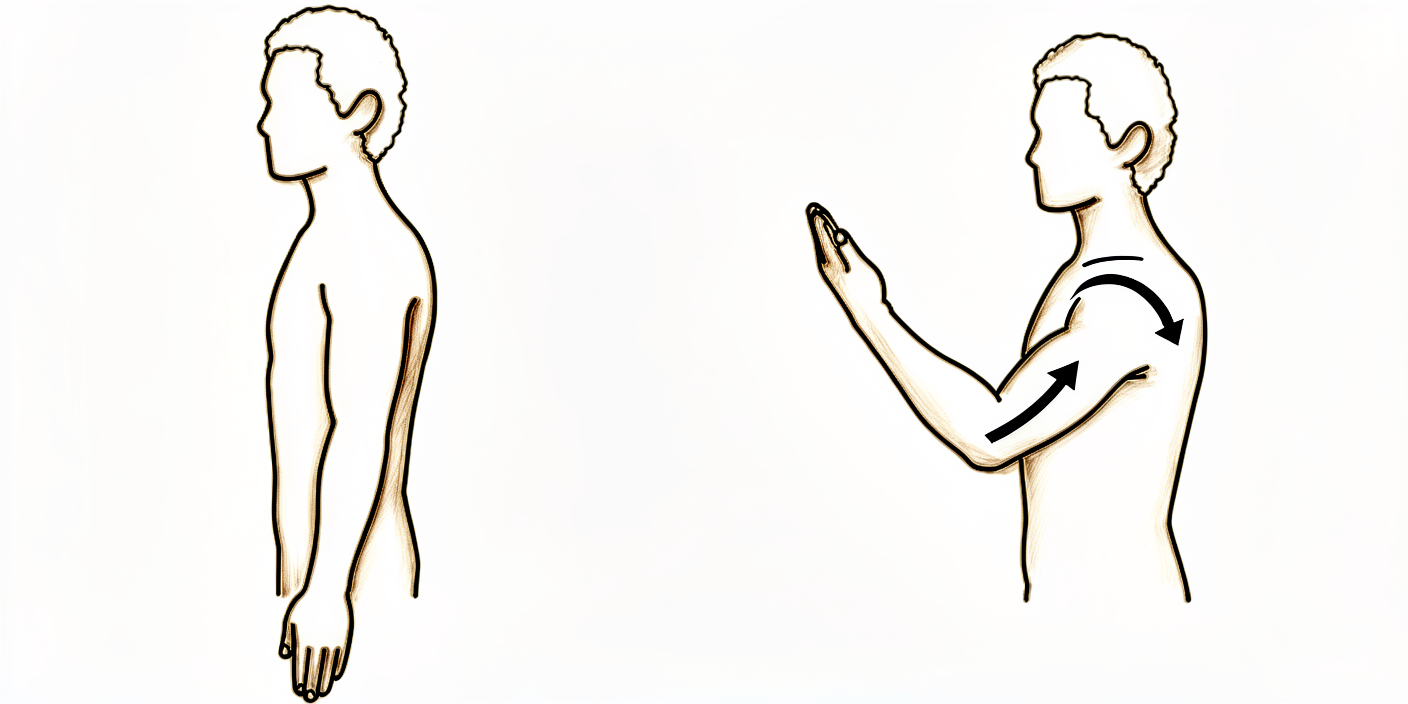
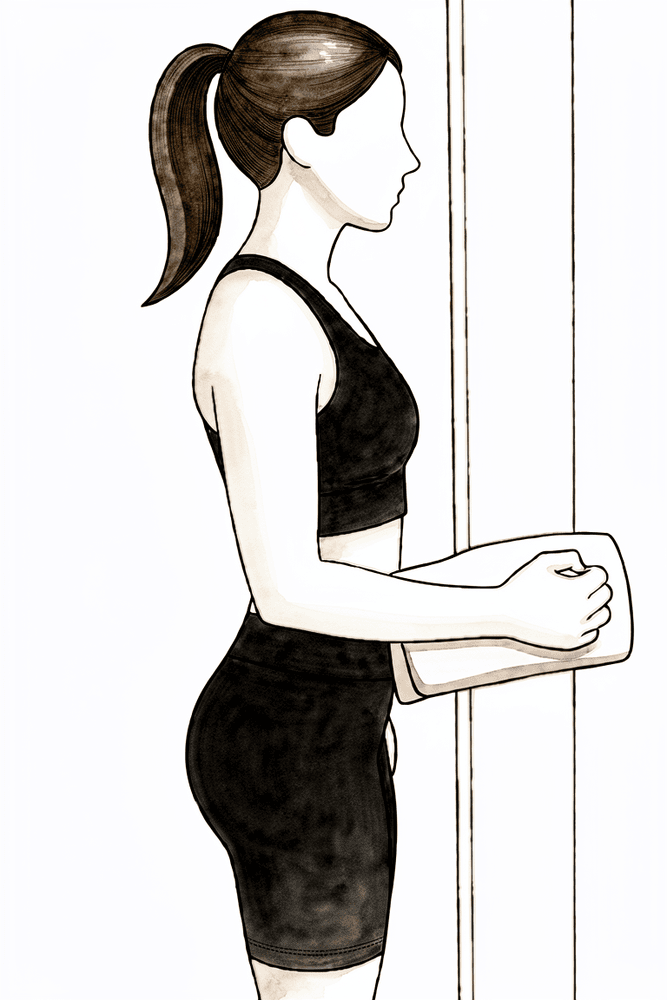
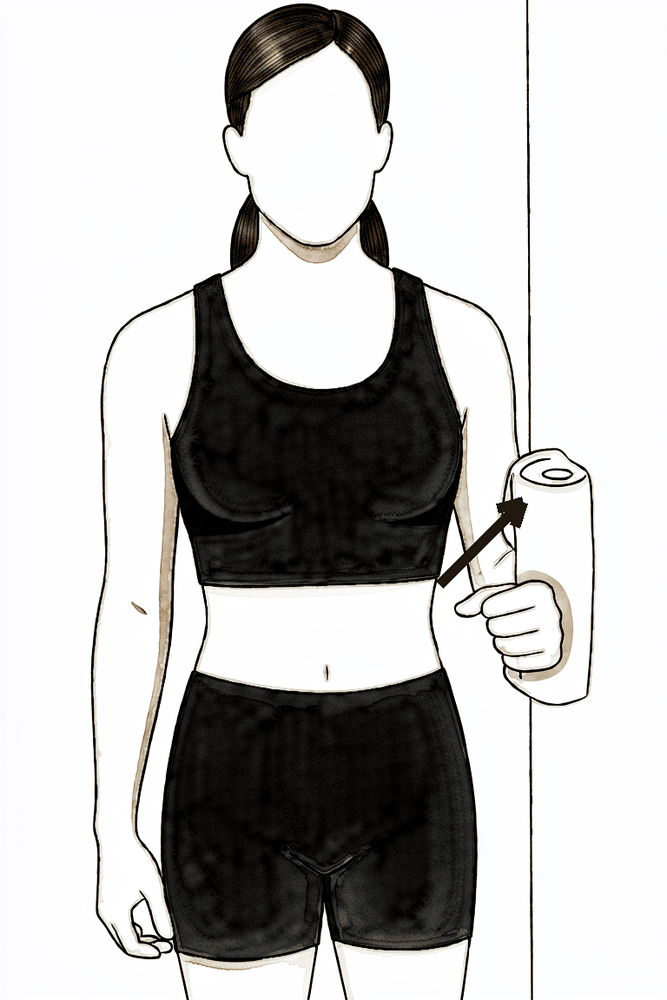
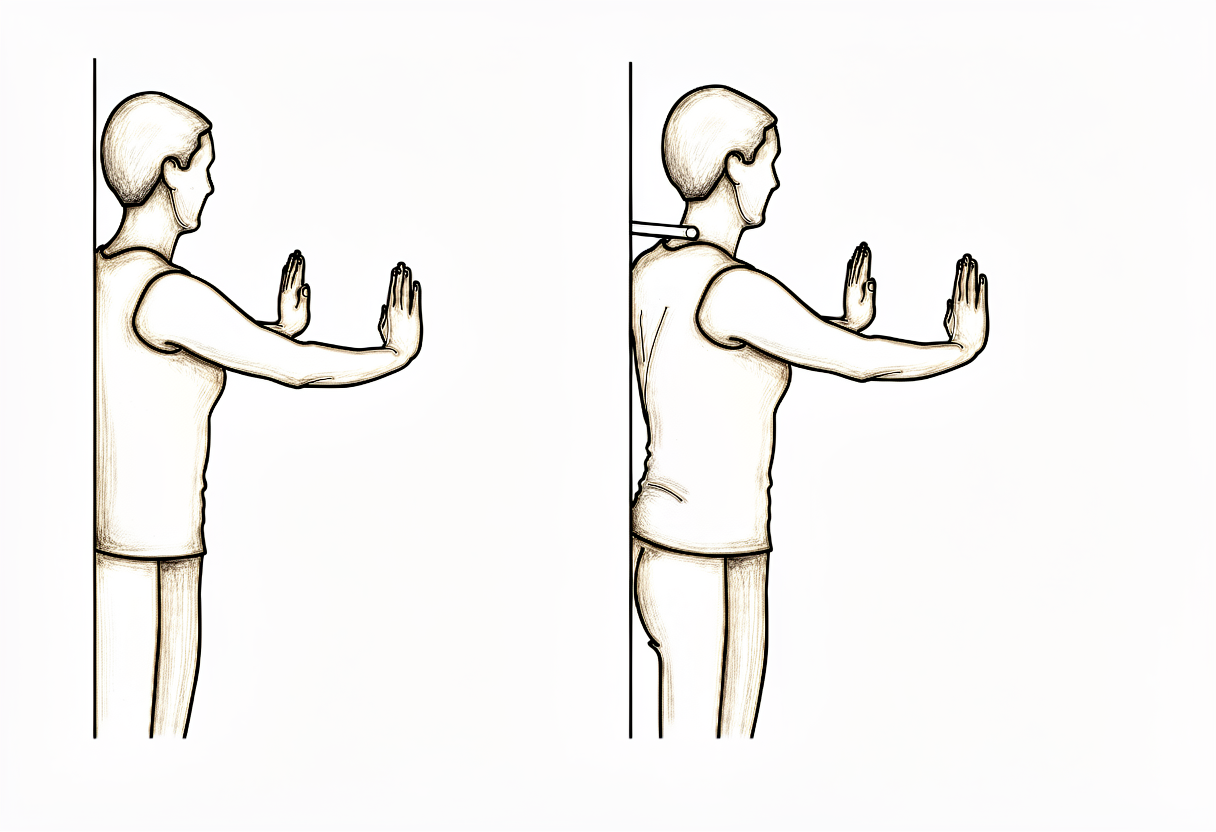
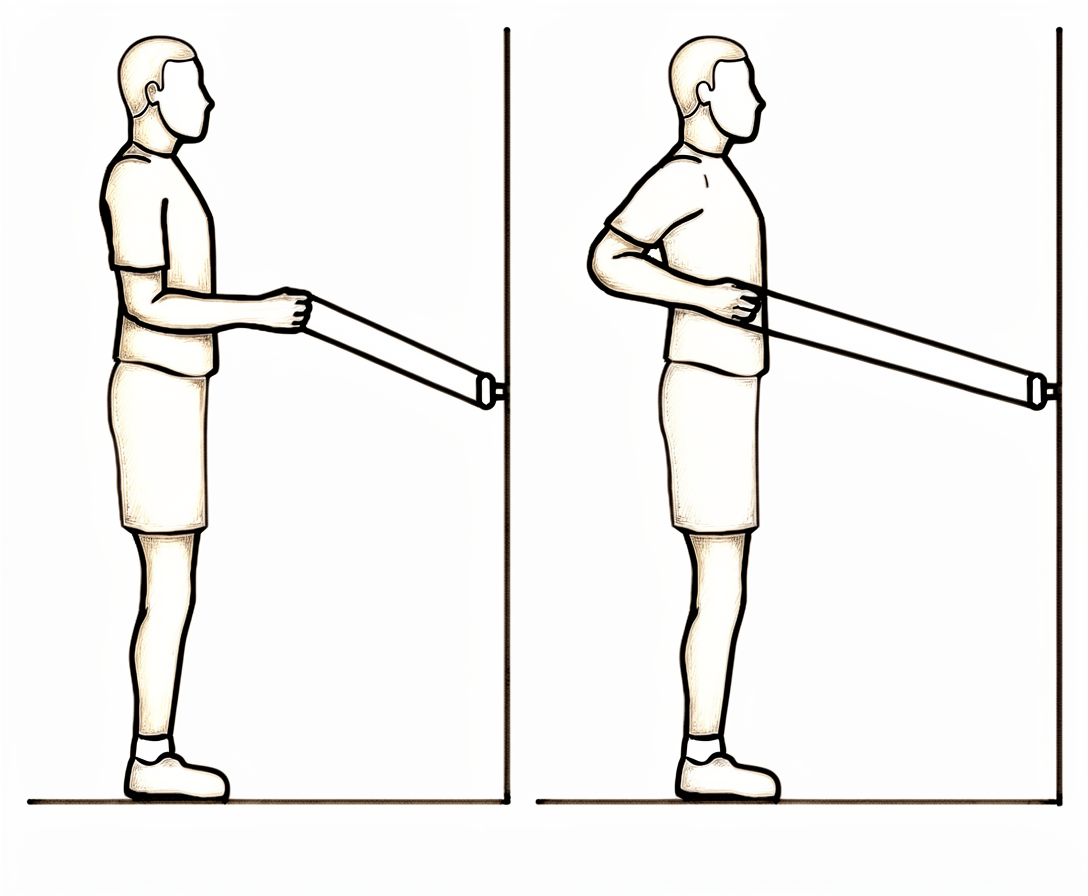
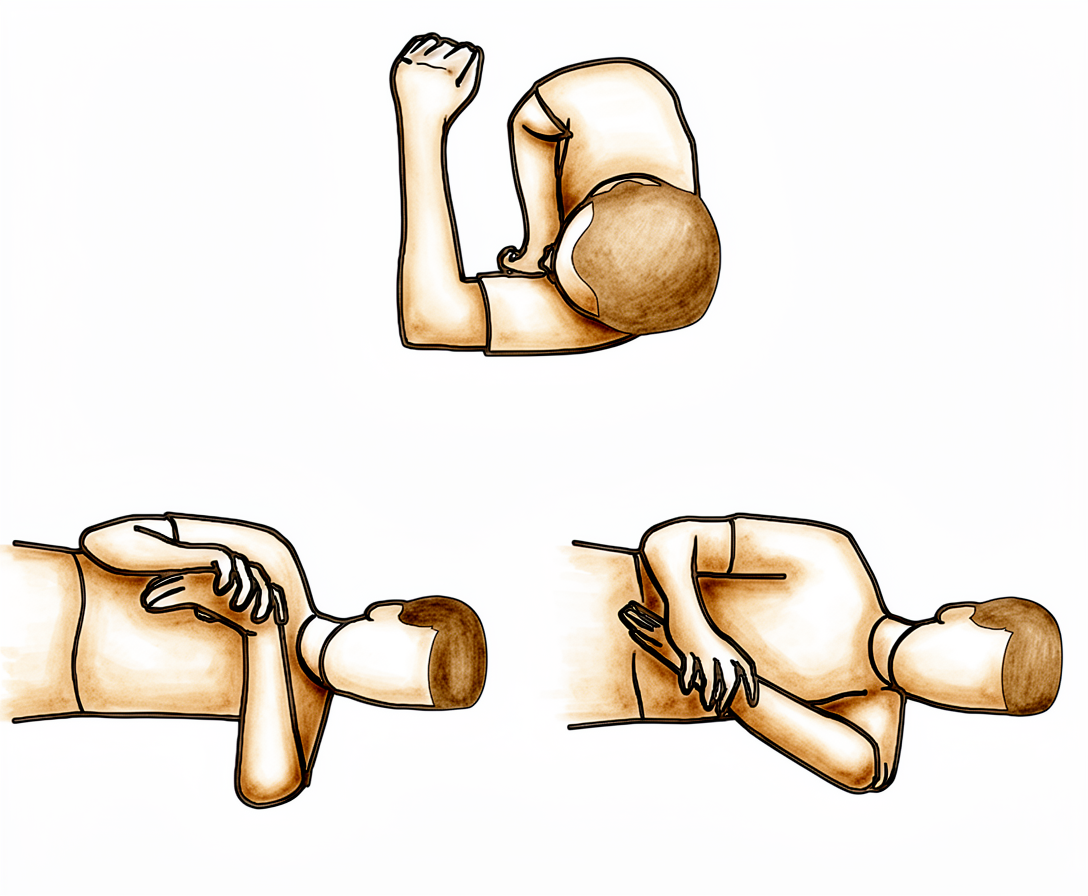
Isometric outward rotation
Stand with your elbow tucked in front of you and bent to 90°, the back of your hand near a wall or door frame. Press the back of your hand gently outwards into the surface WITHOUT letting the arm move — a gentle effort, about a quarter of your strength, with no pain. Hold, then relax.
Hold ~5 seconds, gentle (~25% effort), 10 times, as guided by your physiotherapist
Kieran Hirpara 4.0
Isometric inward rotation (in neutral only)
This is allowed only with the arm at your side, the hand pointing straight ahead (neutral) — NOT with the hand turned inwards across your body. Keep your elbow tucked in and press the palm gently inwards against a wall WITHOUT letting the arm move — about a quarter effort, no pain. Hold, then relax. Stop before your hand crosses towards your stomach.
Hold ~5 seconds, gentle (~25% effort), 10 times, as guided by your physiotherapist
Kieran Hirpara 4.0
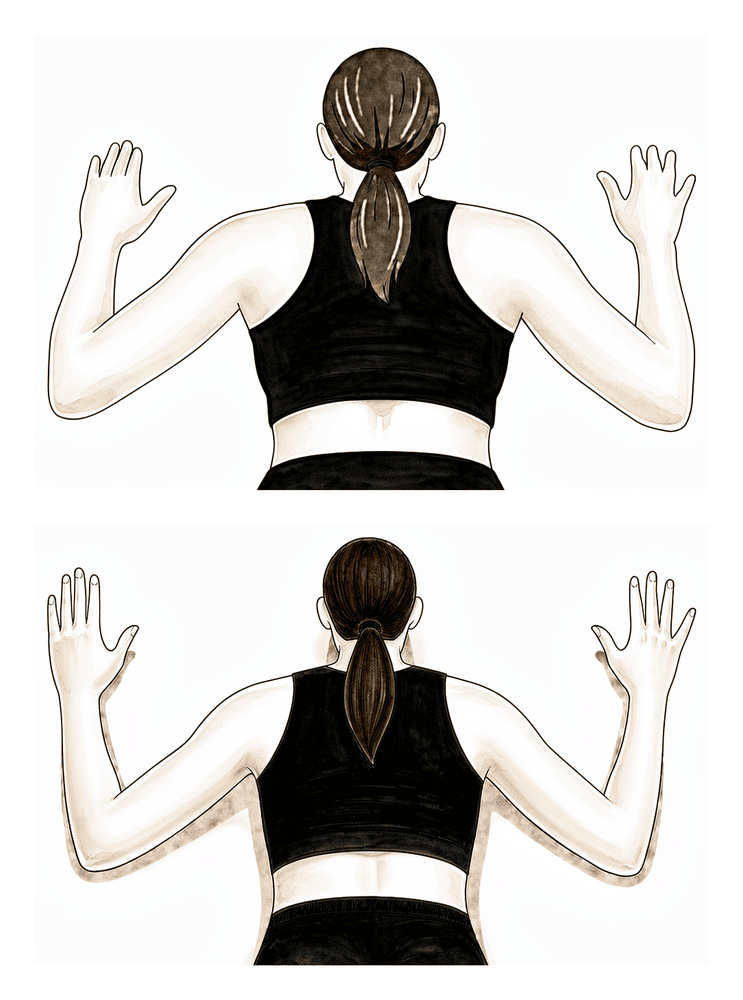
Isometric arm-out-to-the-side
Stand side-on with the outside of your upper arm near a wall, elbow tucked in. Press the arm gently outwards into the wall WITHOUT letting it move — about a quarter effort, no pain. Hold, then relax.
Hold ~5 seconds, gentle (~25% effort), 10 times, as guided by your physiotherapist

Kieran Hirpara 4.0
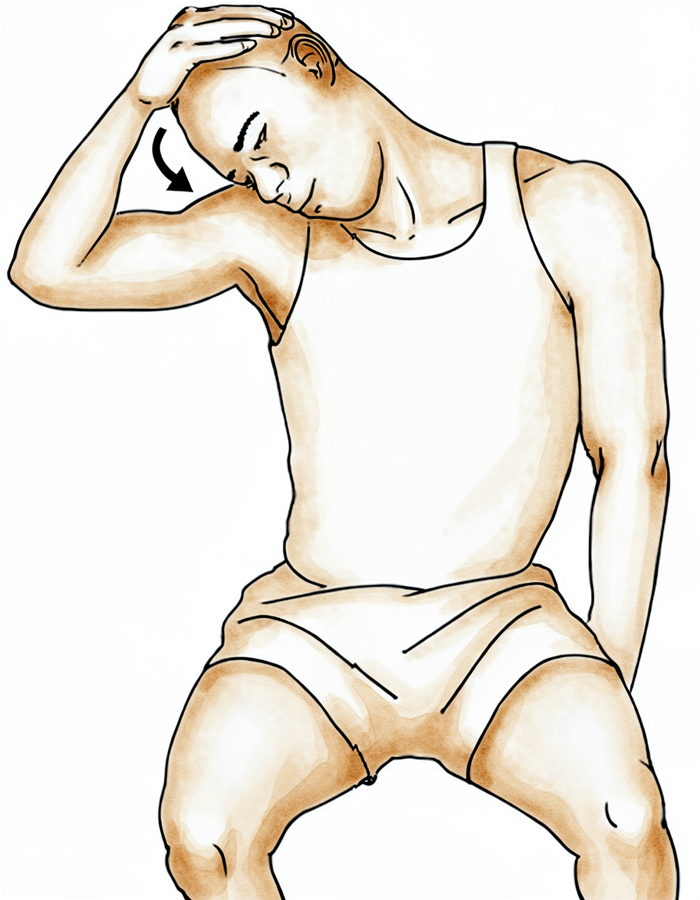
Neck side-stretch
Use your good arm to gently bring your ear towards your good shoulder, away from the operated side, until you feel a comfortable stretch in your neck.
Hold 10 seconds, 3 times, 3 times a day
Kieran Hirpara 4.0
Neck stretch towards the armpit
Use your good arm to gently bring your nose down towards your armpit, away from the operated side, until you feel a comfortable stretch.
Hold 10 seconds, 3 times, 3 times a day
From week two, gentle movement increases — still strictly within the safe directions. Your physiotherapist guides supervised passive and assisted movement to set limits, and you add light press-and-hold (isometric) drills to start waking the muscles up while the arm stays still. The arm must stay in front of the body — still no reaching behind the back and no across-the-body movement, and inward rotation stays at neutral only.
- Sling: continues; keep the arm in front — do not reach behind the back.
- Movement allowed (physiotherapist-supervised): forward lift building towards about 60°, turning outwards to about 45°, out-to-the-side to about 90°; inward rotation kept at neutral (0°) at the side. No home pulleys.
- Exercises: assisted arm-out-to-the-side; gentle isometric (press-and-hold) outward rotation, inward rotation (in neutral only) and out-to-the-side; shoulder-blade strengthening; neck stretches. Stop anything that provokes pain at the back of the shoulder.
Ready for the next phase when: you reach the supervised movement limits above without symptoms at the back of the shoulder; your pain and any swelling are controlled; and your shoulder-blade control is good with gentle movement.
Phase III — Increase movement and begin strengthening (weeks 4–6)
Kieran Hirpara 4.0
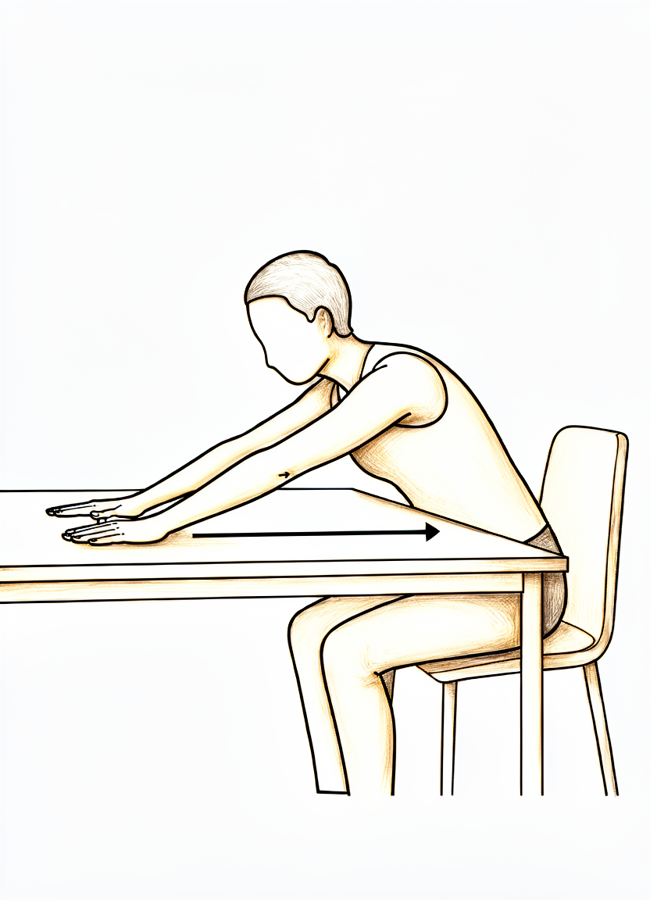
Wall walks
Face a wall or sit at a table with your operated hand resting on it. Slide the hand forwards and up along the surface so the arm reaches in front of you, letting the wall or table take the weight, then slide back. Keep the arm in front — do not let it drift across your body. This builds forward reach with the weight supported.
10 times, 3 times a day, within your physiotherapist's limit
Kieran Hirpara 4.0
Light outward-rotation with a band
From about week 4–6, if your physiotherapist agrees. With your elbow tucked in at your side and bent to 90°, hold a light band and turn your forearm outwards against it, then return with control. Outward rotation is the safe direction after a posterior repair. Use a light band and many repetitions, not heavy resistance.
As guided by your physiotherapist

Kieran Hirpara 4.0
Wall walk out to the side
Stand side-on to a wall with your fingertips resting on it. Walk your fingers up the wall out to the side, raising the arm as far as is comfortable, then walk them back down with control. The wall supports the arm as you regain movement out to the side.
As guided by your physiotherapist
Movement opens up further, and the first light strengthening begins in the safe (outward-rotation) direction. You start active-assisted reaching, such as wall walks, and gentle band work for the outward rotators. Inward rotation is allowed to creep in only a little, and only at your physiotherapist's direction — it remains the most protected movement. The sling continues by day to the six-week mark.
- Sling: simple sling by day to about 6 weeks. If you take it off at night, still avoid turning the arm inwards.
- Movement allowed: forward lift to about 90°, out-to-the-side as comfortable, turning outwards to about 45° at shoulder height (or full at the side); inward rotation limited to about 30° and only at your physiotherapist's direction. Begin active-assisted reaching (wall walks). No lifting, pushing or pulling heavier than about 2 lb, and nothing overhead.
- Exercises: wall walks; continued shoulder-blade work and isometrics; begin light outward-rotation band work at the side.
Ready for the next phase when: you have good active-assisted movement with smooth, even shoulder-blade control; your pain is well controlled; and you are progressing within the staged limits without provoking the back of the shoulder.
Phase IV — Advance (weeks 6–8)
Kieran Hirpara 4.0
Sidelying outward rotation
Lie on your good side with the operated elbow tucked at your waist and bent to 90°. Rotate the forearm upwards (outwards) so the hand lifts towards the ceiling, then lower with control. This strengthens the outward-rotating cuff muscles — the safe direction at this stage.
As guided by your physiotherapist
Kieran Hirpara 4.0
Wall push-up
Stand with your hands flat on a wall at shoulder height and your arms straight. Bend your elbows to bring your chest towards the wall, then push back to the start, pushing the shoulder blades gently apart at the top. Build up gradually — this loads the back of the shoulder directly, so it is progressed slowly and only from this phase.
As guided by your physiotherapist

Kieran Hirpara 4.0
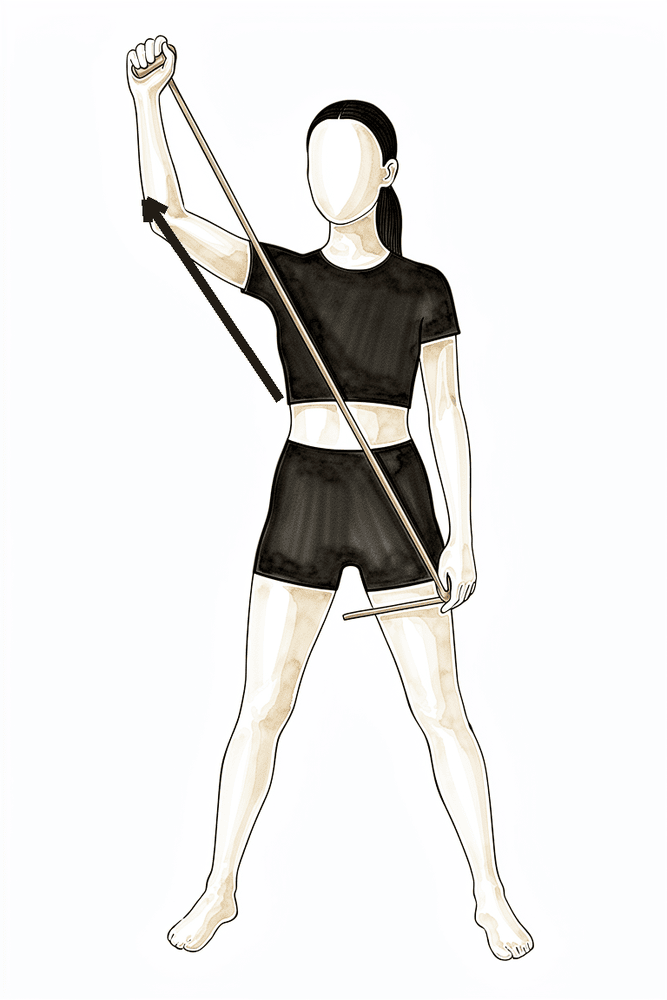
Diagonal band pattern (reaching out and up)
A diagonal whole-arm strengthening pattern with a light band, starting low and across the front of your body and pulling out and up. Keep the movement smooth and within comfortable range; your physiotherapist will set the exact pattern and resistance.
As guided by your physiotherapist
Kieran Hirpara 4.0
Diagonal band pattern (reaching across and down)
The opposite diagonal whole-arm pattern with a light band, from up-and-out to down-and-across. Keep it smooth and controlled, within the range your physiotherapist sets.
As guided by your physiotherapist
The sling comes off at six weeks. Movement under your own power is built up to full in every direction except inward rotation, which is still deliberately held back (capped at about 45° until twelve weeks). Strengthening steps up — light cuff and shoulder-blade work, the first carefully controlled push-ups against a wall, and diagonal whole-arm patterns with a light band.
- Sling: discontinued at 6 weeks.
- Movement allowed: active movement to full as tolerated EXCEPT inward rotation, which stays capped at about 45° until 12 weeks (at the side and at shoulder height). Light lifting up to about 5 lb.
- Exercises: sidelying outward rotation; wall push-ups (built up gradually — they load the back of the shoulder directly); diagonal band patterns; continued cuff and shoulder-blade strengthening.
Ready for the next phase when: you have full movement under your own power in every direction except inward rotation; your strength is building steadily; and there is no pain or swelling after the new strengthening drills.
Phase V — Strengthen (weeks 8–12)
Kieran Hirpara 4.0
Resistance-band row
With a band anchored in front of you, pull the handles towards you, drawing your elbows back and squeezing your shoulder blades together, then return with control. Light band, high repetitions; stop if the shoulder becomes painful.
As guided by your physiotherapist
Kieran Hirpara 4.0
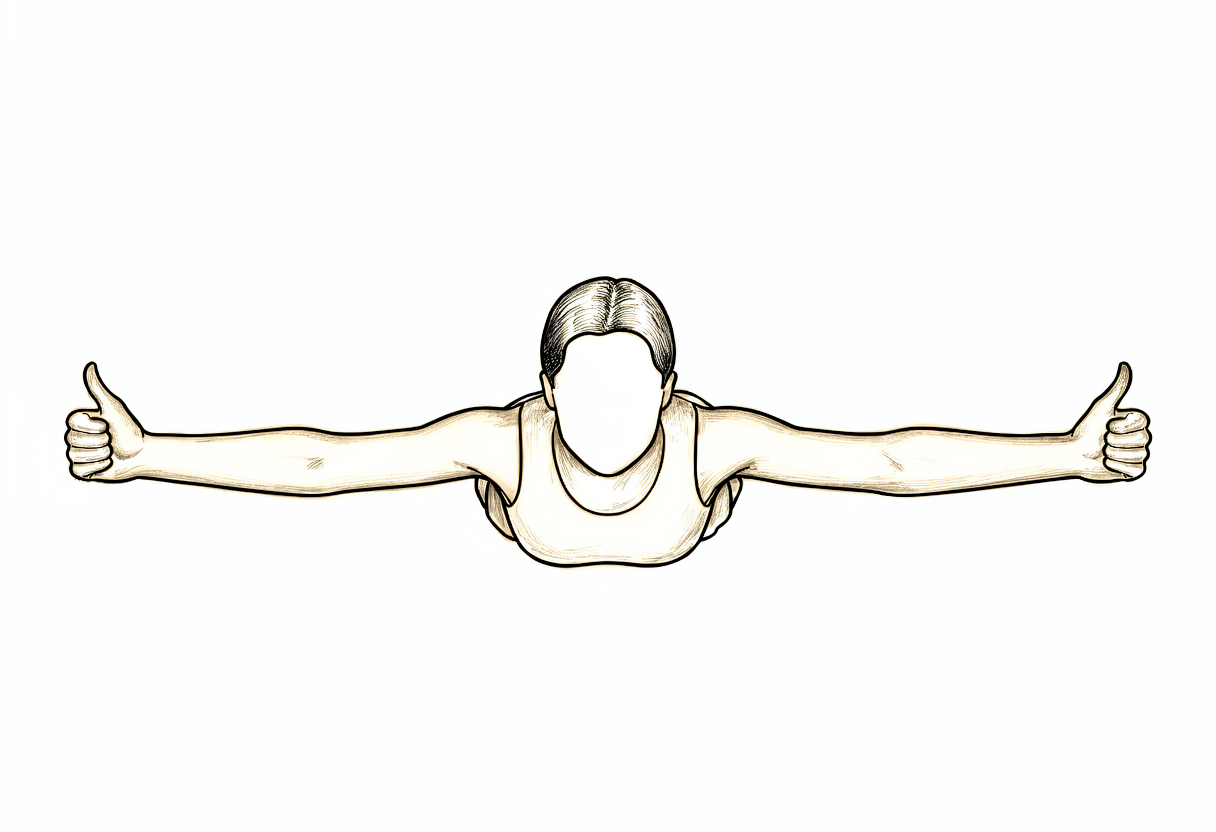
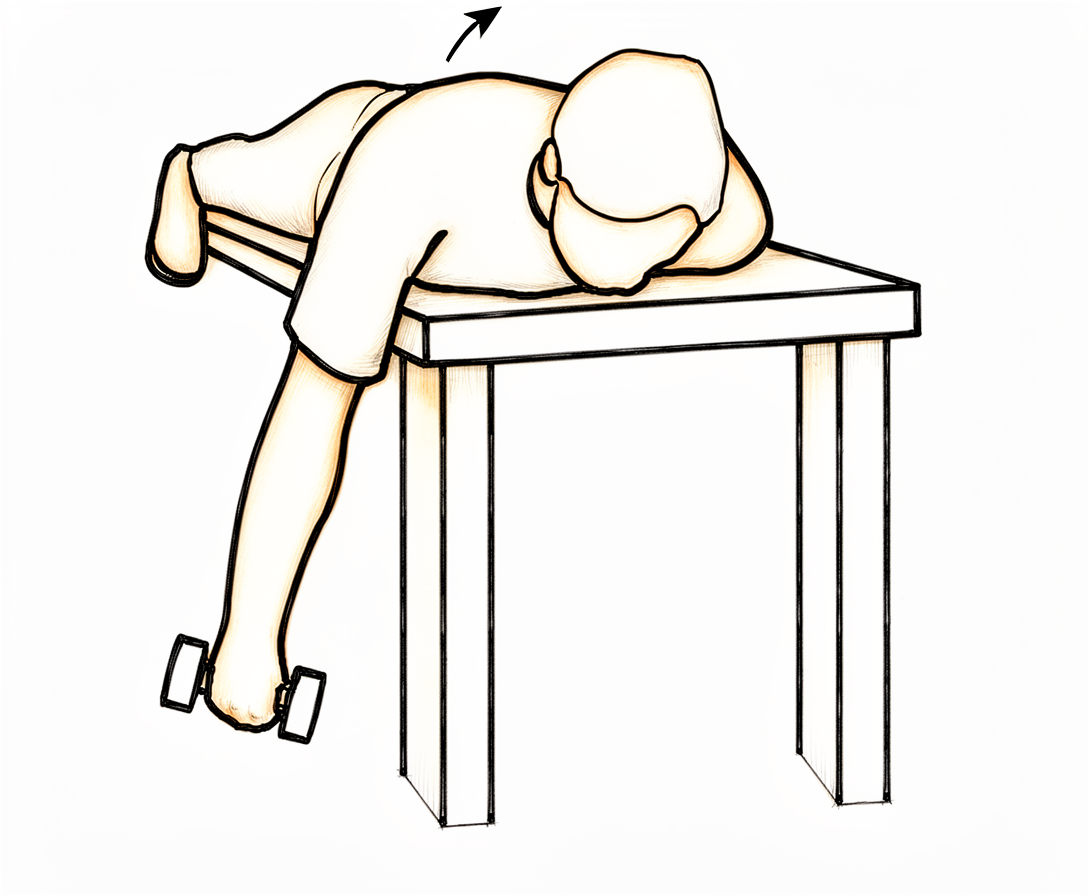
Prone T
Lying face down (or bent forwards over a table), with your thumbs up, raise your arms out to the sides into a T shape, squeezing the shoulder blades together, then lower with control. Start with no weight and add a very light weight only as your physiotherapist directs.
As guided by your physiotherapist
Kieran Hirpara 4.0
Prone W
Lying face down, draw your elbows back and down towards your waist, making a W shape and squeezing the shoulder blades together and down, then release with control. This strengthens the lower shoulder-blade muscles.
As guided by your physiotherapist
Kieran Hirpara 4.0
Shoulder-blade strengthening row
Draw the shoulder blade back and down against a light weight or band, holding briefly, then release with control. This is part of a broader strengthening programme (your physiotherapist may call it the "Thrower's 10") that builds the cuff and shoulder-blade muscles together.
As guided by your physiotherapist
This phase builds strength, control and endurance towards your work and sport. Inward rotation is still capped at about 45° until twelve weeks, but every other plane is worked fully. The programme broadens into a fuller cuff and shoulder-blade strengthening routine (your physiotherapist may call it the "Thrower's 10") with dynamic control drills.
- Sling: none.
- Movement allowed: full in all planes except inward rotation, which stays capped at about 45° until week 12.
- Exercises: resistance-band rows; prone T and prone W; shoulder-blade strengthening; dynamic-control and stabilisation drills. Your physiotherapist may add rhythmic stabilisation — gentle hold-steady drills where they push lightly on your arm and you resist — to retrain control; this is hands-on work with no diagram. Lifting builds gradually towards about 7–10 lb.
Ready for the next phase when: your inward-rotation tolerance is improving; strengthening is pain-free with no reactive swelling; and your strength is building evenly compared with the other side.
Phase VI — Full range and weight training (weeks 12–14)
Kieran Hirpara 4.0
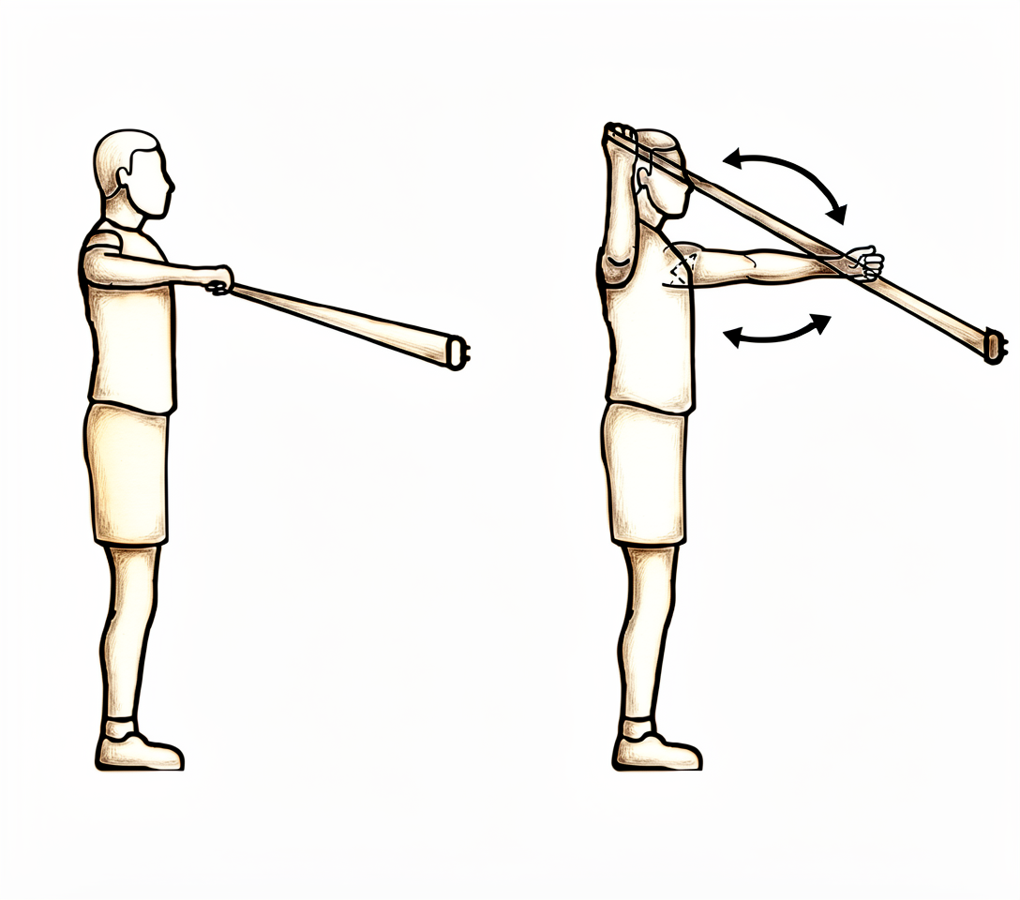
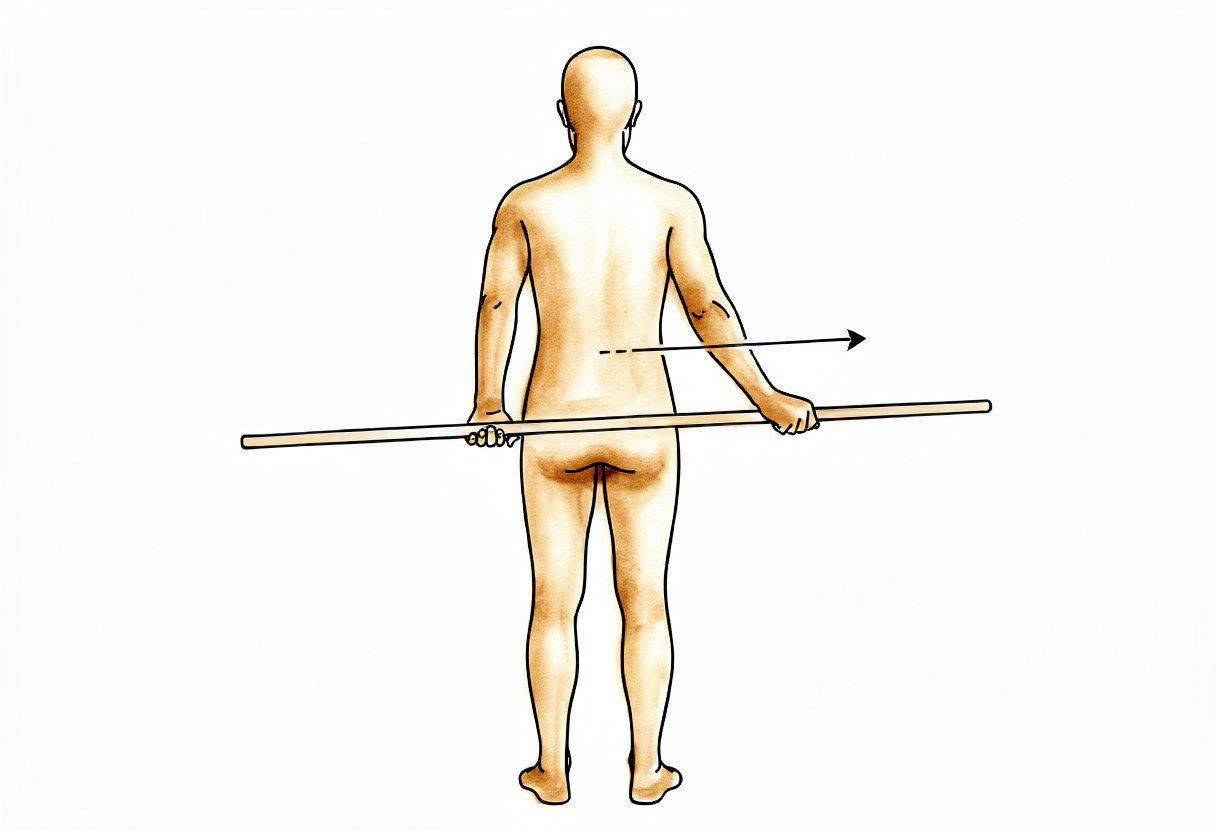
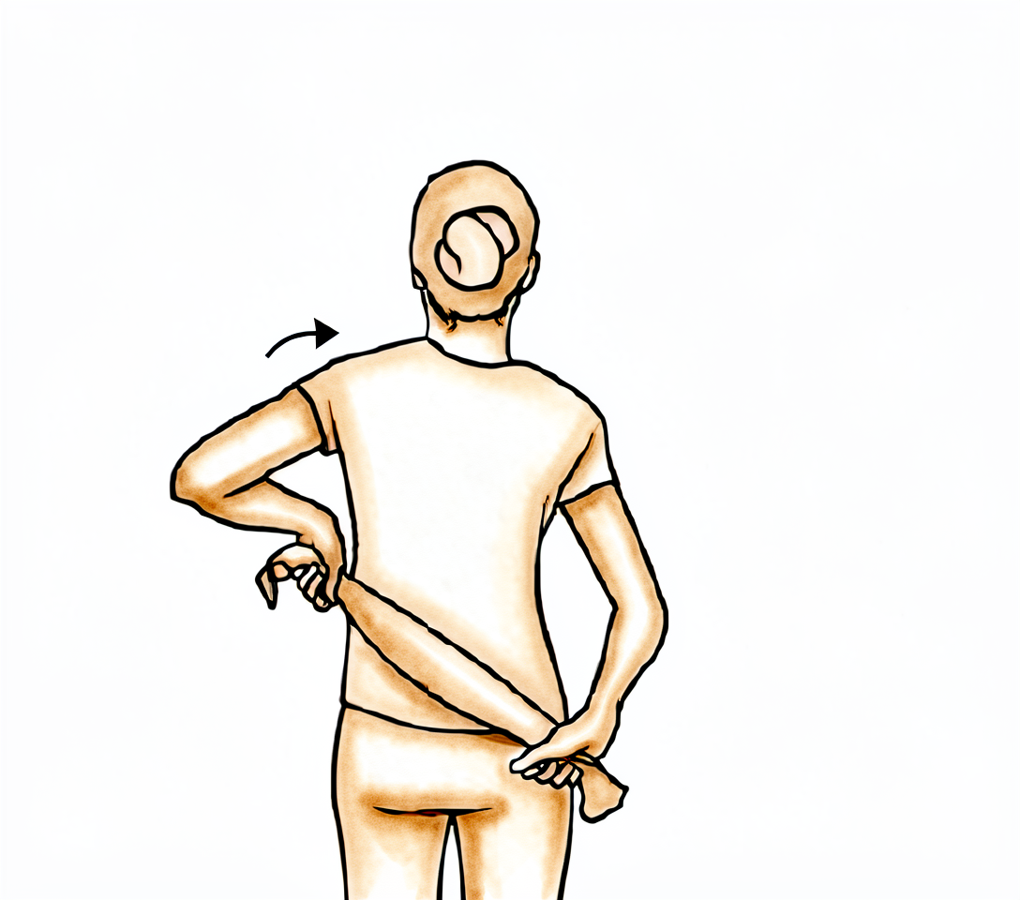
Internal rotation with a stick
From week 12 — NOT before. Inward rotation is the last movement restored after a posterior repair, so behind-the-back reaching only begins now. Hold a stick behind your back and use your good hand to draw the operated hand gently up your back, then lower with control. Progress gradually and never force the end of the range.
As guided by your physiotherapist
Kieran Hirpara 4.0
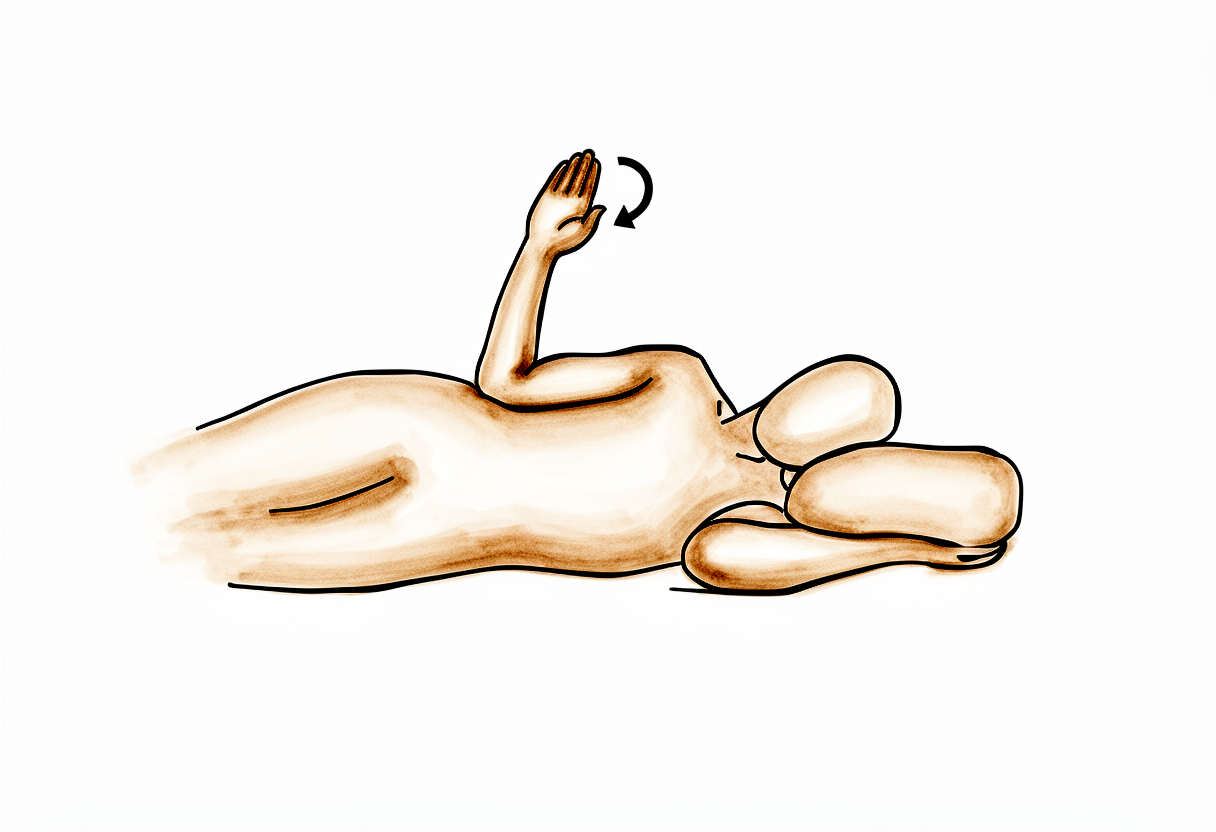
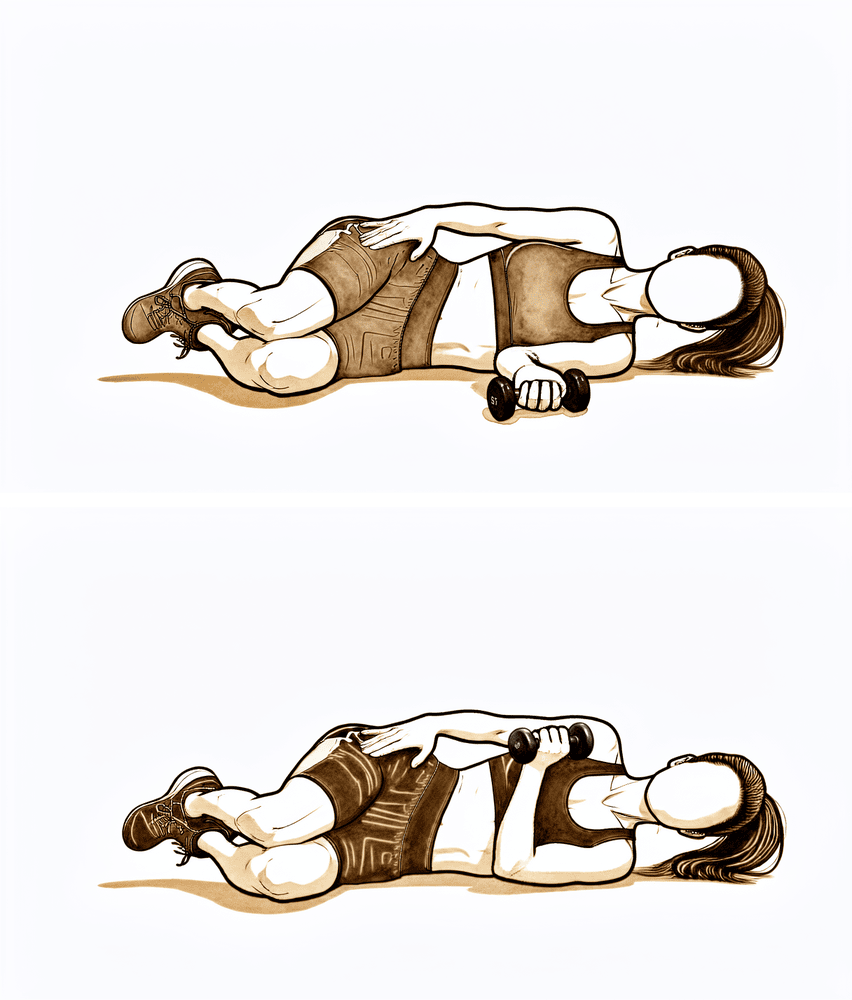
Sidelying inward rotation
From week 12. Lie on your operated side with the arm forwards and the elbow bent to 90°. Rotate the forearm so the hand turns downwards (inwards), then return with control. Begin with no weight and add a light weight only as directed — this strengthens the inward rotators, restored last after a posterior repair.
As guided by your physiotherapist
Kieran Hirpara 4.0
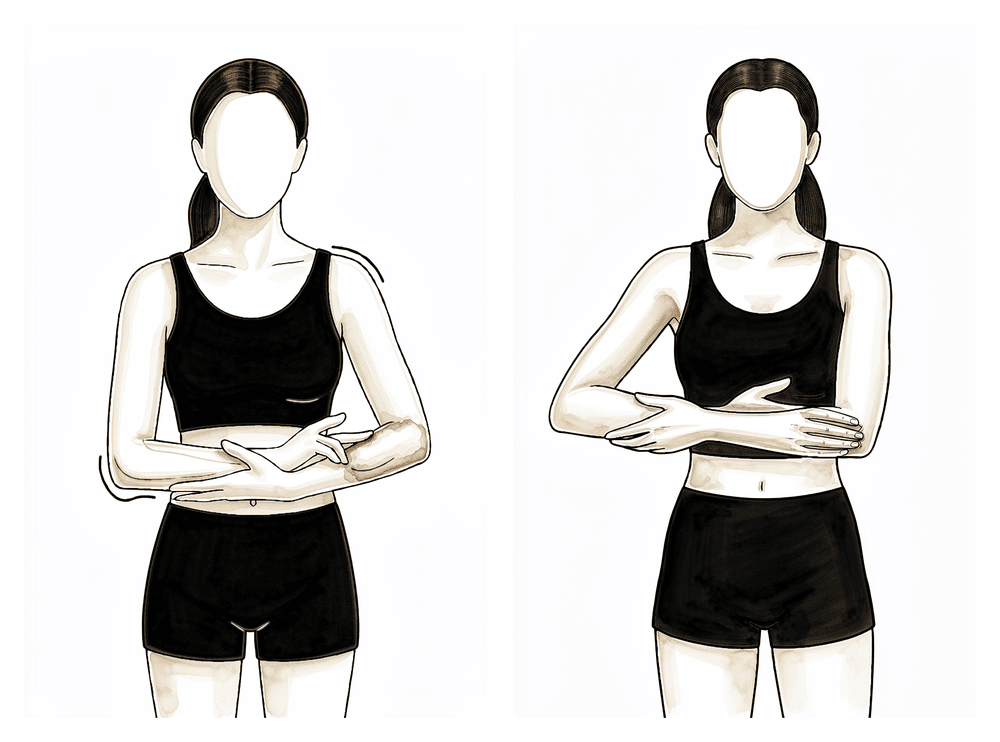
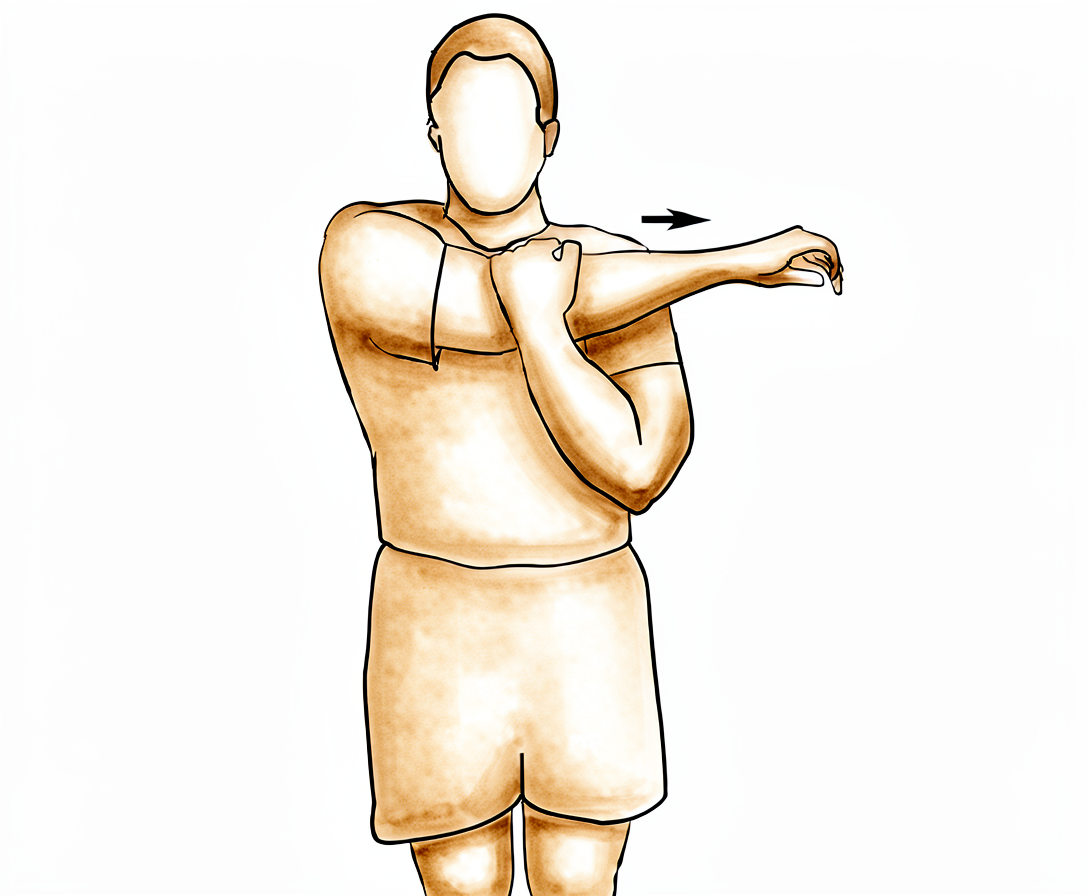
Cross-body stretch
From week 12 — not before, as it loads the back of the shoulder and the repaired area. Use your good hand to draw the operated arm gently across your chest until you feel a comfortable stretch at the back of the shoulder. Progress gradually and do not force.
As guided by your physiotherapist
Kieran Hirpara 4.0
Sleeper stretch
End-range inward-rotation stretching begins from week 12 — not before. Lie on your operated side with the arm out in front at shoulder height and the elbow bent to 90°. Use the other hand to press the forearm gently down towards the bed until you feel a comfortable stretch. Progress gradually and do not force.
As guided by your physiotherapist
Kieran Hirpara 4.0
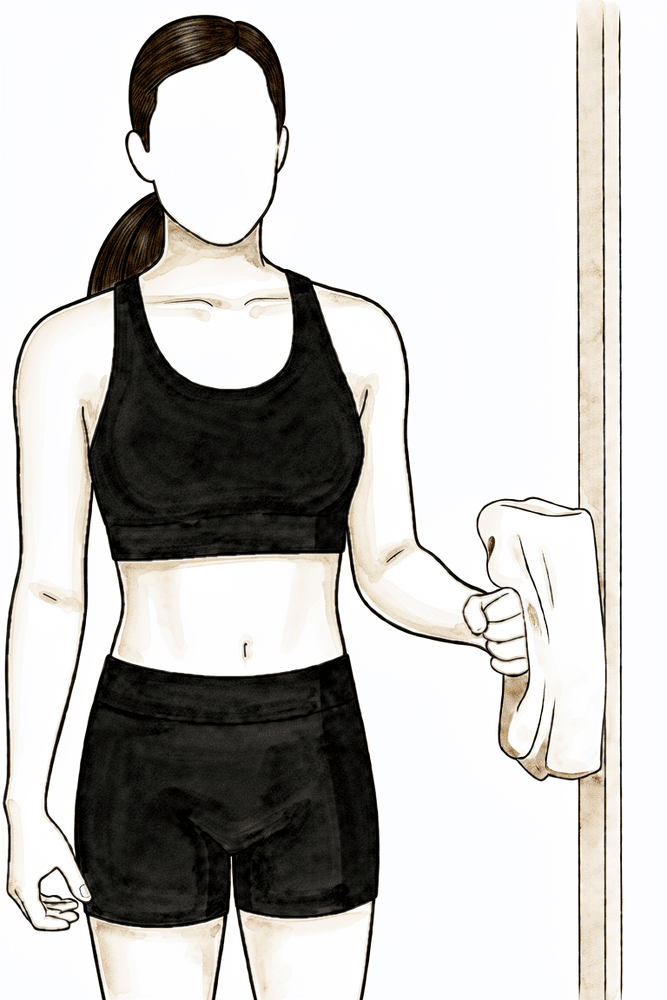
Towel stretch (behind-back inward rotation)
From week 12, to progress full behind-back reach. Hold a towel behind your back with the operated hand below, and use the upper hand to draw the lower hand gently up your back. Progress gradually and do not force end-range inward rotation.
As guided by your physiotherapist
Kieran Hirpara 4.0
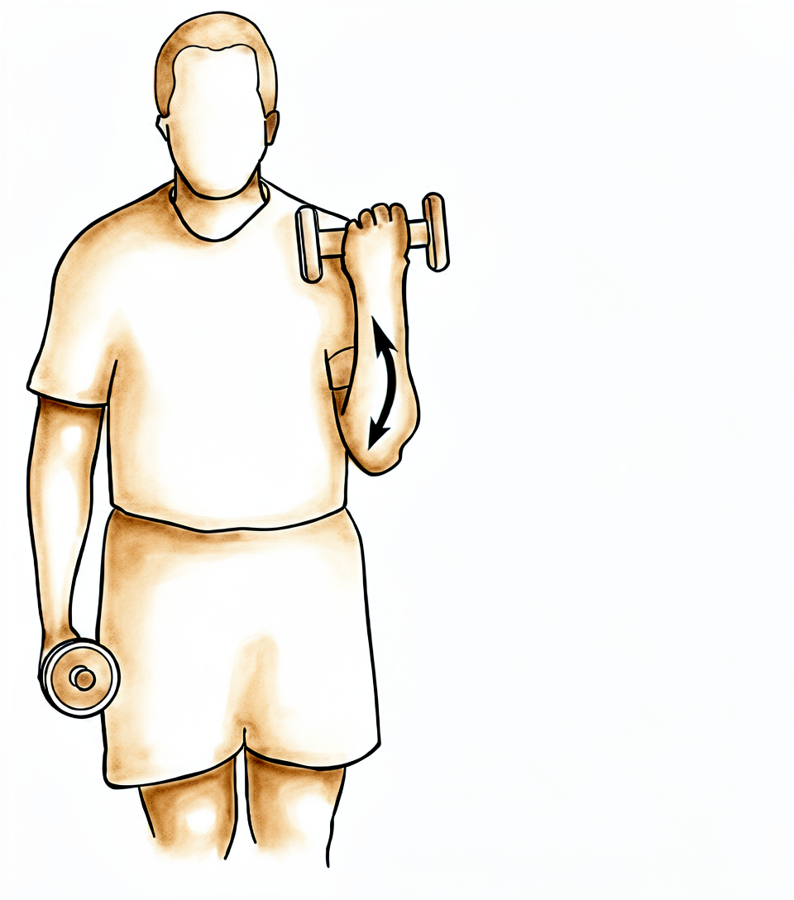
Biceps curl
From week 12, as general arm conditioning resumes. With your upper arm tucked at your side, curl a light weight up by bending the elbow, then lower with control. Keep the shoulder relaxed and still.
As guided by your physiotherapist
At twelve weeks, inward rotation is finally restored to full. This is when behind-the-back and across-the-body stretches begin, and gym work progresses from machines towards free weights. Push-ups build up from the wall towards the floor. The target at this stage is full, symmetric inward rotation — matching your other side — because inward rotation is the movement a posterior repair protects longest.
- Sling: none.
- Movement allowed: full range in all directions, including inward rotation, progressed gradually and never forced.
- Exercises: internal rotation with a stick; sidelying inward rotation; cross-body stretch; sleeper stretch; towel stretch for behind-back reach; biceps curls and general conditioning. Continue and progress the cuff, shoulder-blade and diagonal strengthening from the previous phase.
Ready to progress towards sport when: your inward rotation is becoming symmetric with the other side; you have full, pain-free movement in every direction; and your strength is building towards the other side without reactive swelling.
Returning to sport and work
Return is criteria-based, not decided by the calendar alone — and signed off by both Dr Hirpara and your physiotherapist.
- Throwing and overhead athletes: a graded throwing or interval programme begins from about 14–16 weeks, building up volume and intensity step by step.
- Contact and collision sport (rugby, football, martial arts, racket sports, rock climbing, horse riding): not before 5 months, and only once the criteria below are met.
- Work: sedentary work as tolerated; manual or heavy work at least 3 months.
You are ready to return to sport when:
- you have full, pain-free range of motion in all directions, including inward rotation symmetric with the other side;
- your outward and inward rotation strength is close to the other side (for your physiotherapist: a limb-symmetry index of about 90% or better for internal and external rotation strength on isokinetic or hand-held dynamometry — and with a posterior repair, pay particular attention to symmetric internal-rotation strength, since that is the protected direction);
- you have completed any sport-specific programme (such as an interval throwing programme) with no pain or apprehension; and
- Dr Hirpara has cleared you at review.
After your protocol
This protocol works alongside the practice's general recovery advice — see managing post-operative pain and wound care. For the condition itself, see shoulder instability.
The phased timeline, posterior-specific protection limits, staged return of inward rotation and return-to-sport criteria were prepared with reference to published posterior stabilisation protocols from the University of Virginia Sports Medicine and University of New Mexico Sports Medicine (Posterior Labral Repair Rehabilitation Protocols), Massachusetts General Brigham Sports Medicine (Posterior Bankart Repair), and the clinical commentary "Rehabilitation Following Posterior Shoulder Stabilization" (International Journal of Sports Physical Therapy, 2021), adapted to this practice's approach by Dr Hirpara. The original exercise programme is based on the work of Leonard Funk and the Wrightington Shoulder Unit (shoulderdoc.co.uk).
Evidence & references
Posterior Stabilisation (Posterior Labral / Capsular Repair): Rehabilitation Evidence
Topic: Arthroscopic or open posterior labral repair / posterior capsulorrhaphy (reverse Bankart) for posterior glenohumeral instability. Compiled: 2026-06-16. Sources: local RAG Orthopaedic corpus + published fellowship/PT "standard of care" protocols.
The key difference vs anterior (Bankart/Latarjet): the precaution is REVERSED
Posterior instability and the posterior repair are stressed by the OPPOSITE motions to an anterior repair. The provocative/at-risk position is flexion + adduction + internal rotation (and horizontal adduction) - exactly the position of a posterior load (Itoi/Shoulderology: recurrent posterior instability = PIGHL deficiency failing to resist posterior translation with the arm in flexion and internal rotation). Therefore: - EARLY PRECAUTION = limit flexion, internal rotation, adduction, and horizontal/cross-body adduction; protect against the posteriorly-directed load. (Anterior repairs instead limit ER + abduction.) - Sling/brace is positioned in slight ABDUCTION and NEUTRAL/slight EXTERNAL rotation - often a "gunslinger" brace or abduction pillow - to keep the humeral head off the posterior repair. The arm must be kept in front of the body; do NOT reach behind the back and avoid internal rotation early. - Posterior instability is uncommon (~3-5% of instability) so high-level evidence is sparser; protocols are consensus/biomechanically driven.
Consensus phased timeline (UVA Sports Medicine posterior labral repair standard of care)
| Phase | Week window | Sling/brace | ROM allowed & RESTRICTIONS | AROM / strengthening | RTS |
|---|---|---|---|---|---|
| I - Immediate / protect | 0-2 wk | Sling (all components) at all times incl. sleeping (gunslinger / neutral-to-slight-ER, slight abduction); off only for home ex/PT | Pendulums; elbow/wrist ROM only. No shoulder PROM into the at-risk arc. Keep arm in front of body | Grip/wrist; ball squeezes | None |
| II - Early PROM | 2-4 wk | Continue sling at all times; keep arm IN FRONT - do NOT reach behind back | PROM (PT-supervised), strictly limited: flexion to 60 deg, extension to neutral (0 deg), abduction to 90 deg, ER to 45 deg, IR to neutral (0 deg) at side. No home pulleys | Scapular strengthening; submaximal pain-free isometrics in ALL directions (in sling); cervical ROM | None |
| III - Increase PROM, begin AAROM/strengthening | 4-6 wk | Continue sling by day; may stop sling at night but AVOID internal rotation; keep arm in front | PROM: flexion to 90 deg, extension to 30 deg, abduction full as tolerated, ER 45 deg at 90 deg abd / full at side, IR limited to 30 deg at 90 deg abd. Begin AAROM (wall walks). No reaching behind back | Continue scapular + isometrics; begin light ER Theraband at side. No lift/push/pull >2 lb, no overhead | None |
| IV - Advance | 6-8 wk | Discontinue sling at 6 wk | Advance AROM to full as tolerated EXCEPT IR; limit IR to 45 deg (at side and at 90 deg abd) until 12 wk | Isotonic RC (to 6-8 lb), UBE, wall push-ups, advance scapular, begin D1/D2 PNF (<=3 lb). Lift <=5 lb | None |
| V - Strengthen | 8-12 wk | None | IR still limited to 45 deg until 12 wk; full in all other planes | Advance RC/scapular, dynamic stabilisation, isokinetics with 60 deg block; Thrower's 10 for throwers (from ~10-12 wk). Lift <=7 lb (wk 8-10) -> <=10 lb (wk 10-12) | None |
| VI - Full ROM / weight training | 12-14 wk | None | IR advanced to FULL at 12 wk. Full ROM all directions | Traditional weight training (machines -> free weights), eccentric RC, advance PNF/isokinetics. Begin overhead-work progression | Begin late-stage loading |
| Thrower progression / RTS | 14-24 wk | None | Full | Throwing program from 14-16 wk (60% velocity); isokinetic testing 16-24 wk; interval throwing once passed | No contact sport before 5 months; full RTS on criteria + surgeon clearance |
Active ROM start: AAROM ~4 wk, full AROM (except IR) by ~6-8 wk. Strengthening start: isometrics from ~2-4 wk; isotonic RC ~6 wk. RTS: throwing 14-16 wk; contact sport not before 5 months; criterion-based.
RTS criteria (UVA)
Pass isokinetic test (ER/IR unilateral >=70%, ER bilateral >=98%, IR bilateral >=105%, ER/IR peak-torque/BW ratios); completed throwing program; no pain with activity; surgeon clearance; >=5 months post-op for contact sport.
Posterior-specific precaution summary: sling in slight abduction/neutral-ER (gunslinger); keep arm in front; avoid IR, adduction, horizontal/cross-body adduction, and flexion past limits early; IR is the LAST motion restored (capped 45 deg until 12 wk, full at 12 wk). This is the exact inverse of the anterior protocols, which cap ER.
Key controversies & evidence flags
-
Brace type/position - gunslinger / neutral-to-ER vs simple sling. Biomechanical consensus favours immobilisation in neutral or slight external rotation with slight abduction to unload the posterior capsulolabral repair (reverse of the IR sling used after anterior repair). The Sheean/Kibler current-concepts review and the published PT protocols converge on this, but there is no RCT comparing posterior brace positions. Evidence: consensus / biomechanical (Level V).
-
Throwers / overhead athletes vs traumatic (collision) posterior instability. Posterior labral injury in overhead athletes is often insidious/atraumatic (Sheean 2020), demanding a slower, more conservative throwing return; traumatic posterior instability in collision athletes (Funk 2009 rugby series; Kang "batter's shoulder") may follow a more standard timeline. Savoie (Arthroscopy 2008, 136 shoulders) shows arthroscopic posterior reconstruction is effective after failed conservative care. Evidence: case-series level (Level IV); no RCTs on rehab pace.
-
Sparse high-level evidence overall. Because posterior instability is rare (~3-5%), there are no instability-position RCTs for the posterior repair and protocols are extrapolated/biomechanical. Flag everything here as CONSENSUS / Level IV-V. The "Rehabilitation Following Posterior Shoulder Stabilization" clinical commentary (PMC8168996) is the main synthesising source.
-
Contact-sport return timing. Recent series (e.g., "Favorable Outcomes After Arthroscopic Posterior Bankart Repair for Traumatic Posterior Shoulder Instability in Collision Athletes," PMC12800795) support good RTS, but timing remains criteria-based with a ~5-6 month floor for collision sport. Evidence: cohort (Level IV).
CITATIONS
Published rehabilitation protocols (URLs)
- University of Virginia Sports Medicine - Posterior Labral Repair Rehabilitation Protocol (Arthroscopic or Open): https://med.virginia.edu/orthopaedic-surgery/wp-content/uploads/sites/242/2021/06/Posterior-Labral-Repair.pdf
- St. Louis Orthopedic Specialists - Posterior Labral Repair and Capsulorrhaphy Protocol: https://www.stlorthospecialists.com/wp-content/uploads/2019/05/Posterior-Labral-Repair-and-Capsulorraphy-Rehab-Protocol.pdf
- Dr. Coyner - Posterior Labral Repair Protocol: https://www.drcoyner.com/pdf/posterior-labral-repair-protocol.pdf
- Indianapolis Sports Medicine - Posterior Labral Repair Rehab Protocol: https://www.indysportsdr.com/pdf/posterior-labral-repair-rehab-protocol.pdf
- "Rehabilitation Following Posterior Shoulder Stabilization" (clinical commentary), PMC8168996: https://pmc.ncbi.nlm.nih.gov/articles/PMC8168996/
- "Postsurgical Rehabilitation of Posterior Instability," Musculoskeletal Key: https://musculoskeletalkey.com/postsurgical-rehabilitation-of-posterior-instability/
Local RAG corpus (article / journal / year)
- Eiji Itoi. Shoulderology. 2023. (Posterior instability ~3% of instability; PIGHL deficiency; at-risk position = flexion + internal rotation - the basis for the reversed precaution.) [textbook / mechanism]
- Sheean AJ, Kibler WB, Conway J, et al. Posterior Labral Injury and Glenohumeral Instability in Overhead Athletes: Current Concepts for Diagnosis and Management. Journal of the American Academy of Orthopaedic Surgeons. 2020. [current-concepts review]
- Funk L, Badge R, Tambe A. Arthroscopic isolated posterior labral repair in rugby players. International Journal of Shoulder Surgery. 2009. [case series - traumatic posterior instability, collision athletes]
- Savoie FH, Holt MS, Field LD, Ramsey JR. Arthroscopic Management of Posterior Instability: Evolution of Technique and Results. Arthroscopy. 2008;24(4). (136 shoulders; arthroscopic posterior reconstruction after failed conservative rehab.) [large case series, Level IV]
- Kang RW, Mahony GT, Harris TC, et al. Posterior Instability Caused by Batter's Shoulder. Clinics in Sports Medicine. 2013. [technique / case series]
- Rockwood CA, Fehringer EV. Rockwood and Matsen's The Shoulder. 2016. (Posterior drawer / laxity exam in neutral rotation; diagnostic basis.) [textbook]
Overall evidence grade for the phased protocol itself: CONSENSUS / institutional standard-of-care, weaker than the anterior literature (Level IV-V; no RCTs on posterior brace position or rehab pace). The reversed precaution (limit IR/adduction/flexion; brace in abduction + neutral/ER) is biomechanically well-founded but not RCT-tested.