Subacromial Decompression Info Evidence
Last reviewed
Rehabilitation after isolated arthroscopic subacromial decompression — early movement, staged strengthening and return to activity.
This protocol covers the rehabilitation after an isolated arthroscopic subacromial decompression (acromioplasty, with or without removal of the inflamed bursa) with Dr Kieran Hirpara at Mater Private Hospital Rockhampton. Bring this page or its PDF to your first physiotherapy visit so your rehabilitation stays coordinated. Your rehabilitation is progressed individually by your physiotherapist through the phases below, depending on how your shoulder progresses.
Important: subacromial decompression is often performed together with a rotator cuff repair. This protocol is for an isolated subacromial decompression. If your operation also included a rotator cuff repair, follow the rotator cuff repair protocol instead — the repaired tendon sets a slower pace.
If you have any concerns about your wound after surgery, get in touch with the rooms. It is often helpful to take a photo of the wound and email it for review.
What to expect
Subacromial decompression makes more room for the rotator cuff tendons by shaving the under-surface of the acromion (the bony roof of the shoulder) and removing the inflamed bursa. Nothing is repaired that needs protecting, so early rehabilitation is about movement, not rest: the shoulder is safe to move from the first day, and moving it early is what keeps it from stiffening while it settles.
The sling you wake up with is for comfort only — it is not protecting anything. Leave it off as much as possible and wean out of it early: most people leave the sling off within the first few days, and published protocols expect it to be gone by two weeks at the latest. Do not drive while you are wearing a sling.
Your exercise program uses three kinds of movement, and your physiotherapist will guide which apply at each stage:
- Active range of motion — movement is allowed without aid or help.
- Active-assisted range of motion — using the other arm or an object to assist with moving the arm.
- Passive range of motion — completely relaxed, using the other arm or force to do 100% of the work.
The journey at a glance:
- Phase I — Early movement — roughly the first two weeks
- Phase II — Restoring your range and starting strength — week 2–6
- Phase III — Strengthening — week 6–12
- Phase IV — Return to full activity — week 12 onwards
The shoulder is usually sore rather than fragile in the early weeks, and some people find it stays uncomfortable for up to six weeks. Published guidance suggests most people feel a clear improvement in pain by about three months, and symptoms can keep improving for up to a year. The week ranges below are typical rather than fixed — your physiotherapist will progress you on how your shoulder is moving, not on the calendar.
Phase I — Early movement (Week 0–2)
Kieran Hirpara 4.0
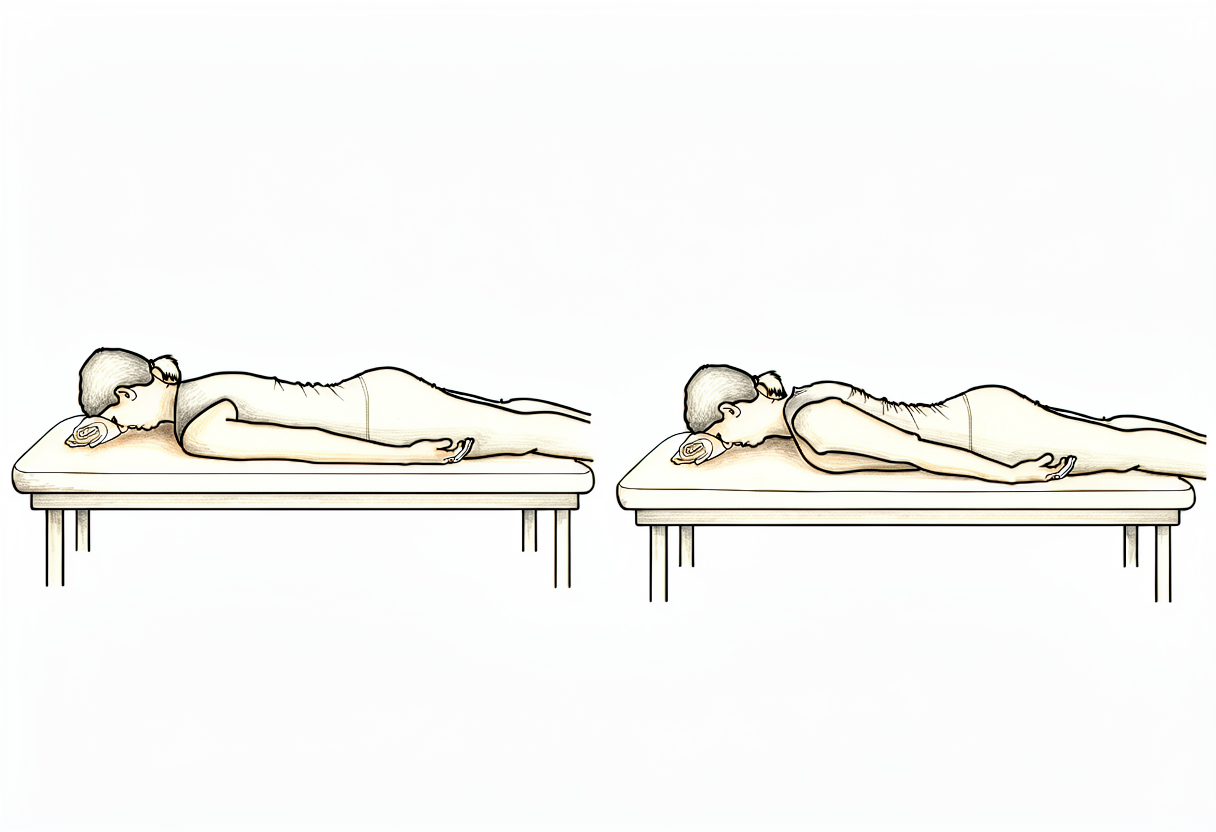
Pendulum exercise
Bend forward at the waist and let the operated arm hang gently away from the body. Let the arm swing in small, relaxed circles — the movement comes from your body, not the shoulder muscles. Work within comfort; pain is the guide.
As guided by your physiotherapist
Kieran Hirpara 4.0
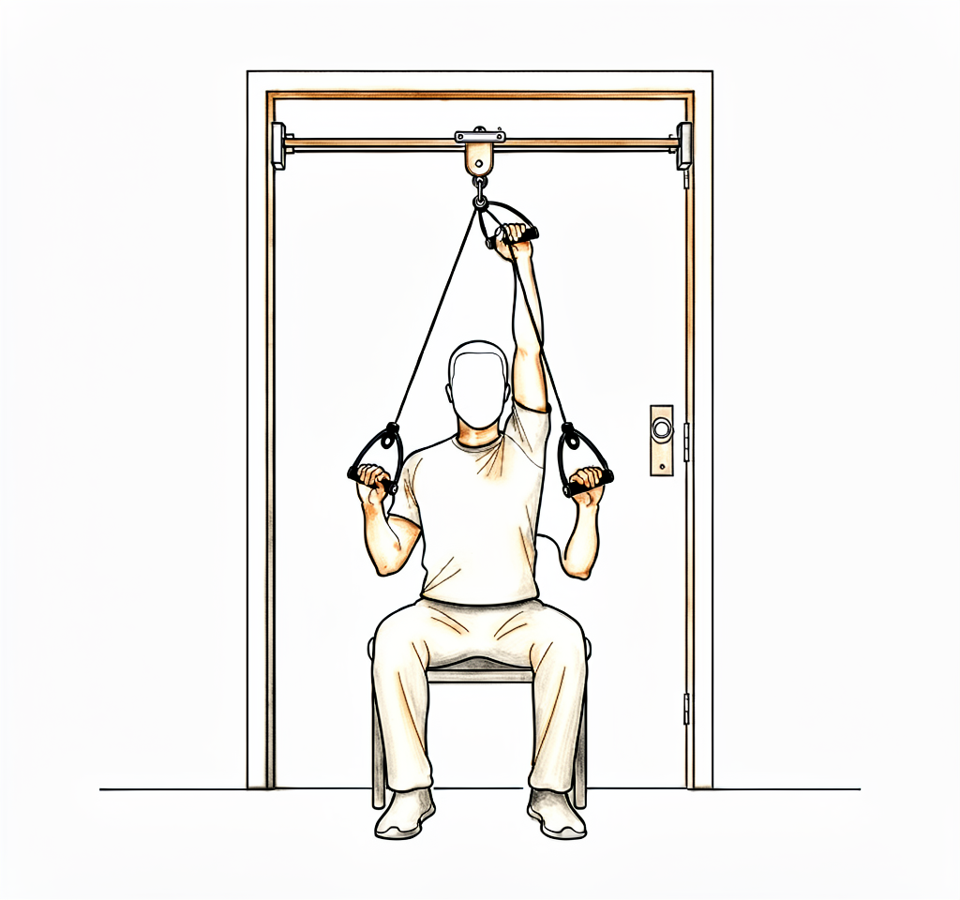
Pulley-assisted elevation
Sit beneath an over-door pulley holding a handle in each hand. Pull down with the good arm to raise the operated arm upwards and slightly forward of the body, letting it stay relaxed, then lower with control. Do not force or overstretch — work within comfortable range.
As guided by your physiotherapist
Kieran Hirpara 4.0
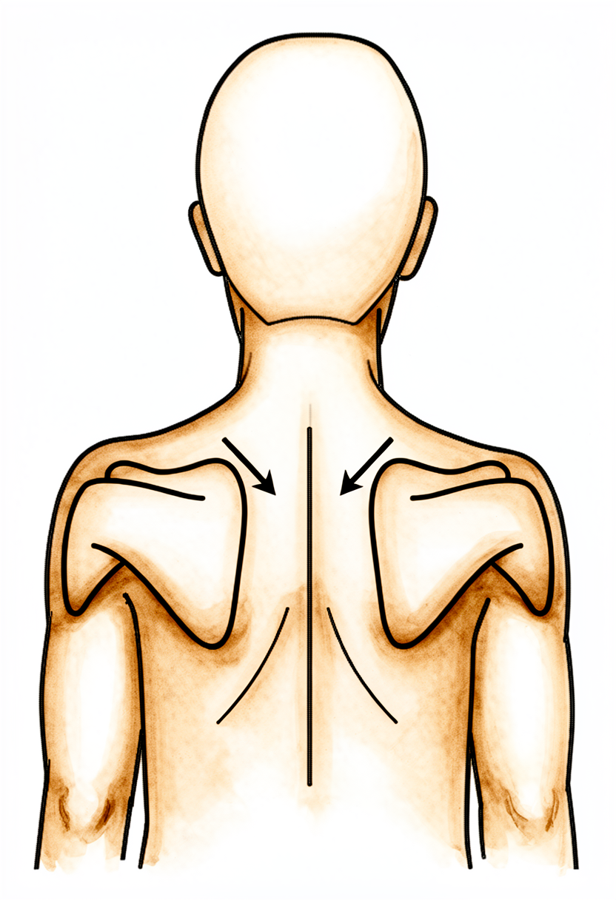
Scapular setting
Sitting tall, gently draw your shoulder blades back together and down, away from your ears. Hold for a few seconds, then relax. Pair this with attention to posture through the day.
As guided by your physiotherapist
Kieran Hirpara 4.0
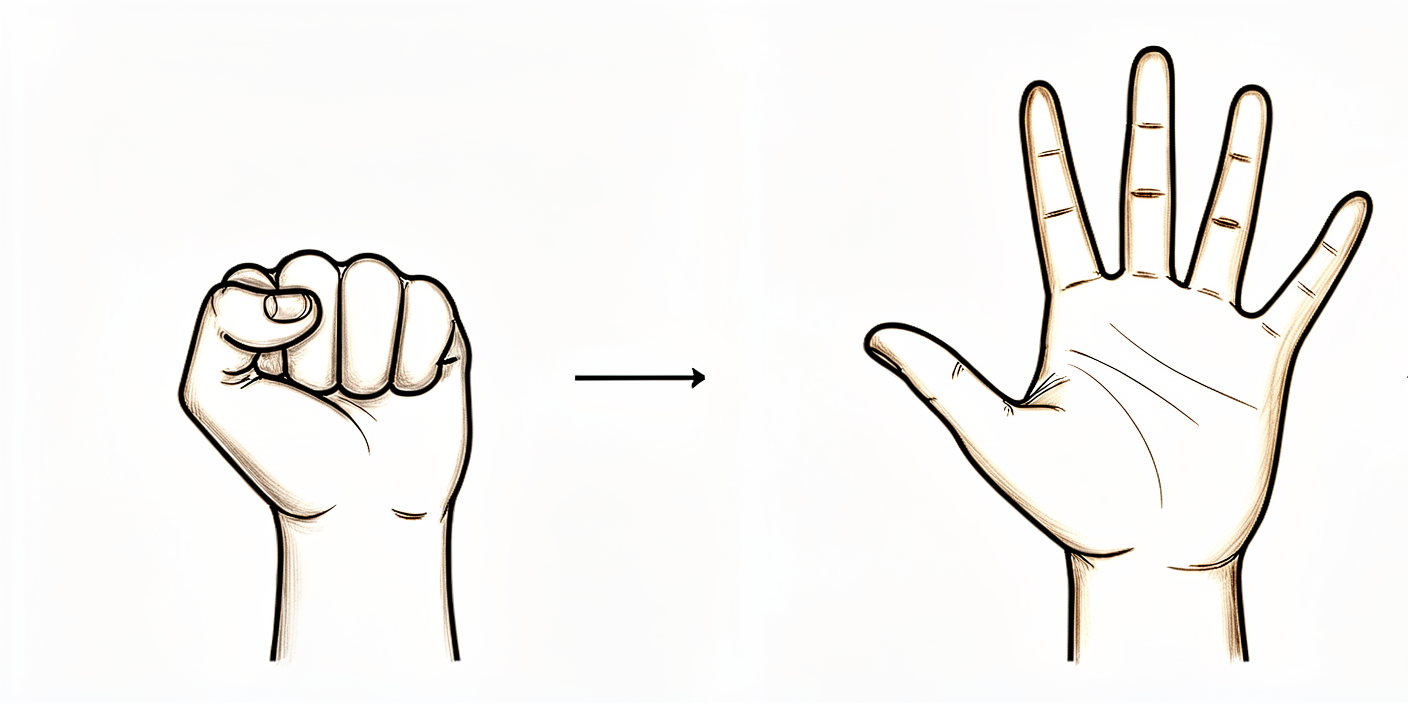
Open and close hand
Keep your hand and fingers moving by opening and closing them, or by squeezing a soft ball. Start this straight away to keep the hand and arm working while the shoulder settles.
10 times, three times a day
Kieran Hirpara 4.0
Wrist movement
Keep your wrist moving by bending it forwards, backwards and side to side. Do this from day one to keep the arm working while the shoulder settles.
10 times, three times a day
Kieran Hirpara 4.0
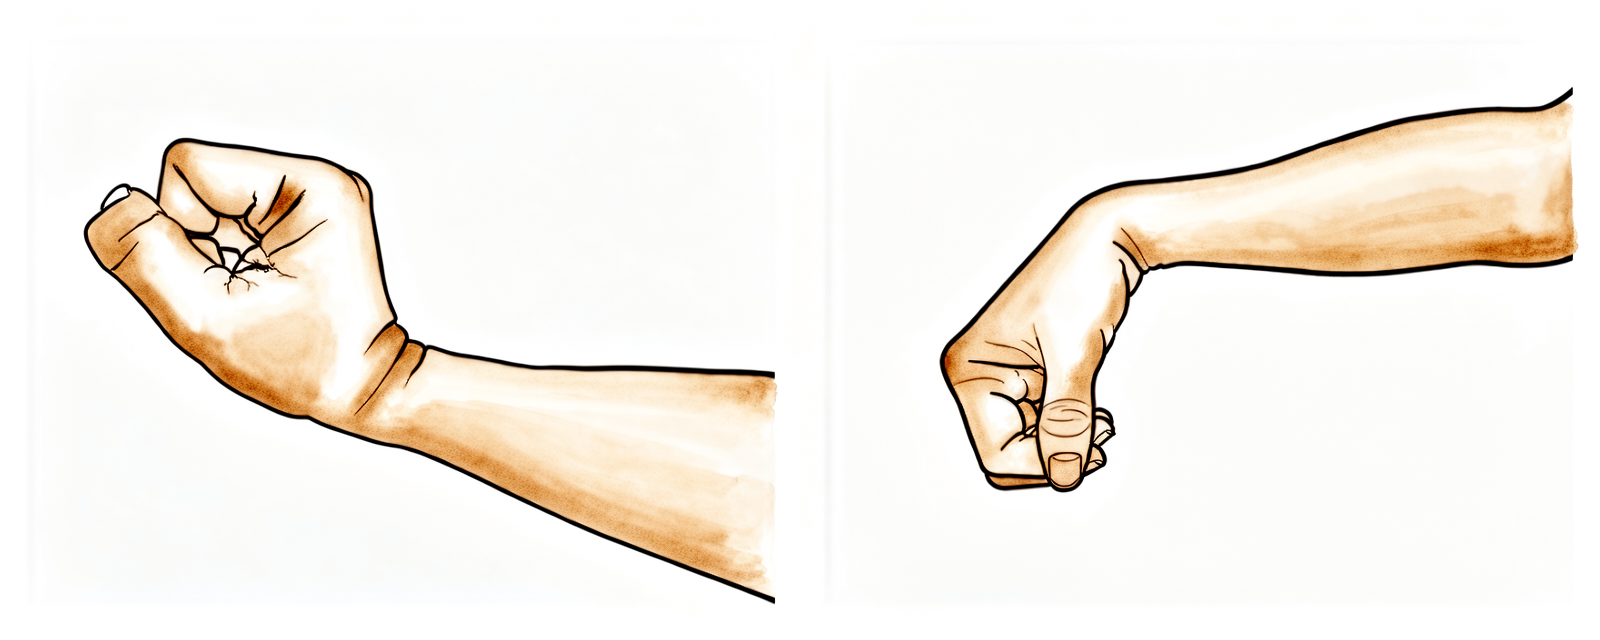
Elbow bends
With the upper arm resting by your side, bend the elbow as far as it comfortably goes, then straighten it fully. Only the elbow moves — keep the shoulder relaxed. Start this from day one.
10 times, three times a day
Kieran Hirpara 4.0
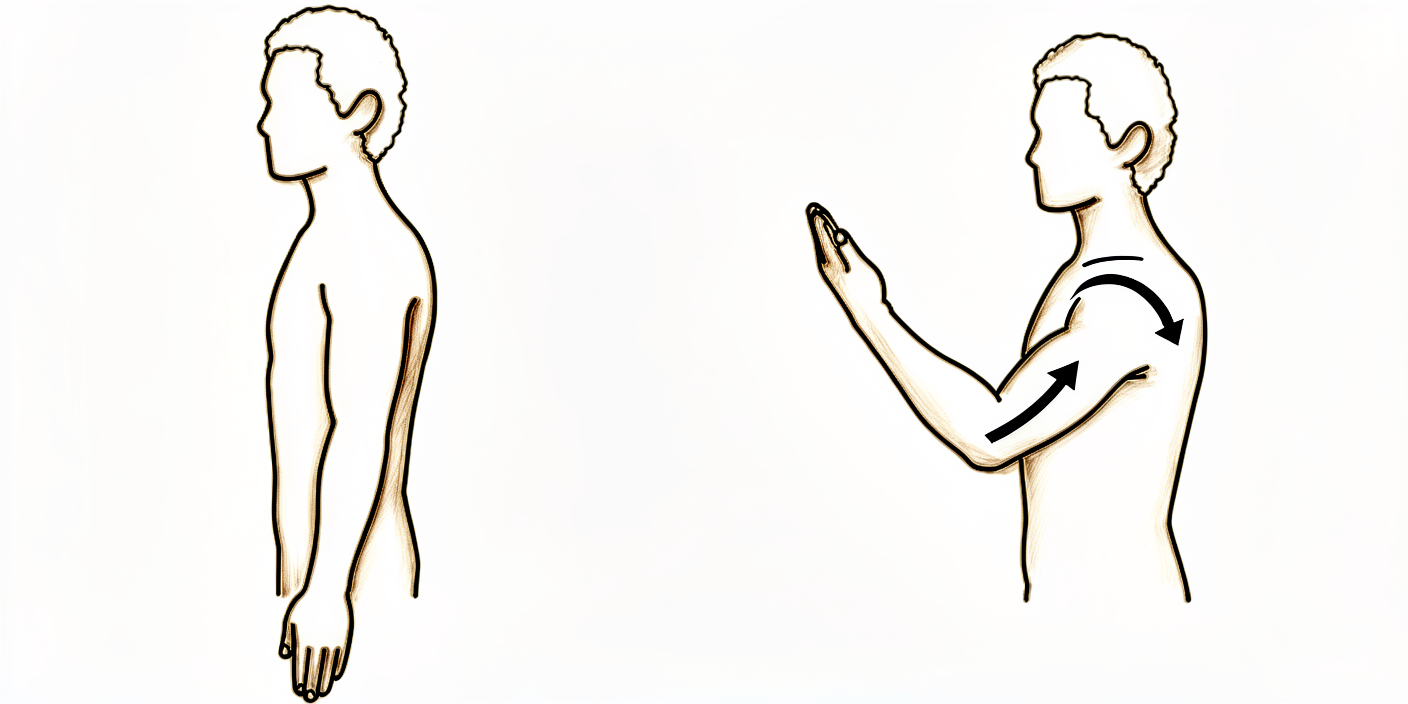
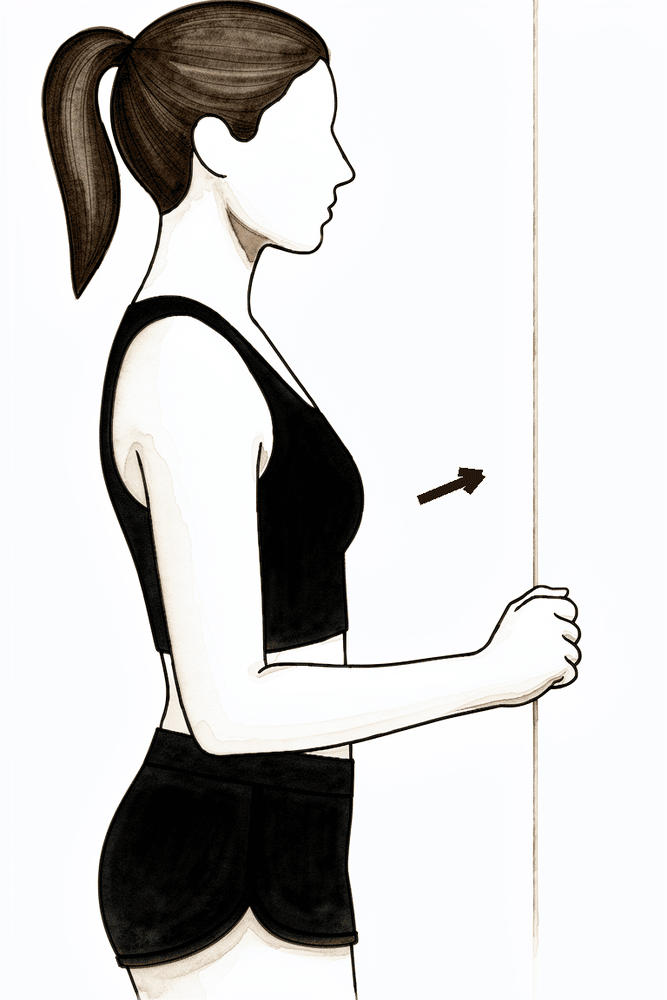
Isometric flexion
Stand facing a wall with your elbow bent and tucked at your side, the front of your fist resting against the wall. Gently press forwards into the wall without letting the arm move, hold a few seconds, then relax. This keeps the muscles working without movement while the shoulder settles.
Hold a few seconds, several times; as guided by your physiotherapist
Kieran Hirpara 4.0
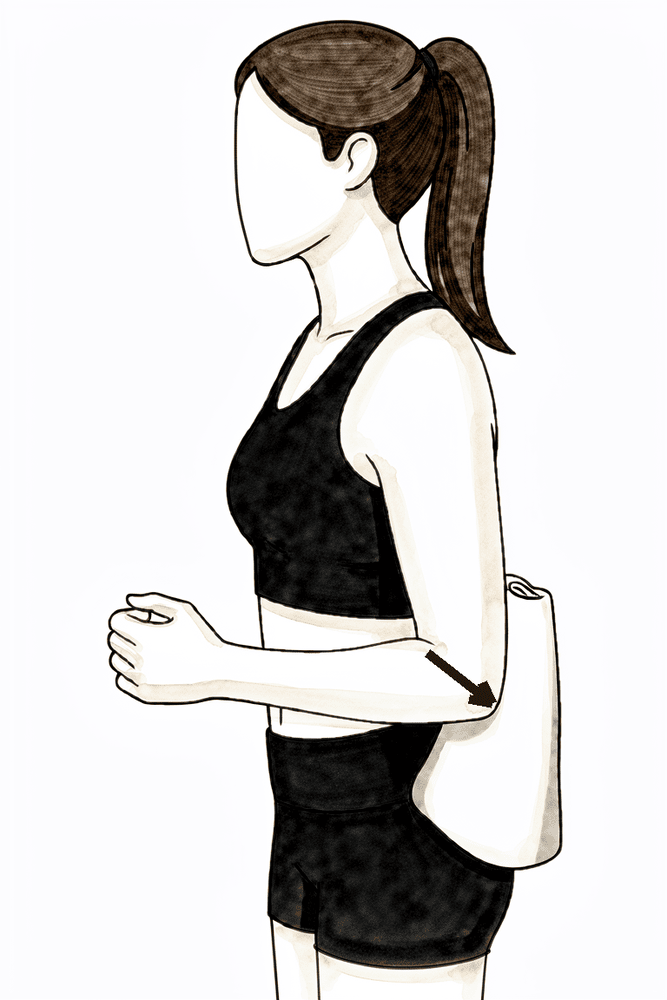
Isometric extension
Stand with your elbow at your side and the back of your upper arm against a wall. Gently press the arm backwards into the wall without letting it move, hold a few seconds, then relax. A no-movement way to keep the muscles active early on.
Hold a few seconds, several times; as guided by your physiotherapist
Kieran Hirpara 4.0
Isometric abduction
Stand side-on with the outside of your upper arm near a wall, elbow tucked at your side. Press the arm gently outwards into the wall without letting it move, hold a few seconds, then relax.
Hold a few seconds, several times; as guided by your physiotherapist
Kieran Hirpara 4.0
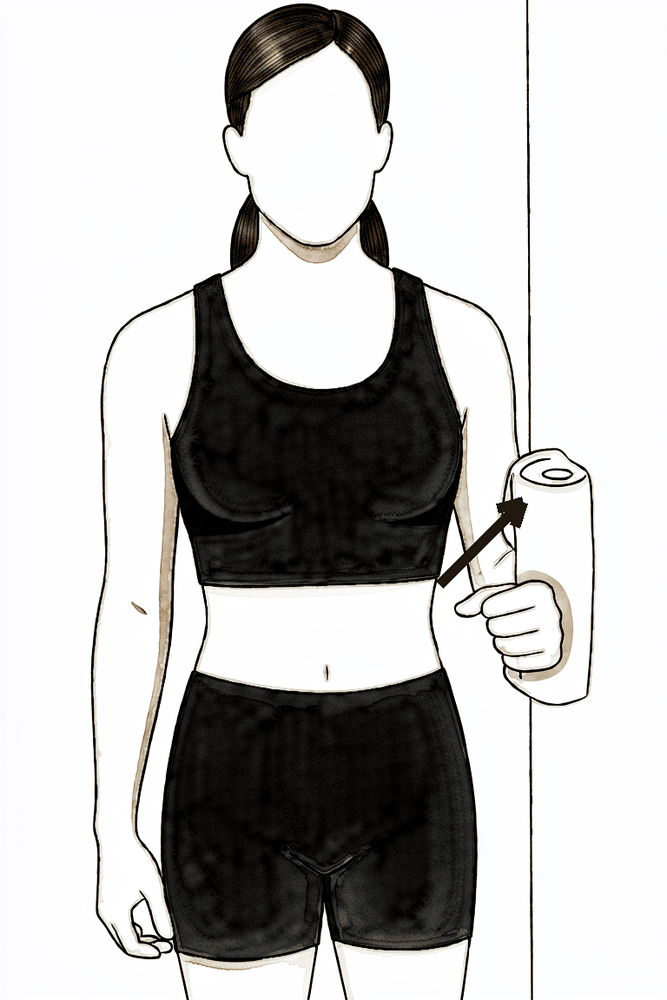
Isometric external rotation
Stand with your elbow tucked at your side and bent to a right angle, the back of your hand against a wall or doorframe. Gently press outwards into it without letting the arm move, hold a few seconds, then relax. This builds the rotator cuff with no movement.
Hold a few seconds, several times; as guided by your physiotherapist
Kieran Hirpara 4.0
Isometric internal rotation
Stand with your elbow tucked at your side and bent to a right angle, the palm of your hand against a wall or doorframe. Gently press inwards into it without letting the arm move, hold a few seconds, then relax. A gentle way to begin activating the cuff.
Hold a few seconds, several times; as guided by your physiotherapist
A nerve block is often used during the operation, so the arm can feel numb for some hours afterwards; start your painkillers before it wears off. In the first two weeks the aims are simple: settle the pain and swelling, and get the shoulder moving within comfort. Use ice regularly for pain relief. Start moving your hand, wrist and elbow straight away, add pendulum exercises and assisted arm movements as comfort allows, and use the arm for normal light daily activities such as washing, dressing and eating. Take your painkillers before your exercises and before physiotherapy appointments. This is keyhole surgery, usually through two or three small puncture wounds closed with adhesive strips — keep them dry until healed, which usually takes 10–14 days. People in desk-based jobs commonly return to work within the first two weeks; driving can resume once you are out of the sling and can control the car comfortably — including performing an emergency stop — which is typically somewhere between one and three weeks after surgery.
For your physiotherapist:
Goals
- Settle pain and swelling
- Re-establish non-painful range of motion (active-assisted progressing to active)
- Prevent muscular atrophy and begin re-establishing dynamic stability
- Independence with light activities of daily living
Management
- Cryotherapy regularly for pain and swelling; analgesia before exercises and sessions
- Elbow, wrist, hand, neck and thoracic range-of-motion exercises from day 1
- Pendulums; pulley or wand active-assisted elevation in the scapular plane; external and internal rotation starting at 30–45° of abduction
- Progress to active range of motion as comfort allows
- Scapular setting in sitting; postural awareness
- Submaximal isometrics (flexion, extension, abduction, external and internal rotation) and gentle rhythmic stabilisation
- From week 2: heat before exercise if helpful; progress rotation work towards 90° of abduction; external and internal rotation with elastic tubing, arm at the side
Precautions
- Work within comfortable ranges — do not force or overstretch; pain is the guide
- Sling for comfort only; wean within the first days and discard by two weeks
- No driving while wearing a sling
- No heavy lifting, no lifting overhead, no jerking movements
- Avoid pushing up from a chair or bed through the operated arm for the first six weeks — the acromion has been thinned and forceful loading should be avoided while it remodels
Criteria to progress
- Pain well controlled with simple analgesia
- Swelling settling and wounds healed or healing without concern
- Comfortable active-assisted movement, with active movement returning below shoulder height
Phase II — Restoring your range and starting strength (Week 2–6)
Kieran Hirpara 4.0
Side-lying external rotation
Lie on your non-operated side with the top elbow bent to a right angle and tucked against your body. Keeping the elbow at your side, rotate the forearm up towards the ceiling, then lower with control. Begin without weight.
Add light weight (0.5–1 kg) after a week of pain-free, well-controlled repetitions
Kieran Hirpara 4.0
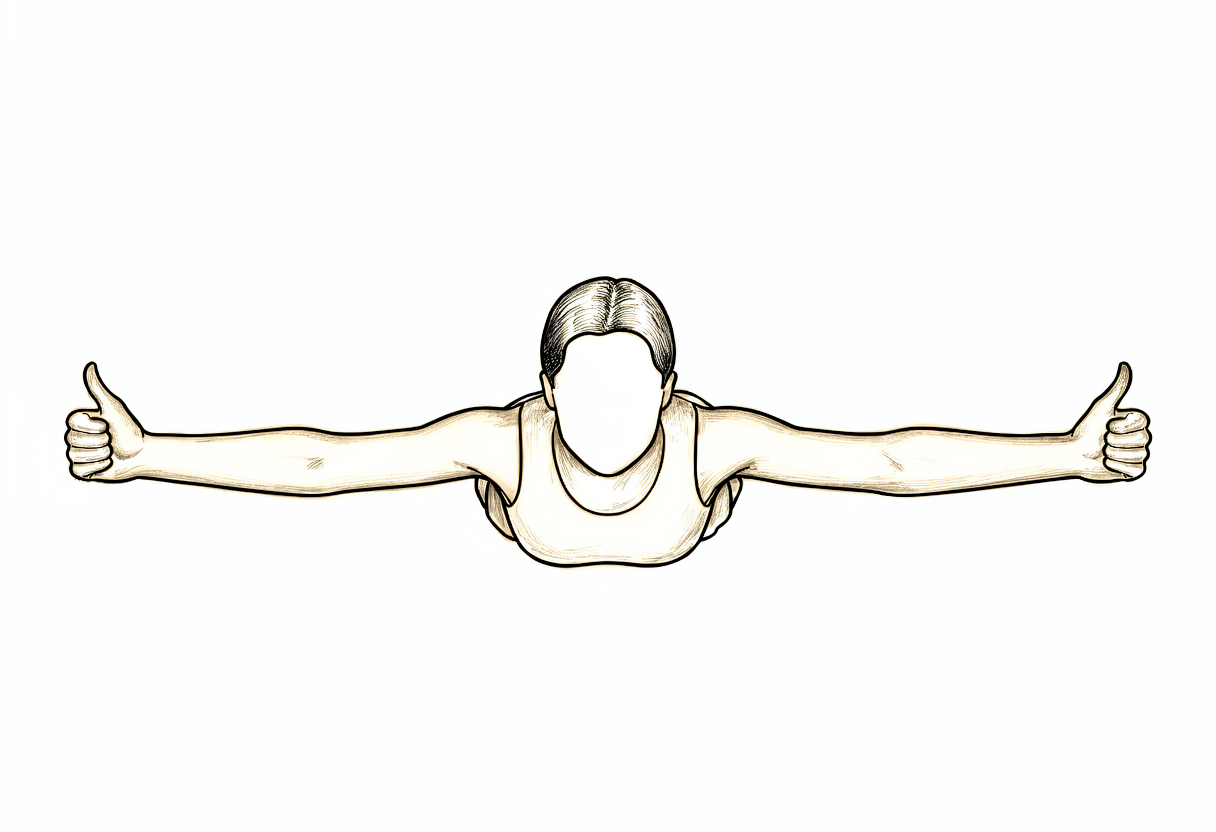
Prone horizontal abduction (prone 'T')
Lie face down with the arm hanging towards the floor. Squeeze the shoulder blade in towards the spine and lift the arm out to the side to shoulder level, thumb leading, then lower slowly. Begin without weight; light weight can be added once repetitions are pain-free and well controlled.
As guided by your physiotherapist
Kieran Hirpara 4.0
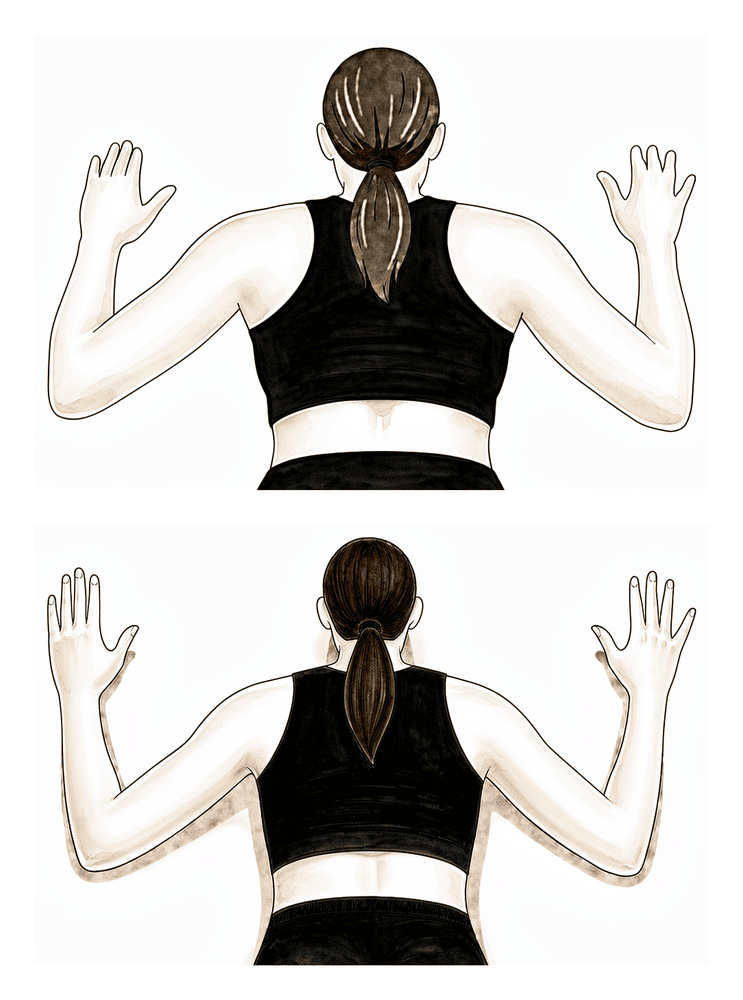
Lower trapezius retraining
Lie face down on a bed or table with the arm relaxed over the edge. Draw the shoulder blade down and in towards the spine, letting the arm lift as the blade moves — the effort comes from below the shoulder blade, not from hitching the shoulder. Lower slowly and repeat.
As guided by your physiotherapist
Kieran Hirpara 4.0
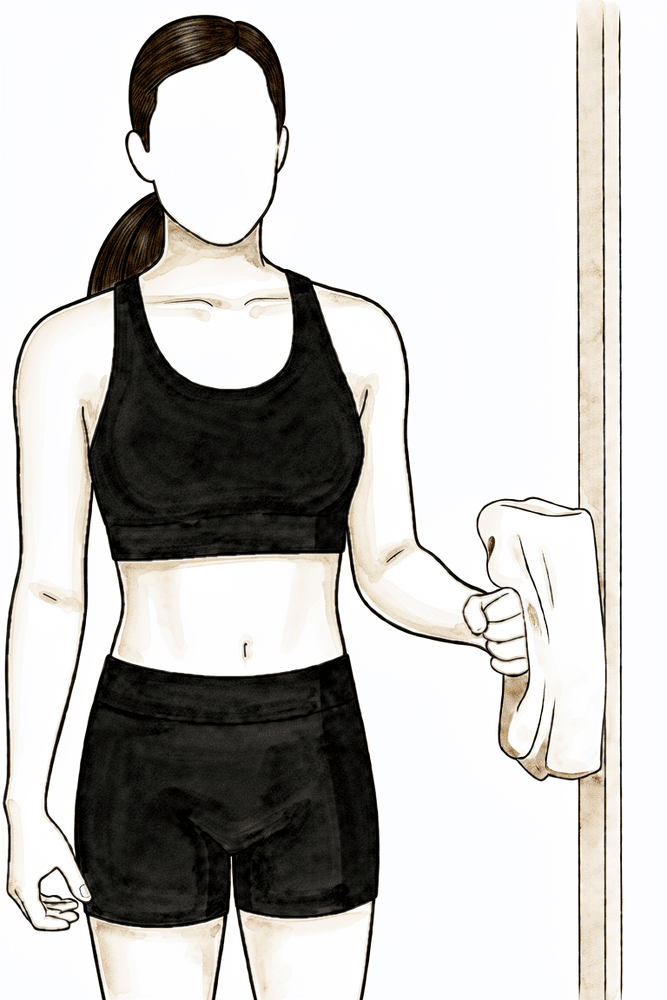
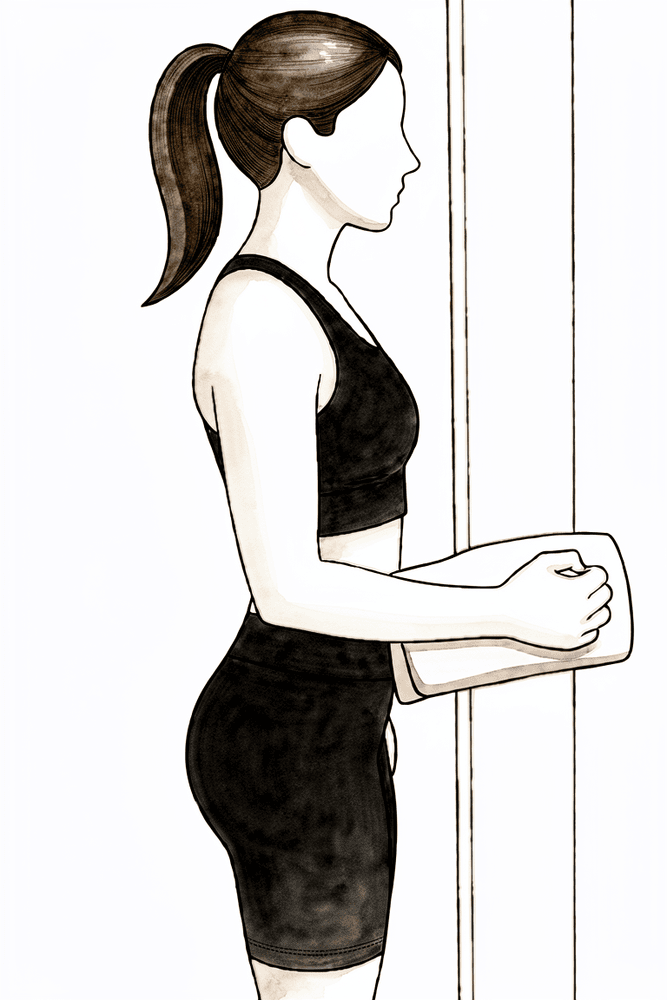
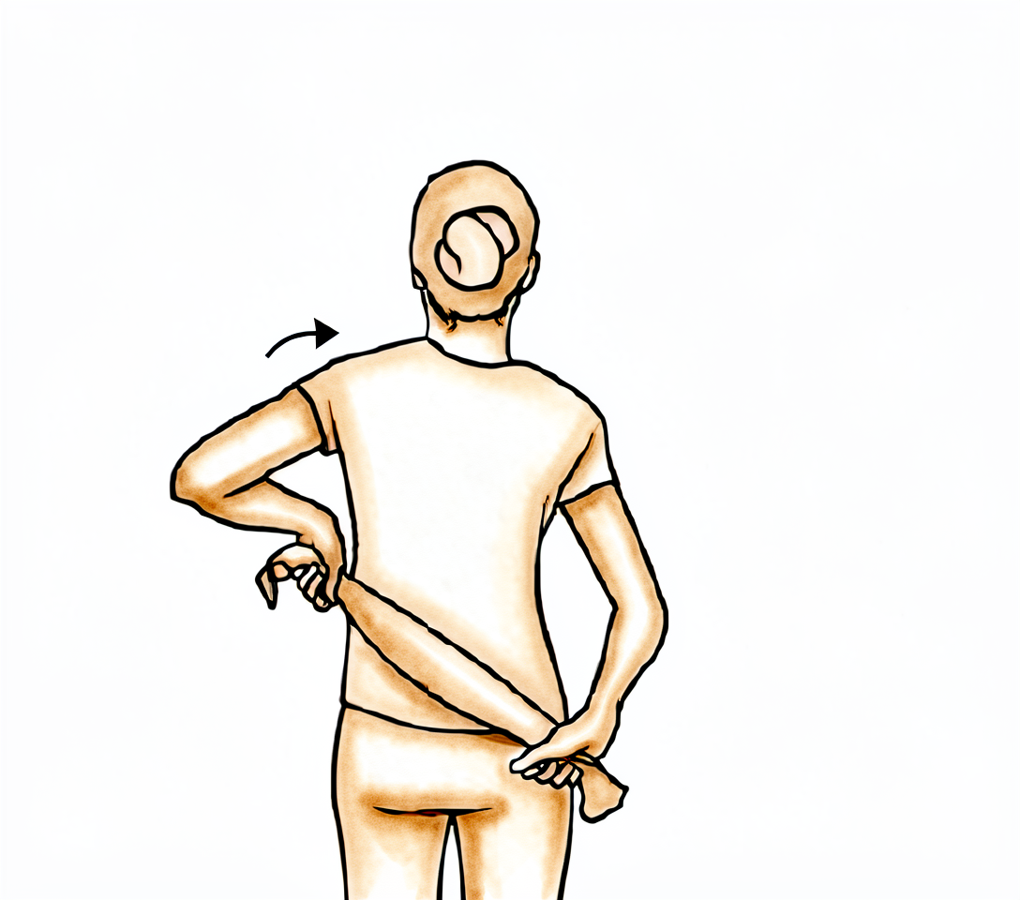
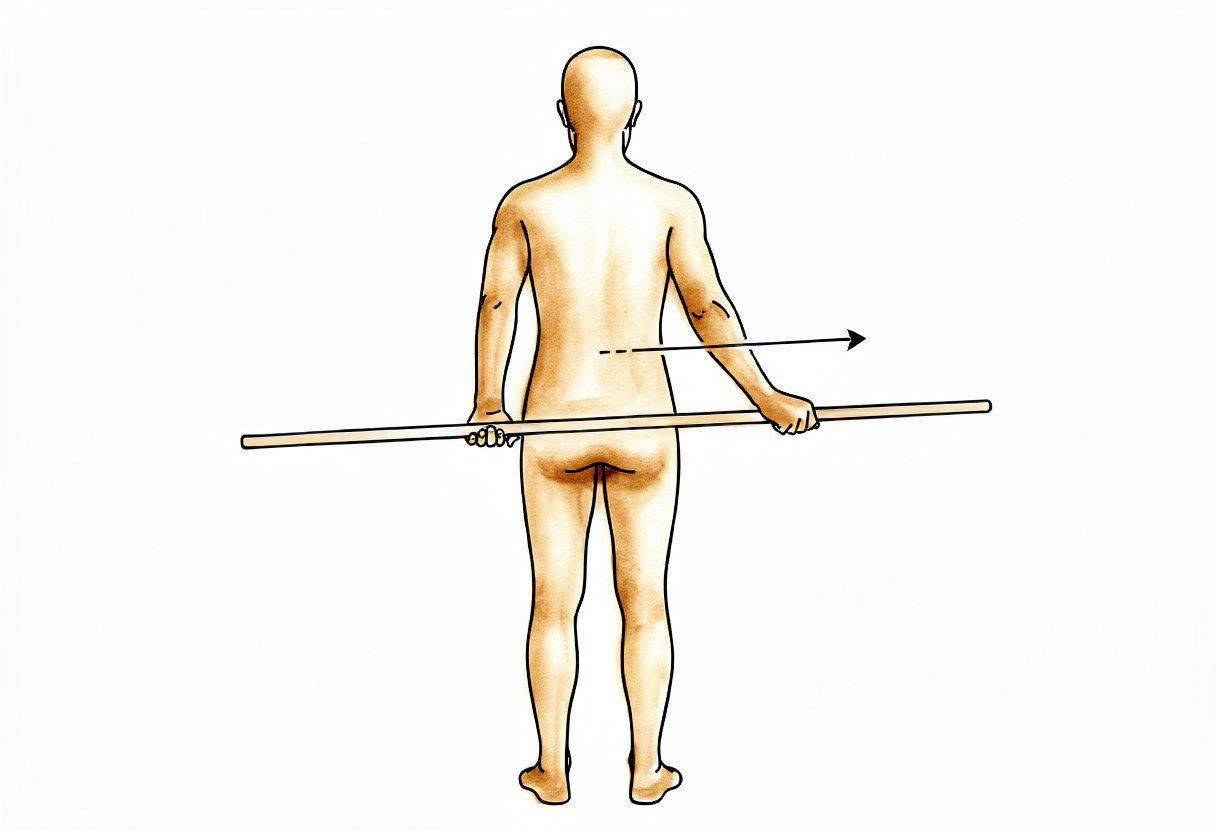
Behind-the-back stretch
Hold a towel behind your back, with the operated hand low and the good hand above. Use the good arm to draw the operated hand gently up the back until a stretch is felt, hold briefly, then lower. A gentle stretch at the back of the shoulder is the aim — do not force it.
As guided by your physiotherapist
Kieran Hirpara 4.0
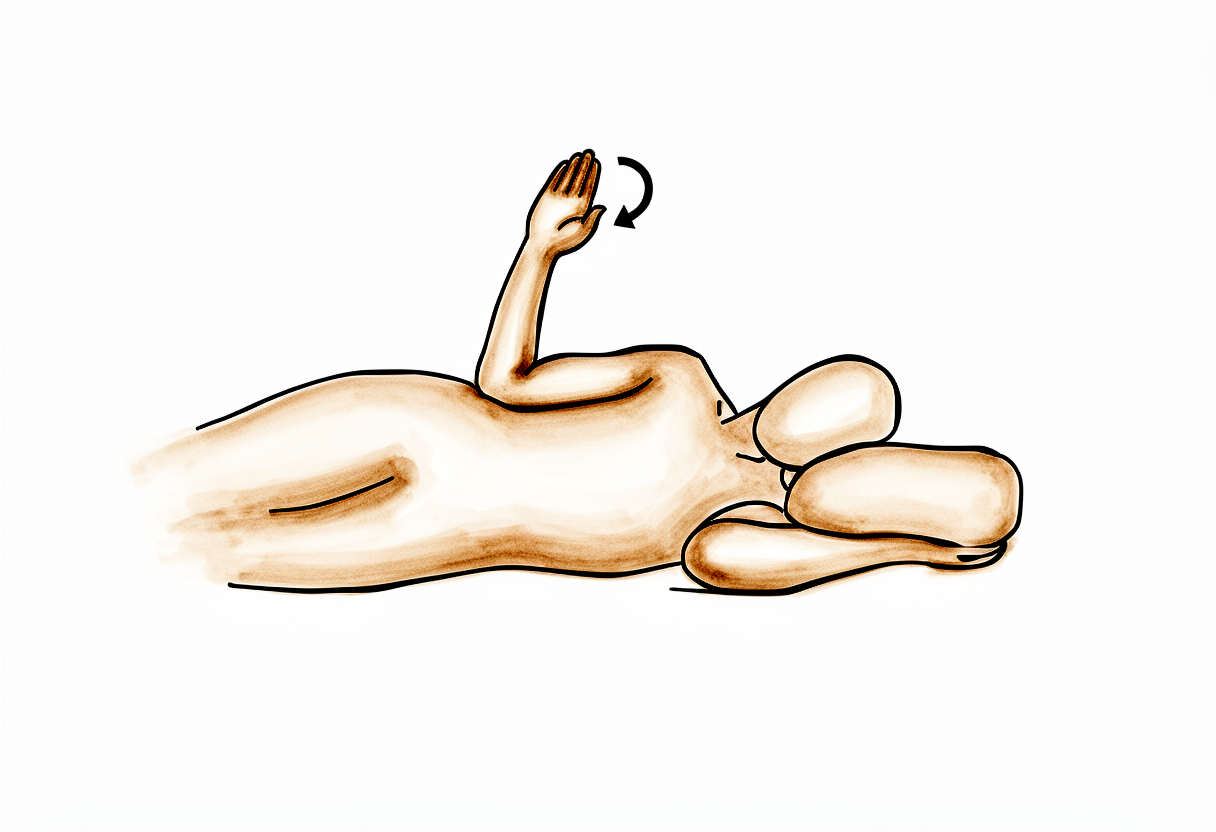
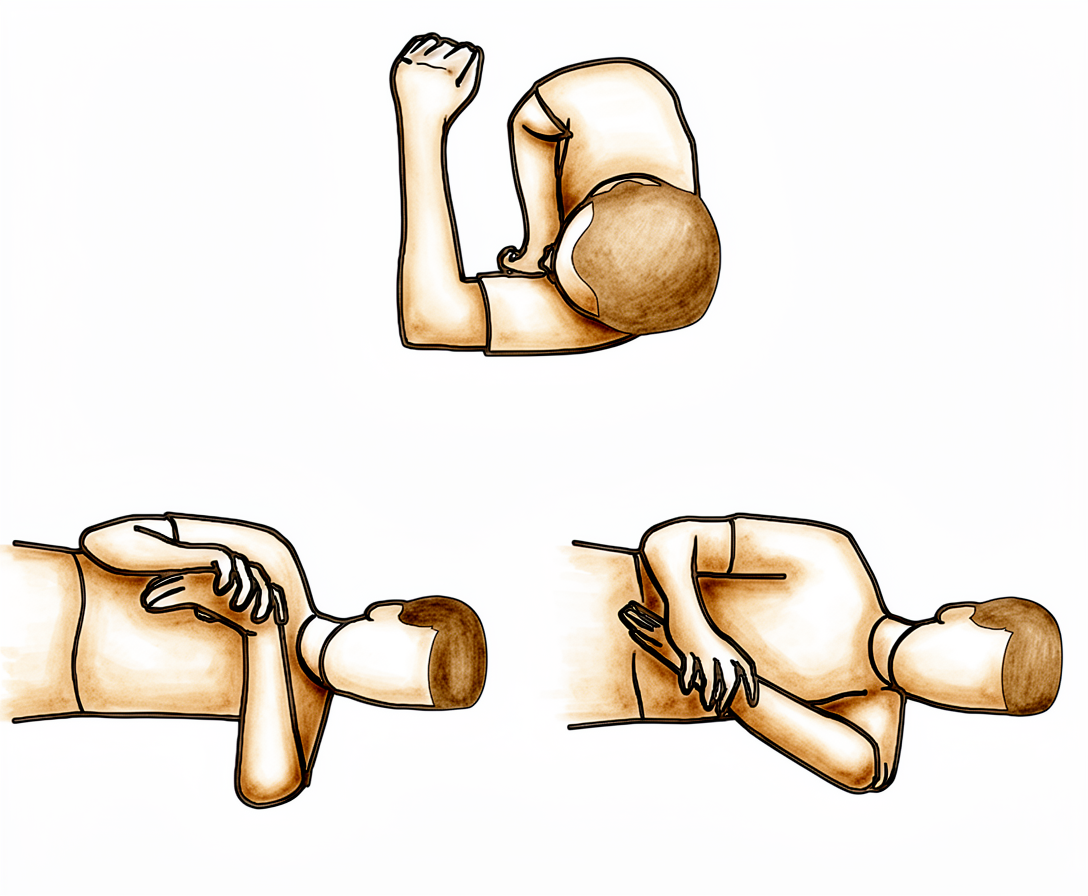
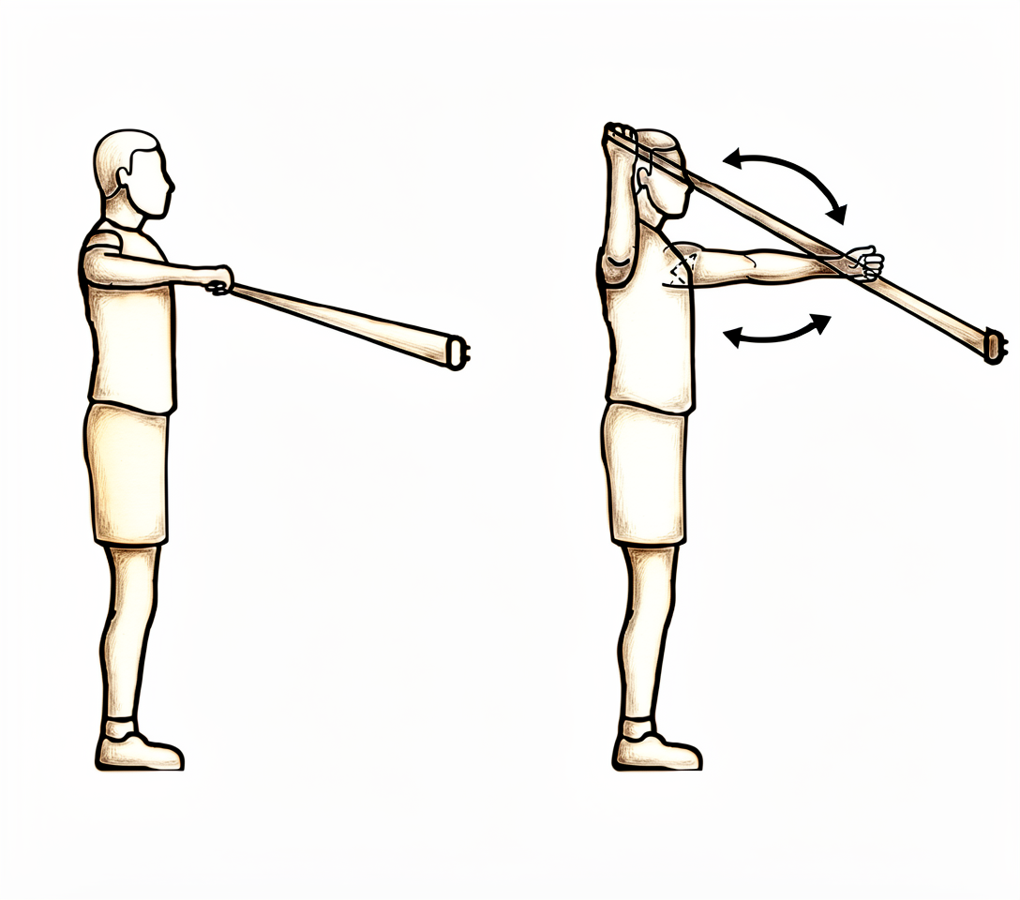
Sleeper stretch (posterior capsule)
Lie on your operated side with the shoulder and elbow both bent to a right angle. With your other hand, gently press the forearm down towards the bed until you feel a stretch at the back of the shoulder, then ease off. This is the posterior capsular stretch your physiotherapist will use to free up rotation — keep it gentle, no sharp pain.
Hold 20–30 seconds, a few times; as guided by your physiotherapist
Kieran Hirpara 4.0
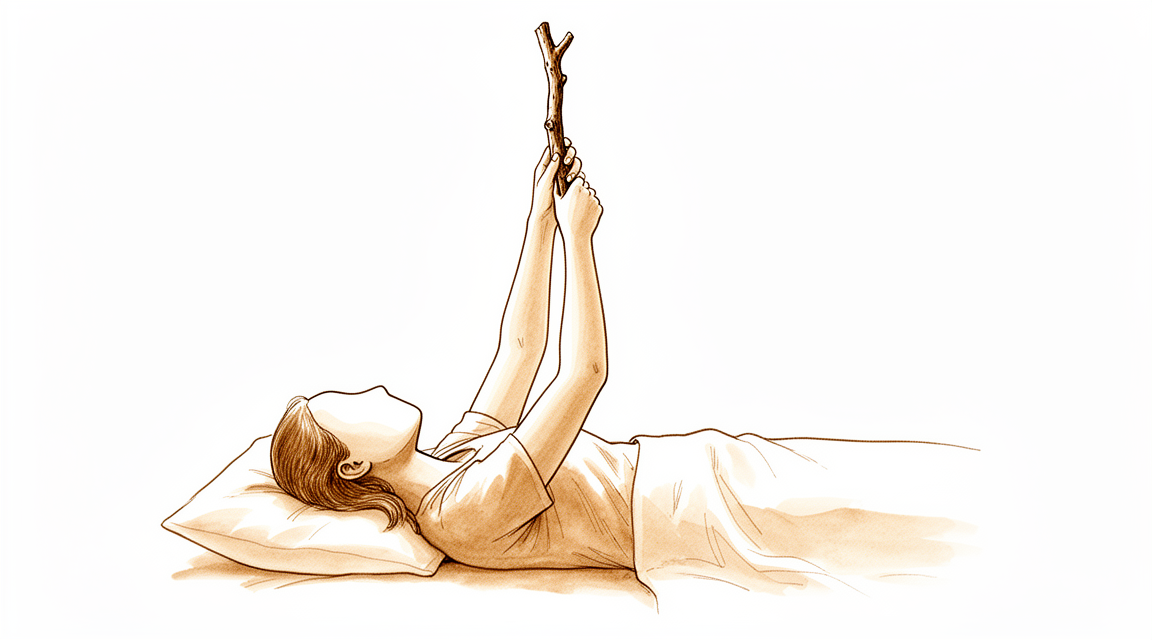
Assisted abduction with a stick
Lie on your back and hold a stick in both hands. Use the good arm to guide the operated arm out to the side towards shoulder level, then lower with control. This helps restore abduction towards 90 degrees as your range returns.
As guided by your physiotherapist

Kieran Hirpara 4.0
Scaption (full-can elevation)
Stand with the arm by your side, thumb pointing up. Raise the arm out at a forward angle — midway between straight ahead and out to the side — no higher than is comfortable, then lower slowly. Begin without weight; keep the shoulder blade settled and avoid shrugging.
Begin unweighted; add light weight once repetitions are pain-free and well controlled
Kieran Hirpara 4.0
Prone row
Lie face down with the arms hanging towards the floor. Squeeze the shoulder blades together and draw the elbows back and down so the arms make a 'W', then lower slowly. Begin without weight; light weight can be added once repetitions are pain-free and well controlled.
Begin unweighted; add light weight (around 0.5–1 kg) after a week of pain-free repetitions
This phase is about getting the rest of your movement back and beginning to rebuild strength. Your exercises progress from assisted movements to moving the arm actively in all directions, with most published protocols expecting full or near-full range by about six to eight weeks. Strengthening starts gently — first without weight, then with elastic bands and very light weights for the rotator cuff and shoulder blade muscles. Many people find heat before exercise and ice afterwards helpful. Moderate work (light lifting below shoulder height) typically becomes possible during this phase, guided by your physiotherapist.
For your physiotherapist:
Goals
- Full, or near-full, active range of motion in all planes by around week 6–8
- Regain and improve rotator cuff and scapular strength
- Normalise scapulohumeral rhythm and neuromuscular control
- Continue to settle pain
Management
- Progress range of motion in all planes, including behind-the-back internal rotation with gentle posterior capsular stretching
- Glenohumeral joint mobilisation (inferior, posterior and anterior glides) as indicated
- Isotonic program beginning unweighted — shoulder elevation, prone rowing, prone horizontal abduction, prone extension to neutral, sidelying external rotation, abduction to 90° — adding light weight (around 0.5–1 kg) after a week of pain-free, well-controlled repetitions
- External and internal rotation with elastic tubing; progress towards rotation work in more elevated positions as comfort allows
- Scapular neuromuscular control and lower trapezius work; trunk, core and lower-limb conditioning
- Upper-limb endurance work; heat before and ice after sessions as preferred
Precautions
- Avoid loaded work in a painful impingement range — exercises may be hard, but should not reproduce the pre-operative pain
- Do not target supraspinatus or mid-deltoid loading until it is pain-free, and avoid it if it provokes resting or night pain
- Continue to avoid pushing up through the operated arm and heavy or overhead lifting until six weeks
Criteria to progress
- Full, non-painful range of motion with minimal tenderness
- Rotator cuff strength around 4/5 on manual testing, with good scapular control
Phase III — Strengthening (Week 6–12)
Kieran Hirpara 4.0
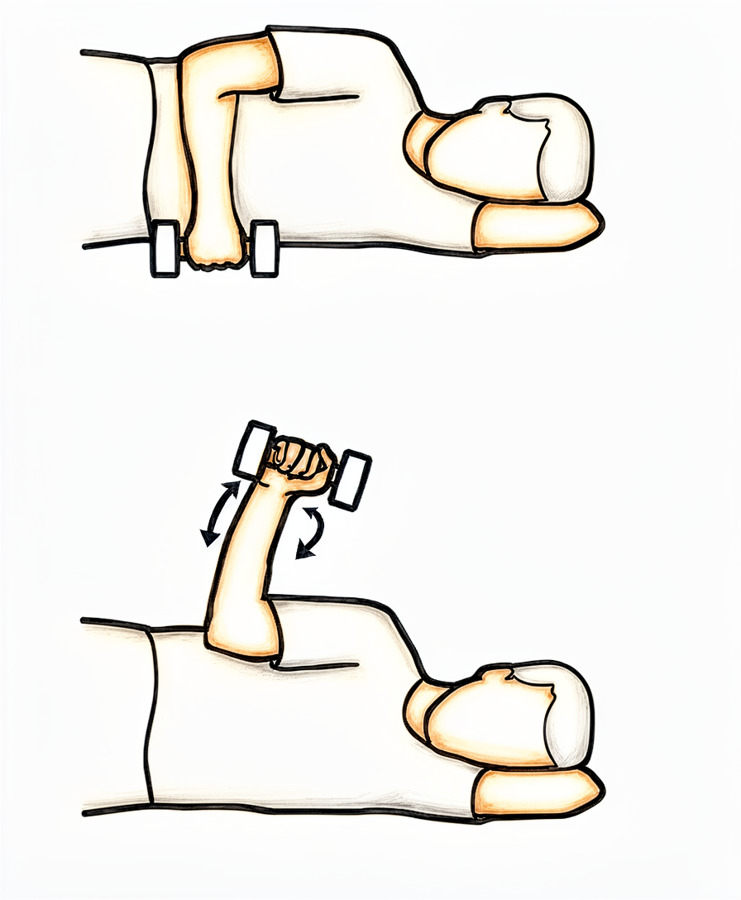
Side-lying external rotation with weight
Lie on your non-operated side with the top elbow bent to a right angle and tucked against your body. Holding a light weight, rotate the forearm up towards the ceiling, then lower slowly. Exercises should feel like work but stay essentially pain-free — ease off anything that provokes resting or night pain.
2–3 sets of 8–12 repetitions
Kieran Hirpara 4.0
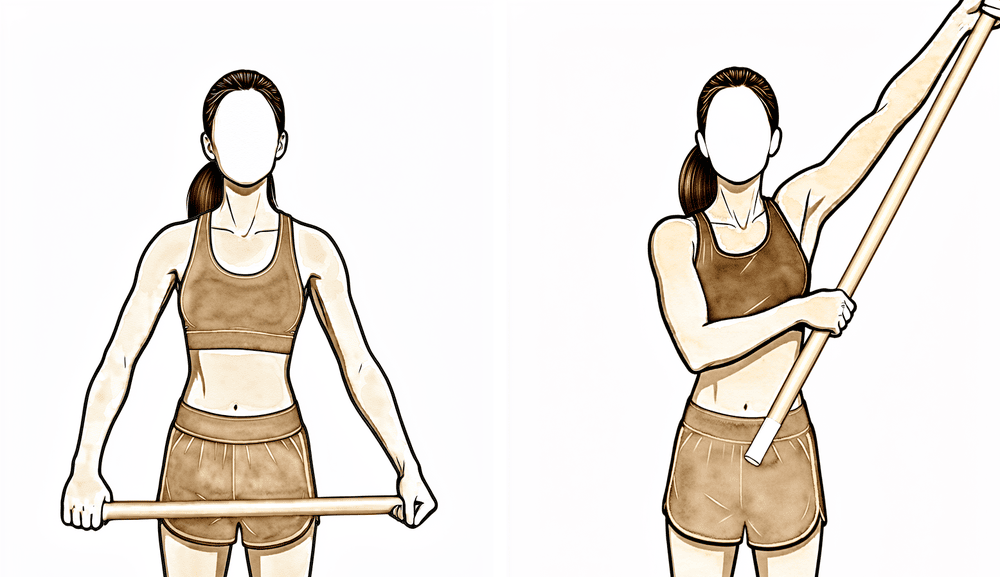
Band external rotation
Stand with your elbow tucked into your side and bent to a right angle, holding an elastic band anchored at waist height. Keeping the elbow at your side, rotate the forearm outwards against the band, then return slowly. This progresses the rotator cuff on from the earlier isometric and unweighted work.
2–3 sets of 8–12 repetitions
Kieran Hirpara 4.0
Band internal rotation
With your elbow tucked into your side, hold a band anchored to one side and rotate the forearm inwards across your body against the band, then return slowly. Keep the resistance progressing as your strength builds.
2–3 sets of 8–12 repetitions
Kieran Hirpara 4.0
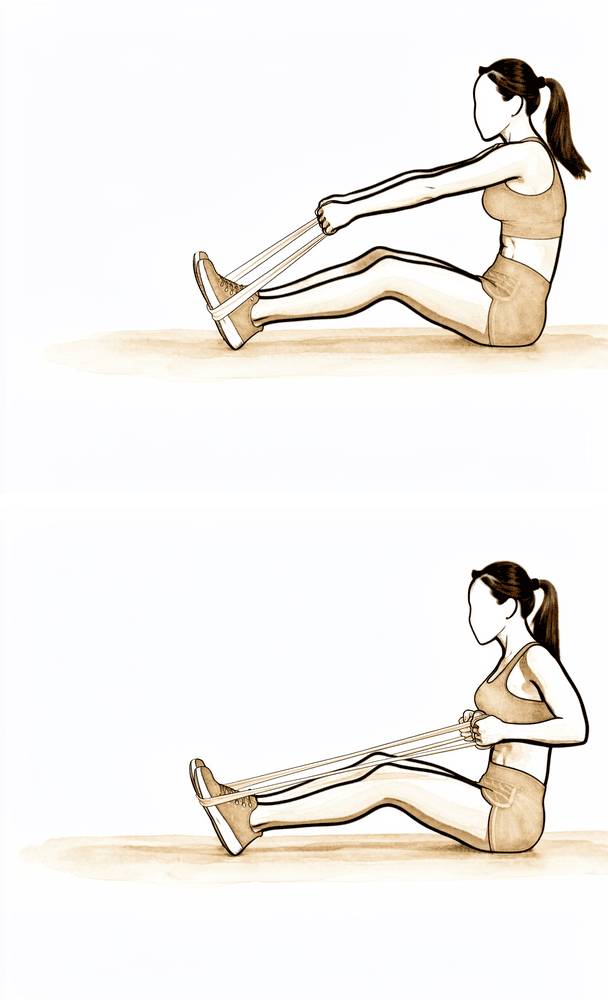
Standing row
Hold a band anchored in front of you at waist height. Keeping the arm fairly straight, pull it back and down towards your hip, squeezing the shoulder blade down and back, then return slowly. This builds the shoulder-blade muscles that support the cuff.
2–3 sets of 8–12 repetitions
Kieran Hirpara 4.0
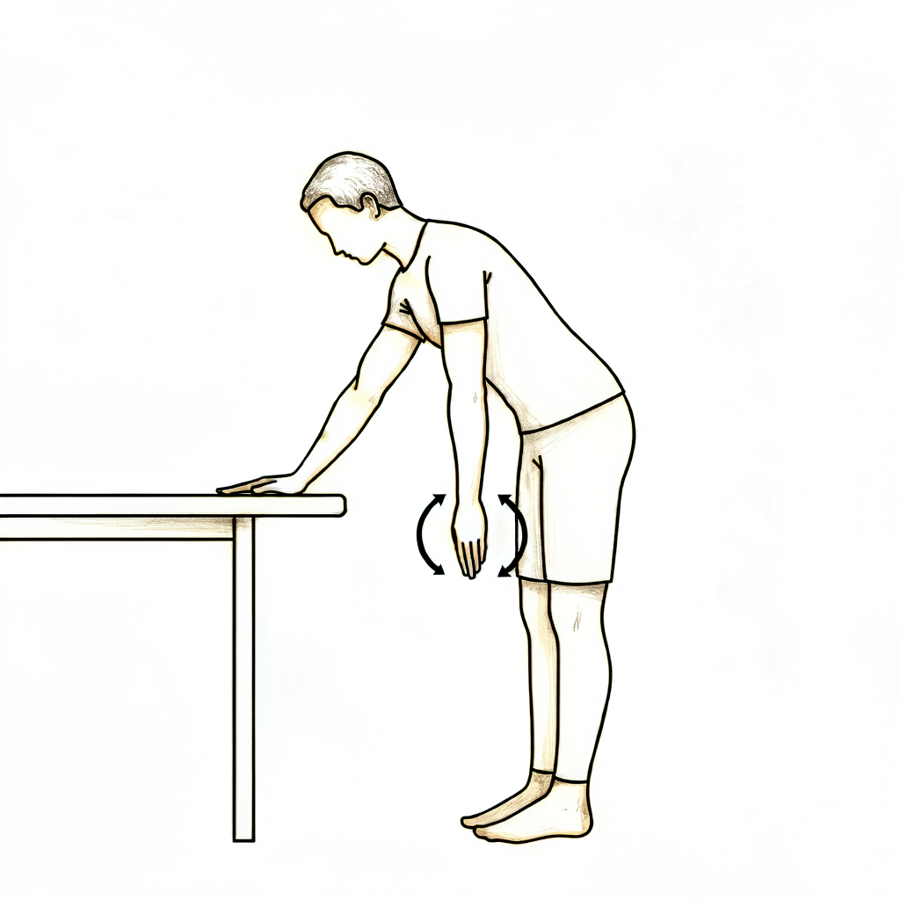
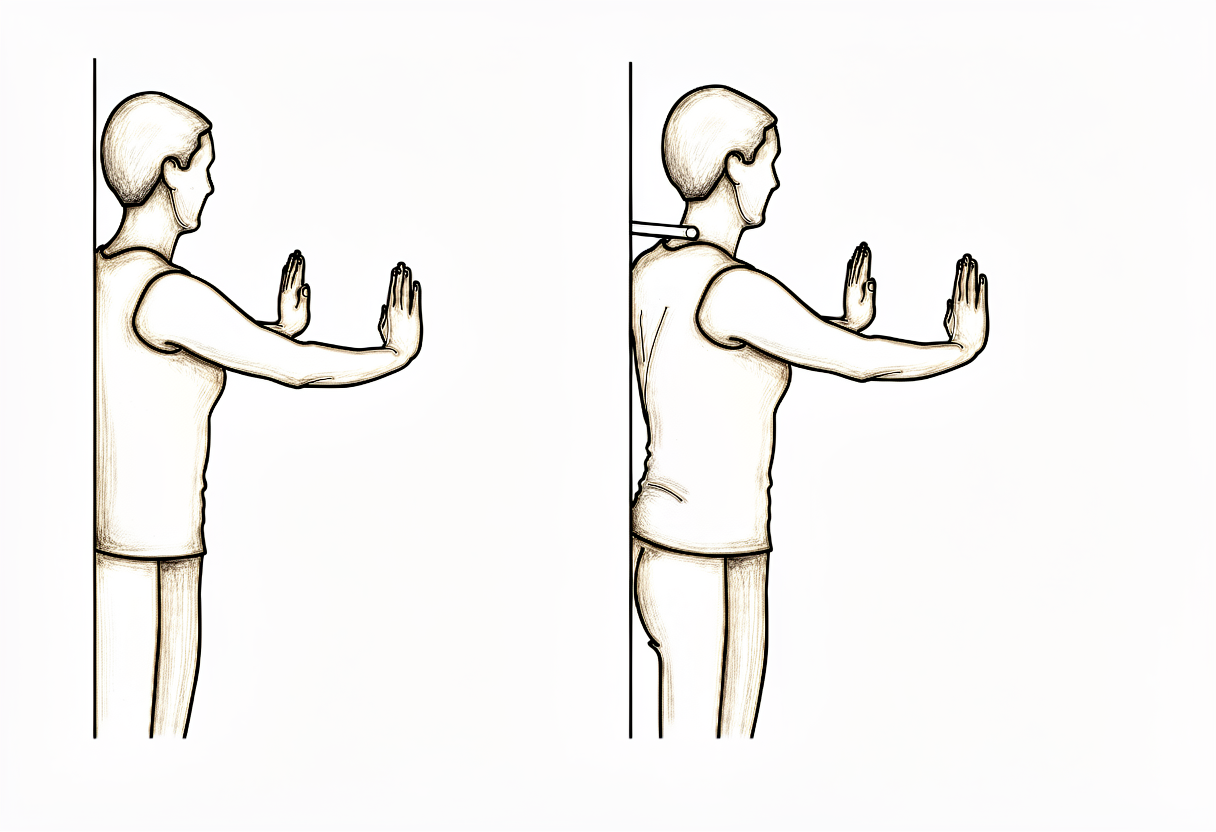
Wall push-up plus
Stand facing a wall with your hands flat on it at shoulder height. Bend the elbows to lean towards the wall, then push back, adding a gentle push through the hands at the end to spread the shoulder blades. A closed-chain exercise to build control — introduce it as guided by your physiotherapist.
As guided by your physiotherapist
With your movement back, attention turns to strength, endurance and control. Resistance work progresses from bands to weights, and exercise becomes more dynamic — including, for people returning to sport, the start of controlled plyometric work and a graduated return to training. Swimming typically resumes from about six weeks (breaststroke first, freestyle when comfortable), and medium work — light lifting below shoulder height — is usually manageable from six weeks. An interval return-to-sport program commonly starts at weeks 10–12 when strength criteria are met.
For your physiotherapist:
Goals
- Improve strength, power and endurance of the shoulder complex
- Optimise neuromuscular control, proprioception and movement patterning (no shoulder hitching)
- Prepare for a graduated return to sport and heavier work
Management
- Progress the isotonic program: isometrics → elastic bands → weights; rotator cuff, deltoid and scapular stabilisers at 2–3 sets of 8–12 repetitions
- Introduce eccentrically resisted work, closed-chain exercises and rhythmic stabilisation; proprioceptive work including weight-bearing and four-point kneeling
- Plyometric activities — two-handed drills (chest pass, side-to-side throws) progressing to one-handed drills (wall dribbles, throwing drills) towards the end of the phase
- Begin an interval sports program at weeks 10–12 if criteria are met
- Continue core and conditioning work; cryotherapy as needed
Precautions
- Exercises should be difficult but essentially pain-free — back off any work that provokes resting or night pain
- Heavy lifting and sustained overhead loading wait until around three months
Criteria to progress
- Full, pain-free active range of motion (approximately equal to the other side)
- Strength approaching the other side (published criteria range from 70% to enter dynamic training, towards 90% for return to sport)
- No pain or tenderness with progressive loading
Phase IV — Return to full activity (Week 12 onwards)
The final phase is a graduated return to heavy work, overhead tasks and sport. Heavy or repetitive lifting and sustained work above shoulder height typically resume from about three months. Return to competitive sport — particularly overhead sport — is based on meeting criteria rather than the calendar: full pain-free movement, strength close to the other side and confidence with sport-specific drills. The shoulder commonly keeps improving well beyond this phase — published guidance describes improvement continuing for up to a year.
For your physiotherapist:
Goals
- Graduated return to heavy work, overhead activity and sport
- Maintain range of motion, strength and control in the long term
Management
- Continue the strengthening program, advancing gym- and sport-specific work as tolerated
- Continue the interval sports program with a staged return to throwing and other overhead sport
- Self-managed capsular stretches and maintenance exercises as needed
Precautions
- Progression remains symptom-guided — if pain recurs, reduce load, restore comfortable movement and rebuild
Criteria to progress
- Full, non-painful range of motion
- Strength and functional testing satisfactory (around 90% of the other side in published return-to-sport criteria)
- Satisfactory clinical review
After your protocol
The phases above are adapted from published rehabilitation protocols and patient guidance for arthroscopic subacromial decompression — OrthoIndy, Sports Surgery New York, Gundersen Health System Sports Medicine, Twin Cities Orthopedics, Oxford University Hospitals NHS Foundation Trust and Royal Berkshire NHS Foundation Trust. The week ranges are typical rather than fixed, and your ongoing rehabilitation is guided individually by your physiotherapist, working with the practice, based on how your shoulder recovers. This page works alongside the practice's general recovery advice — see managing post-operative pain and wound care. For the operation itself and the condition it treats, see subacromial decompression. The evidence behind this protocol — including how it fits the trial evidence on subacromial surgery — is summarised in the evidence section, available as a PDF from the top of this page.
Evidence & references
Arthroscopic Subacromial Decompression (Acromioplasty) — Post-operative Rehabilitation
Topic scope: Post-operative rehabilitation after isolated arthroscopic subacromial decompression (ASD / acromioplasty ± bursectomy). When a decompression is performed together with a rotator cuff repair, the repaired tendon sets the (slower) pace and the rotator-cuff-repair protocol takes priority — this page is for the isolated decompression.
Defining principle of this rehab: a subacromial decompression shaves bone and clears bursa — it repairs nothing that needs protecting. So (like a debridement, and unlike a cuff repair or stabilisation) the rehab is an early-movement pathway: a short sling for comfort only, weaned within days, motion and normal light use from day one, and a rapid return of range and function. The aim is to settle the post-operative flare and keep the shoulder moving while it quiets down — rehabilitation, not rest, does the work.
A. THE PROCEDURE & ITS EVIDENCE CONTEXT (important)
Arthroscopic subacromial decompression removes the subacromial bursa and shaves the under-surface of the acromion to "make room" for the rotator cuff, on the impingement model of subacromial pain.
The efficacy of the bony decompression itself is one of the most debated questions in shoulder surgery, and the rehabilitation context cannot be stated honestly without it:
- CSAW (Beard et al, Lancet 2018; n=313, 3-arm) — a placebo-controlled surgical RCT. Decompression gave no clinically important benefit over arthroscopy-only (placebo) surgery, and both surgical arms were only marginally better than no treatment — a difference below the pre-specified minimal clinically important threshold.
- FIMPACT (Paavola et al, BMJ 2018) — a second placebo-controlled RCT: no benefit of ASD over diagnostic arthroscopy, and neither was superior to a structured exercise programme at 2 years.
- Cochrane review (Karjalainen et al, 2019) — high-certainty evidence that subacromial decompression provides little or no clinically important benefit over placebo for pain, function, or quality of life.
The practical consequence is that structured exercise/physiotherapy is first-line for subacromial pain, and ASD is now a selective operation — reserved for patients who have failed an adequate non-operative programme or who have a specific mechanical lesion. This does not make a well-selected decompression valueless, but it explains why the post-operative emphasis is on early movement and rehabilitation, which is what reliably drives recovery.
B. POST-OPERATIVE PHASED TIMELINE (isolated decompression)
A nerve block is commonly used (numb arm for some hours — start analgesia before it wears off). Keyhole wounds; desk-based work commonly resumes within ~2 weeks.
| Phase | Window | Sling | ROM / use | Strengthening | Notes |
|---|---|---|---|---|---|
| I — Early movement | Week 0–2 | Comfort only, off within days (gone by ≤ 2 wk) | Hand/elbow immediately; pendulums + assisted motion as comfort allows; normal light daily use from day 1 | — | Settle pain/swelling; ice; analgesia before exercise. No driving while in sling (typically back ~1–3 wk once out of sling + safe emergency stop) |
| II — Restore range / start strength | Week 2–6 | Off | Progress to full active ROM all planes | Begin gentle cuff + scapular strengthening | Range comfortable below shoulder height; most daily activity resumed |
| III — Strengthening | Week 6–12 | Off | Full | Progressive cuff/scapular loading, band → light weight | Heavier and overhead loading built gradually |
| IV — Return to full activity | Week 12 + | Off | Full | Advanced/sport-specific | Full unrestricted activity typically ~3 months |
There is no construct-protection branch in the isolated decompression — the only branch is if a rotator cuff repair was also done, which converts recovery to the protected cuff-repair pathway.
C. KEY CONTROVERSIES / EVIDENCE QUALITY
- Does the bony decompression add anything? Two placebo-controlled RCTs (CSAW, FIMPACT) and a Cochrane review say it adds little or nothing over placebo or exercise for subacromial pain. Strong (RCT/SR). → exercise-first, selective surgery.
- Decompression added to a cuff repair — multiple RCTs show no added benefit of routine acromioplasty at the time of arthroscopic cuff repair. Moderate–strong.
- The post-operative rehab protocol itself — consensus/expert (institutional protocols), no defining rehab RCT; phase timings are typical, not trial-derived. Weak/consensus.
(Patient-facing note: the efficacy debate belongs in this clinician evidence section, not the patient protocol page — surfaced here for the surgeon's awareness.)
D. EVIDENCE STRENGTH FLAGS (summary)
- STRONG (RCT / SR): ASD provides little/no benefit over placebo surgery or exercise (CSAW Lancet 2018; FIMPACT BMJ 2018; Cochrane Karjalainen 2019); no benefit of added acromioplasty at cuff repair.
- MODERATE: early-motion rehabilitation after isolated decompression (institutional cohorts / consensus protocols, consistent ~3-month recovery).
- WEAK / CONSENSUS: the specific phase/timeline structure of the post-op protocol.
CITATIONS
RAG corpus (180,000+ Orthopaedic articles)
- Is acromioplasty justifiable? Orthop Traumatol Surg Res. 2019. DOI: 10.1016/j.otsr.2019.10.002
- Indications for Arthroscopic Subacromial Decompression: a Level V evidence clinical guideline. Arthroscopy. 2019. DOI: 10.1016/j.arthro.2019.06.012
- The role of subacromial decompression in patients undergoing arthroscopic repair of full-thickness rotator cuff tears. Arthroscopy. 2012. DOI: 10.1016/j.arthro.2011.11.022
- Arthroscopic repair of full-thickness rotator cuff tears with and without acromioplasty (RCT). Am J Sports Med. 2014. DOI: 10.1177/0363546514529091
- A comparative study of arthroscopic débridement versus repair for Ellman grade I partial cuff tears. J Shoulder Elbow Surg. 2020. DOI: 10.1016/j.jse.2020.03.006
Landmark trials / reviews (URLs)
- Beard DJ, et al. Arthroscopic subacromial decompression for subacromial shoulder pain (CSAW): placebo-controlled 3-group RCT. Lancet. 2018. https://www.thelancet.com/journals/lancet/article/PIIS0140-6736(17)32457-1/fulltext
- Paavola M, et al. (FIMPACT) Subacromial decompression versus diagnostic arthroscopy for shoulder impingement: randomised, placebo surgery controlled trial. BMJ. 2018;362:k2860. https://www.bmj.com/content/362/bmj.k2860
- Karjalainen TV, et al. Subacromial decompression surgery for rotator cuff disease. Cochrane Database Syst Rev. 2019. https://www.cochranelibrary.com/cdsr/doi/10.1002/14651858.CD005619.pub3/full
Published rehab protocols (basis for the phase structure)
- Kendall C. Arthroscopic Subacromial Decompression Physical Therapy Protocol. OrthoIndy. https://www.orthoindy.com/wp-content/uploads/Arthroscopic-Subacromial-Decompression.pdf
- Strauss EJ. Rehabilitation Protocol: Arthroscopic Subacromial Decompression / Distal Clavicle Excision. Sports Surgery New York. https://www.sportssurgerynewyork.com/pdf/arthroscopic-subacromial-decompression-distal-clavicle-excision-rehab-protocol.pdf
- Gundersen Health System Sports Medicine. Subacromial Decompression / Acromioplasty Rehabilitation Program. https://www.gundersenhealth.org/sites/default/files/2022-06/Sports-Medicine-Protocol-Subacromial-Decompression-Acromioplasty.pdf
- Meisterling RC. Arthroscopic Subacromial Decompression Rehabilitation. Twin Cities Orthopedics. https://tcomn.com/wp-content/uploads/2016/06/Arthroscopic-Subacromial-Decompression-Rehabilitation.pdf
- Scott-Dempster C, Harper J. Outpatient Post-operative Physiotherapy Guidelines: Sub-Acromial Decompression. Oxford University Hospitals NHS FT. https://www.ouh.nhs.uk/media/zidppie2/sub-acromial-decompression.pdf
- Royal Berkshire NHS FT. Arthroscopic subacromial decompression and/or ACJ excision: discharge advice. https://www.royalberkshire.nhs.uk/media/smegtn3c/arthroscopic-subacromial-decompression-and-or-acromioclavicular-joint-excision-discharge-advice_jul24.pdf